Login through Google SSO #
Create App ->
1)Login on admin.google.com
2)Go to the web and mobile apps.
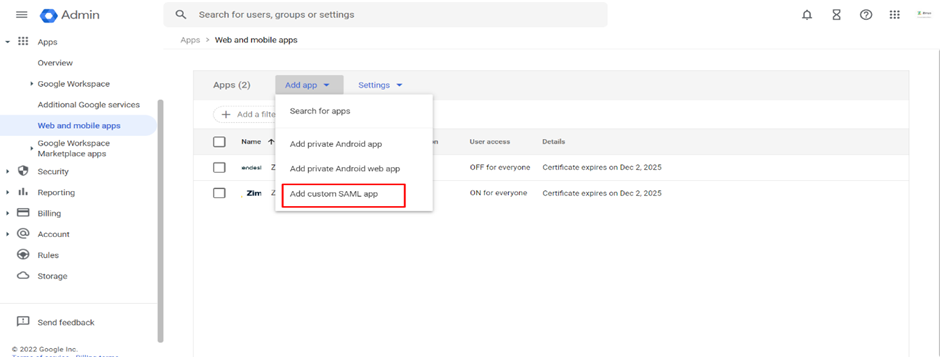
3) Fill in details (App Name, App Description), Upload App Icon, and then click on ‘Continue.’

4) On the next page, Copy SSO URL and Paste it into the ‘SSO URL’ input on the Zimyo SSO configuration Setting page.

5) Similarly, Copy Entity Id and Paste it into the ‘Identity Provider Issuer’ input on the Zimyo SSO configuration Setting page.
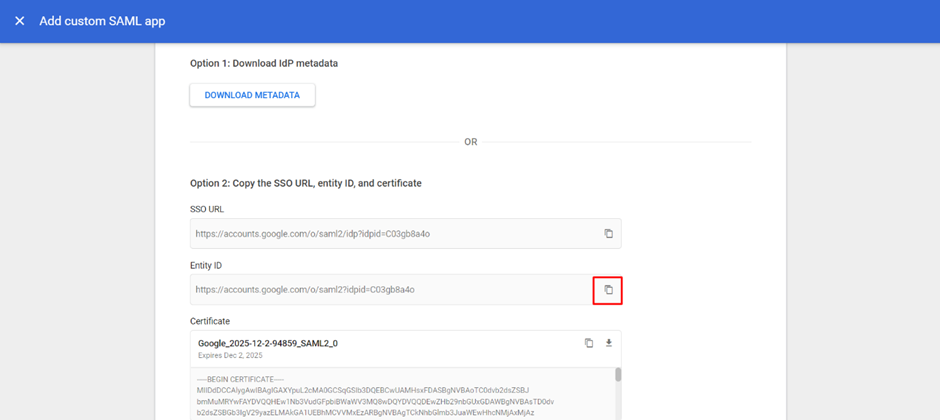
6) Download the Certificate and upload it on the Zimyo SSO configuration Setting page and then click on continue.

7) On the next page, Copy ‘ACS URL’ From the Zimyo SSO configuration Setting page and paste it into ACS URL.
8) Copy ‘Service Provider Issuer’ From the Zimyo SSO configuration Setting page and paste it into Entity Id

9) Select Name Id format as Email.
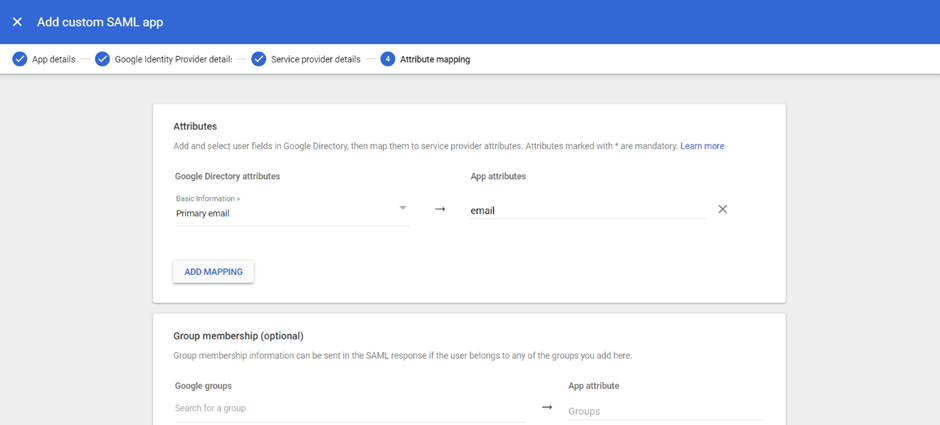
10) Select Name Id as Basic Information > Primary Email and then continue.
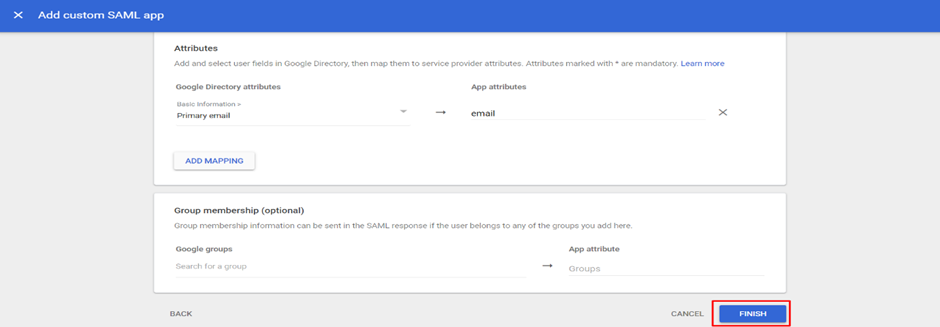
11) On the next page, ADD MAPPING Primary Email -> Email.
12) Then Click on Finish to complete App Creation.
Add user to App ->
- Go to the web and mobile apps.
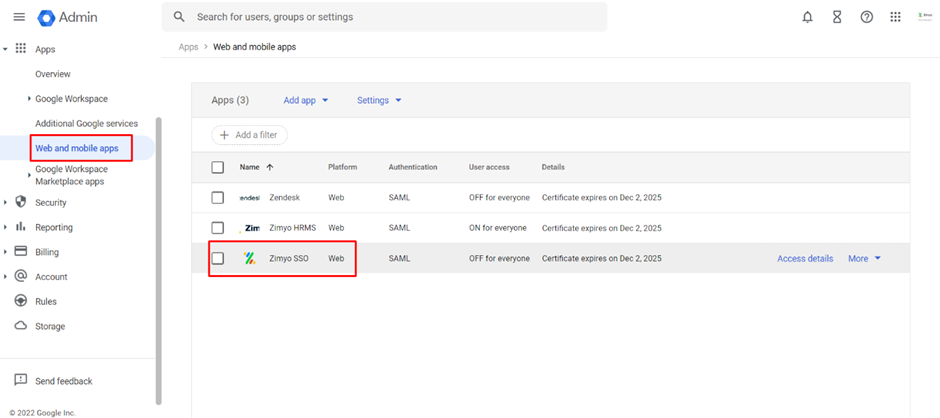
- Click on the newly created App.
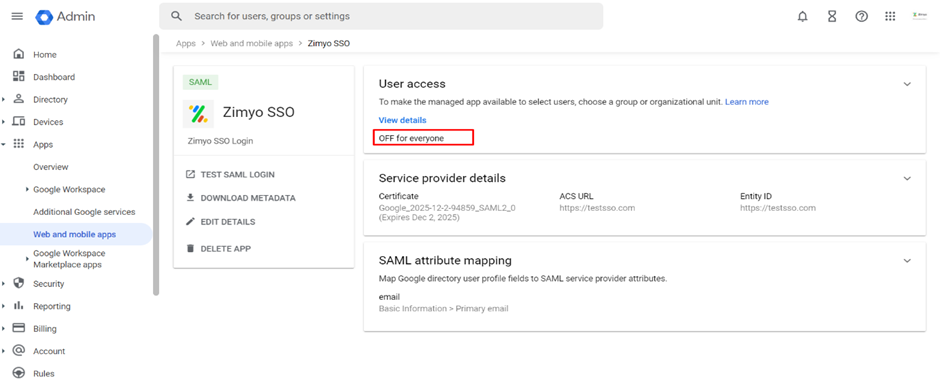
- On the next page, Under ‘User Access,’ Click on ‘OFF for everyone.
- On the next page, select ‘ON for Everyone’ and Save.

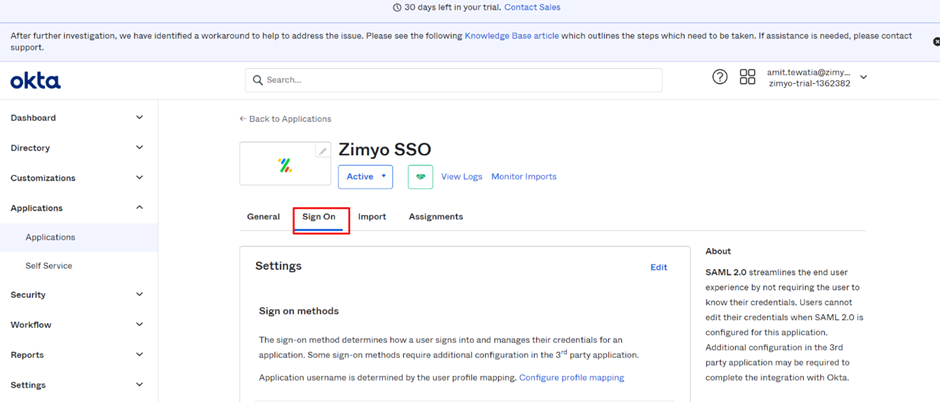
Login through Okta SSO #
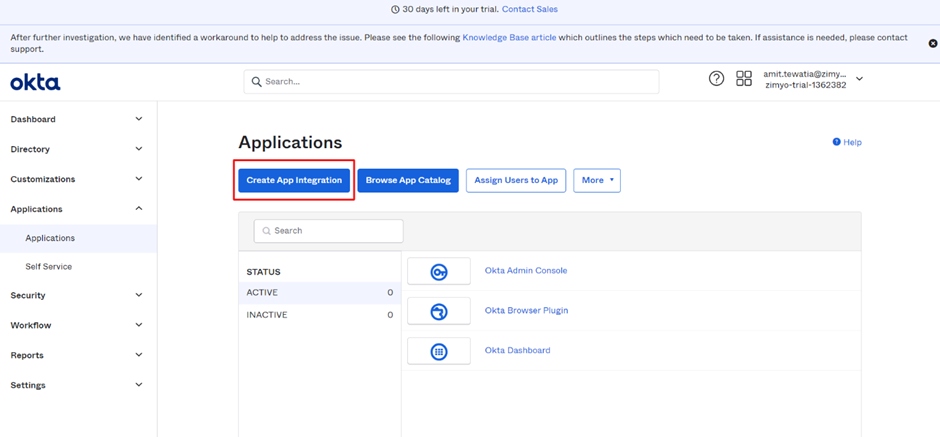
Create App ->
Login on Okta SSO
1)Click on Admin.

2) On the next page, click on ‘Applications’ under Applications and then click on ‘Create App Integration.’

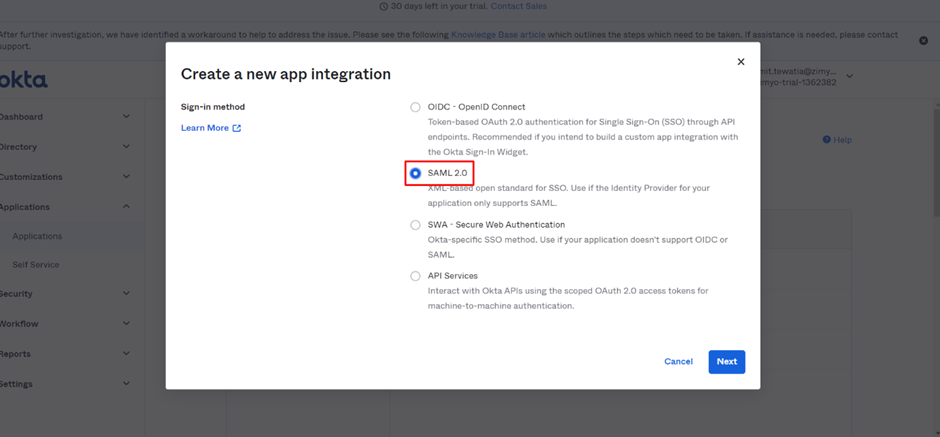
3) On the next page, select ‘SAML 2.0’ and then click on Next.
4) On the next page, Add App name, upload the logo and then click on ‘Next.’

5) On the next page, Copy ‘ACS URL’ From the Zimyo SSO configuration Setting page and paste it into ‘Single Sign On URL.’
6) Copy ‘Service Provider Issuer’ From the Zimyo SSO configuration Setting page and paste it into ‘Audience URI (SP Entity ID).’
7) Select ‘Name Id Format’ as EmailAddress.
8) Select ‘Application username’ as email and click ‘Next’ on the Bottom.

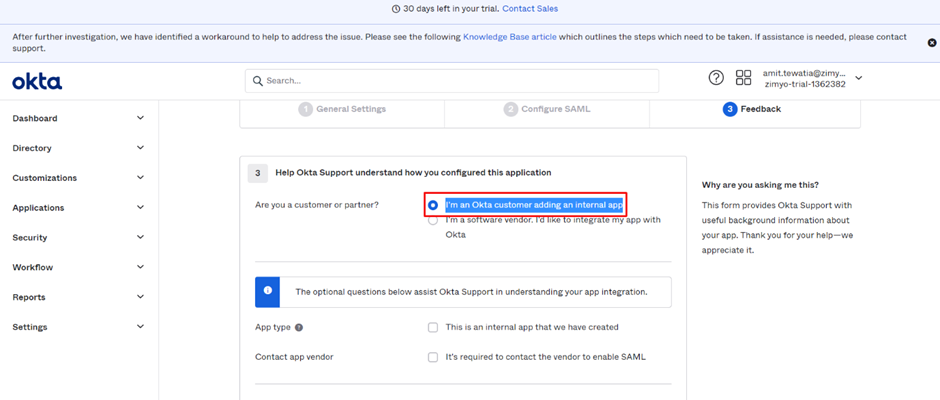
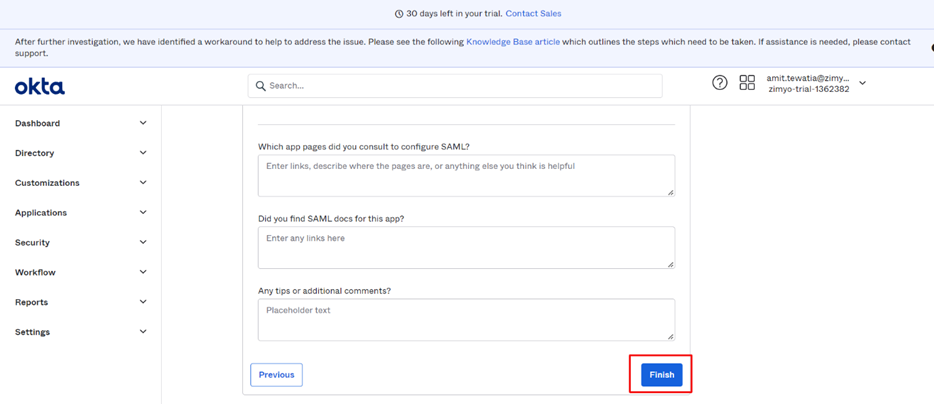
9) On the Next page, select ‘I’m an Okta customer adding an internal app’ and then click on ‘Finish.’
10) Click On ‘Sign On’ and scroll to the Bottom right, and then click on ‘View SAML setup instructions.’

11) Copy ‘Identity Provider Single Sign-On URL’ and paste it into the ‘SSO URL’ input on the Zimyo SSO configuration Setting page.

12) Copy ‘Identity Provider Issuer’ and paste it into the ‘SSO URL’ input on the Zimyo SSO configuration Setting page.
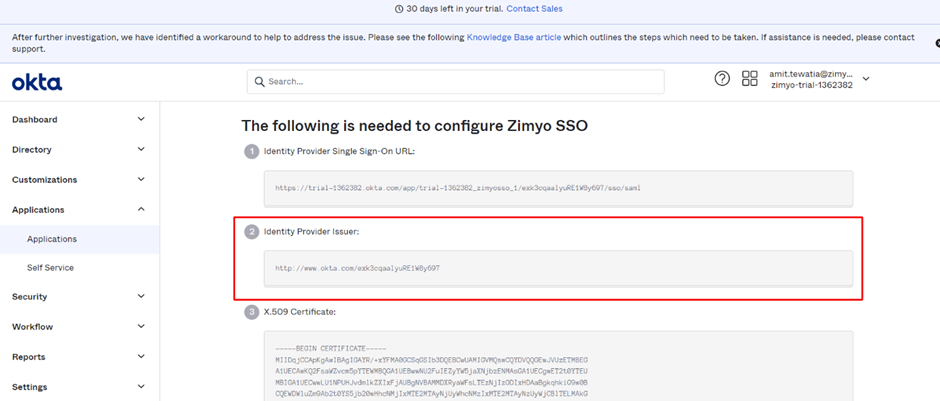
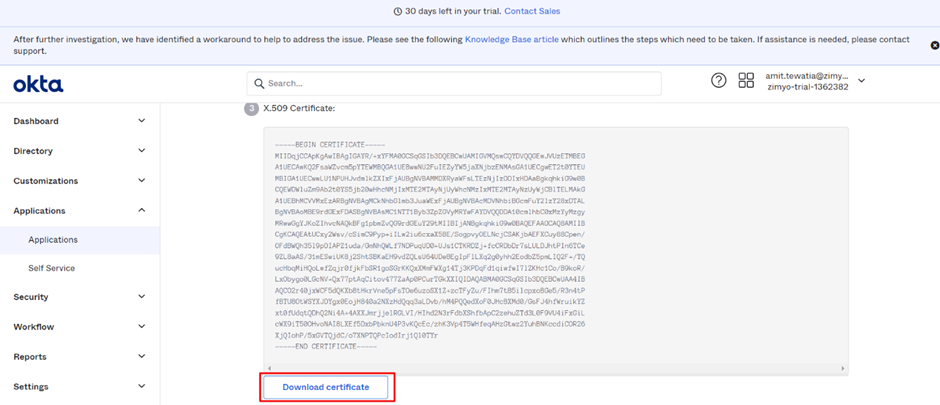
13) ‘Download Certificate’ and upload it on the Zimyo SSO configuration Setting page.
Add user to App ->
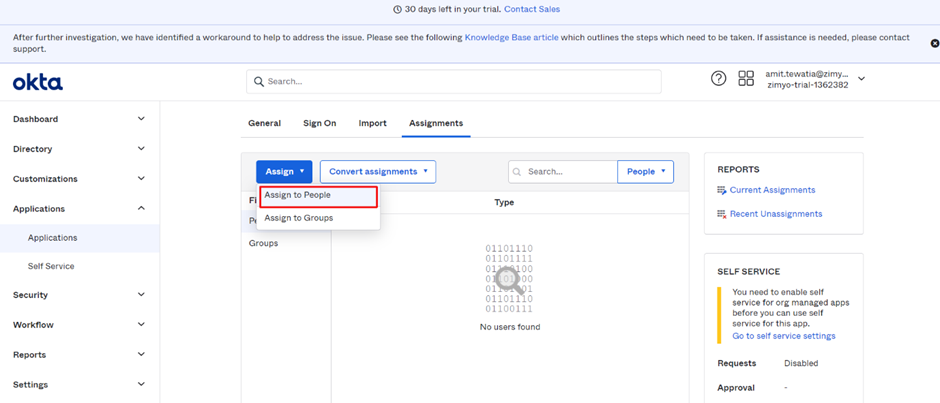
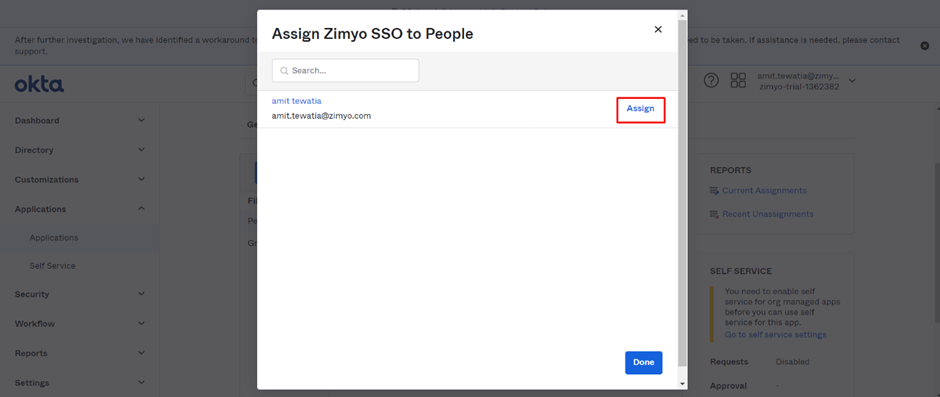
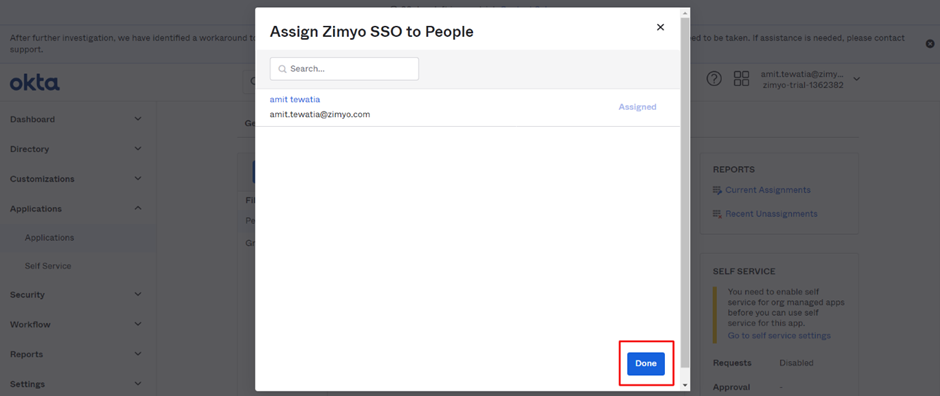
1) Click on ‘Assignments’ and then click on ‘Assign.’

2) Click on ‘Assign to People/Assign to Group.’
3) Search and Assign Users and then click ‘Done.’
Login Through Azure SSO #
Create App ->
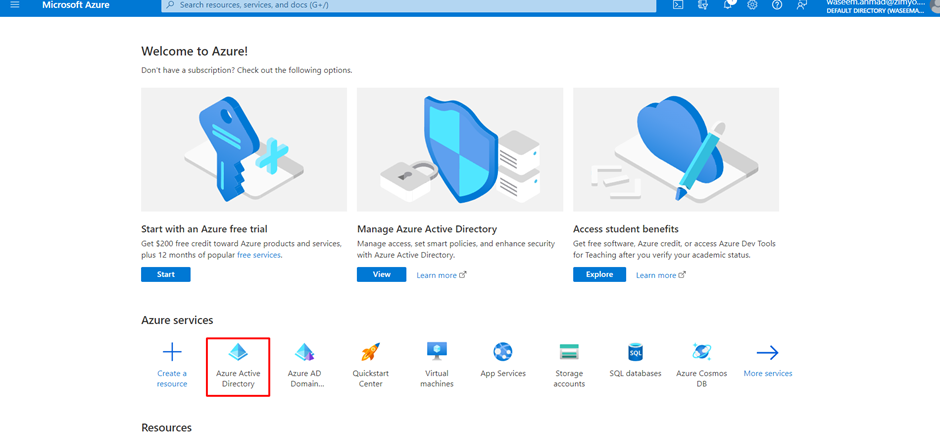
Login on portal.azure.com
1)Click on Azure Active Directory.
2) On the next page, Click on Add and then click on Enterprise Application.


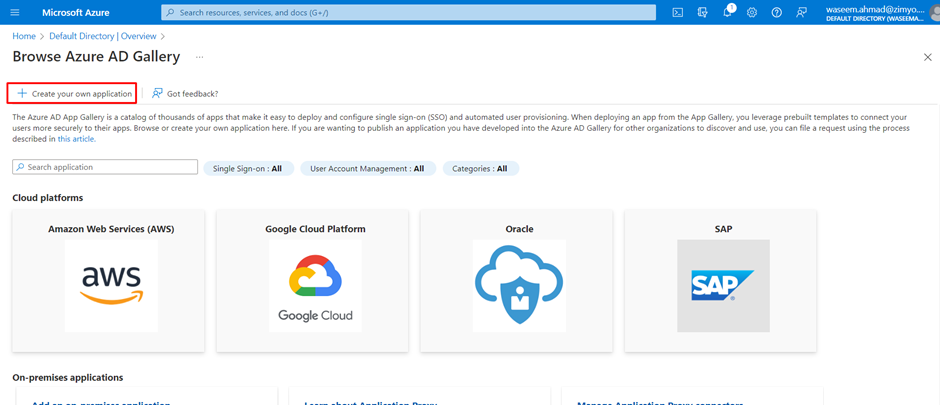
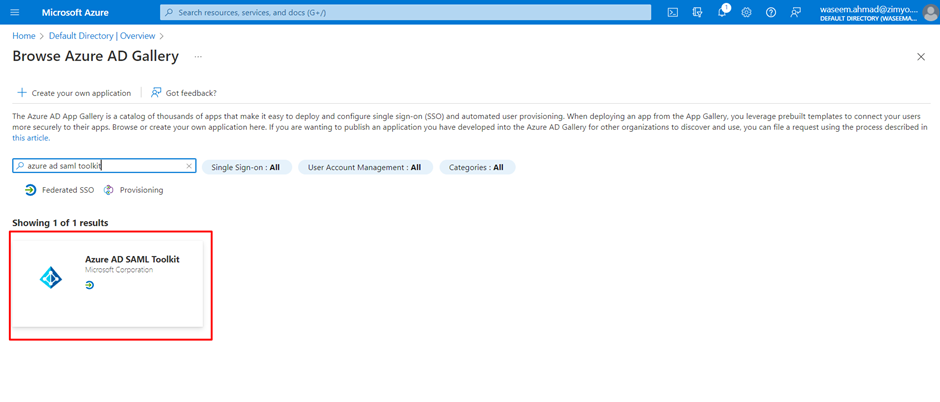
3) On the next page, search for ‘azure ad saml toolkit’ and then click on the ‘Azure AD SAML Toolkit’ App showing in the result.
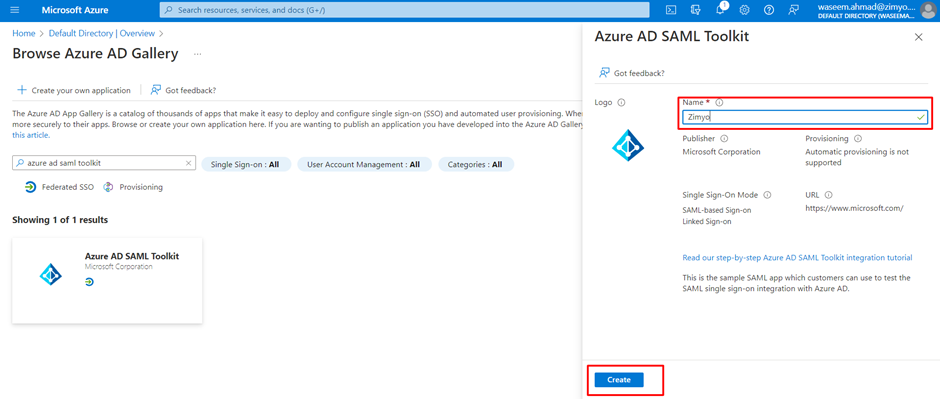
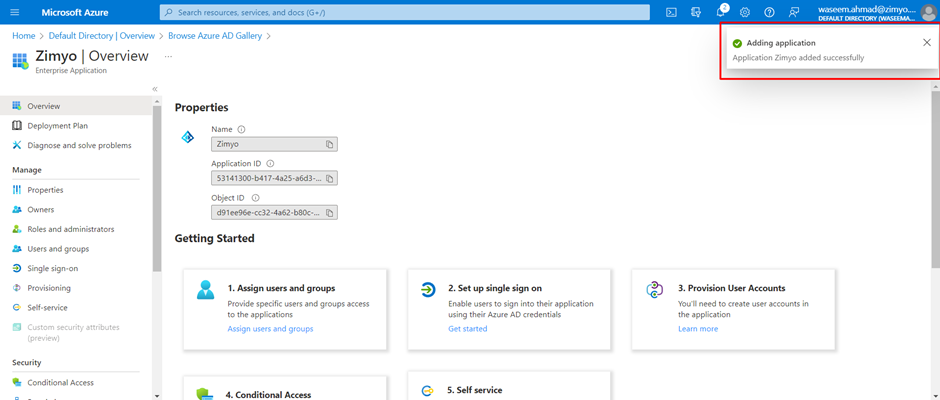
4) Add App Name and then click on ‘Create.’
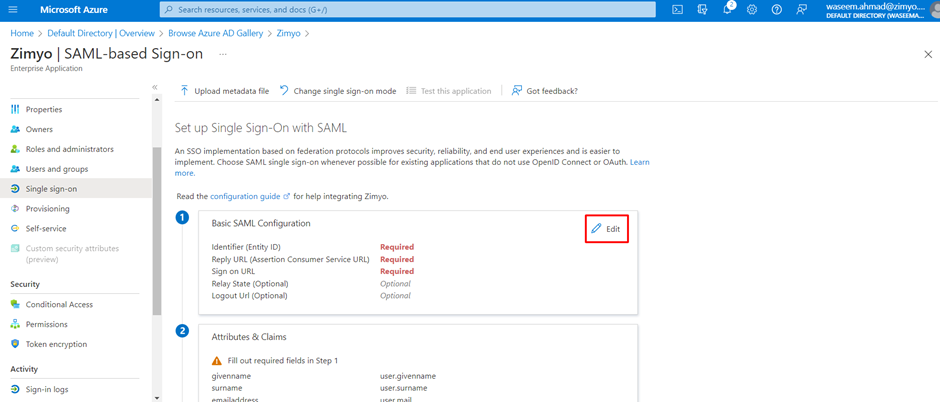
5) On the next page, Click on ‘Set up Single sign-on and then click on ‘SAML.’


6) On the next page, Click on ‘edit’ under ‘Basic SAML Configuration.
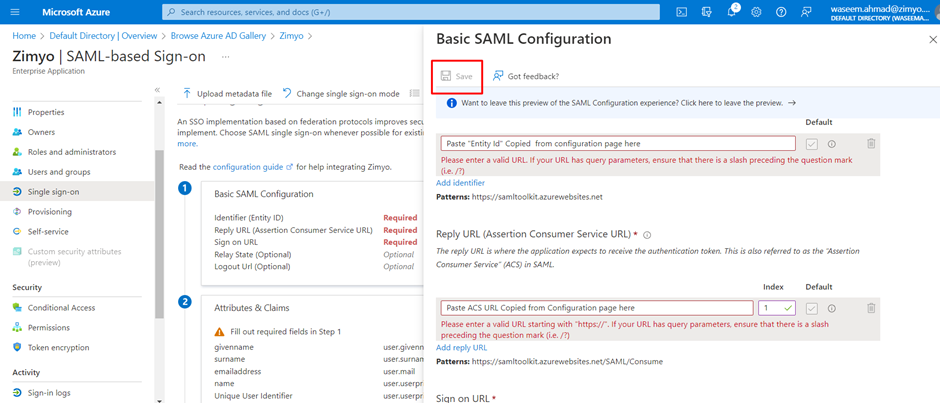
7) Copy ‘Service Provider Issuer’ From the Zimyo SSO configuration Setting page and paste it into ‘Identifier (Entity Id).’

8) Copy ACS URL’ From the Zimyo SSO configuration Setting page and paste it into the Reply URL.
9)Paste the Copied ‘ACS URL’ From the Zimyo SSO configuration Setting page into Sign-On URL.
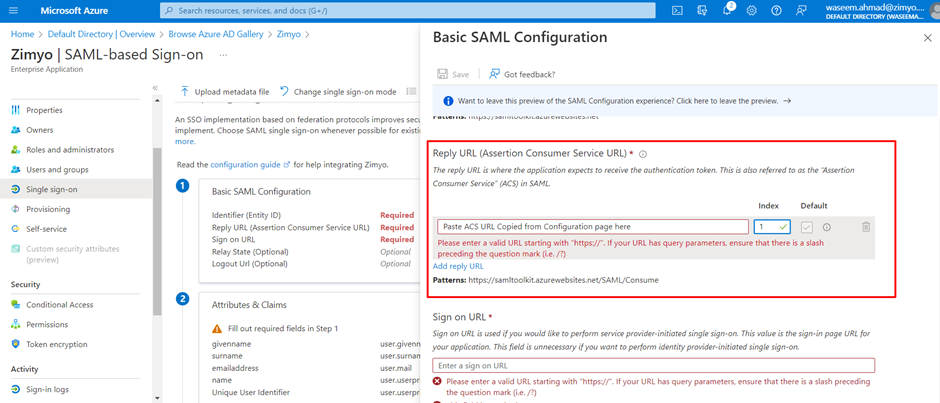
10) Click on Save to save the setting.
11) Click on ‘edit’ under ‘Attribute Claims.’
12) On the next page, click on ‘User unique identifier’ under ‘Required Claim.’
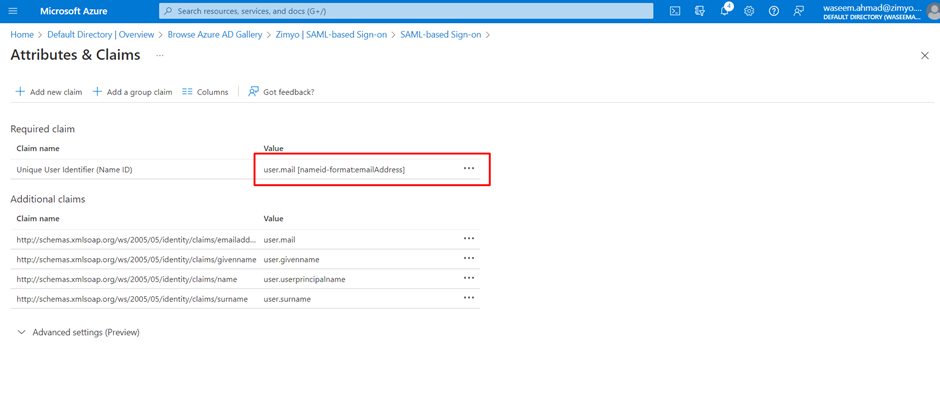
13) Select ‘Name Identifier format ’ as ‘Email address.
14) Select Source as ‘Attribute.’
15) Select Source Attribute as ‘user. Mail’.

16) Click on Save to save the setting.

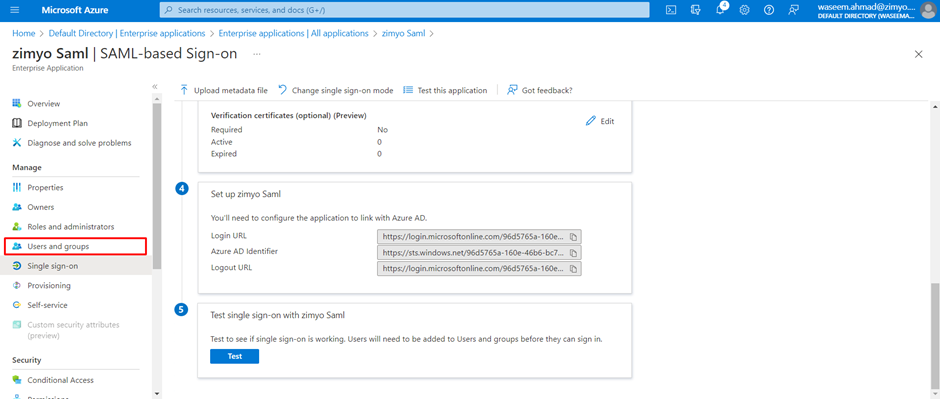
17) Copy the’ Login URL’ and Paste it into ‘SSO URL’ input on the Zimyo SSO configuration Setting page.

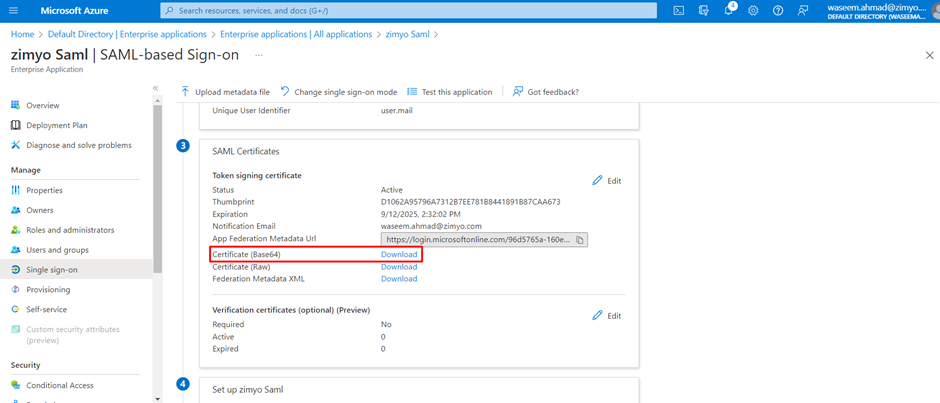
18) Similarly, Copy ‘Azure AD Identifier’ and Paste it into the ‘Identity Provider Issuer’ input on Zimyo SSO configuration Setting page.
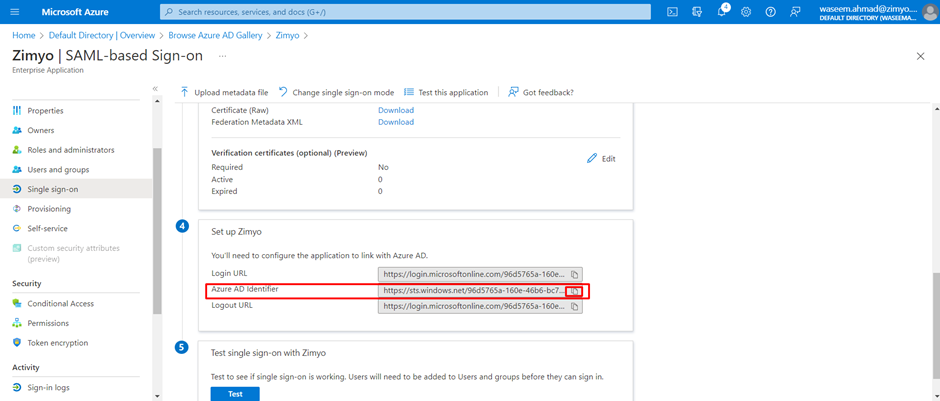
19) Download the Certificate (Base 64) and upload it on Zimyo SSO configuration Setting page and then click on continue.
Add user to App ->
1) Go to User and Groups.
2) Click on the newly created App.
3) Click on ‘Add user/group

.’
4) On the next page, Click on Users.

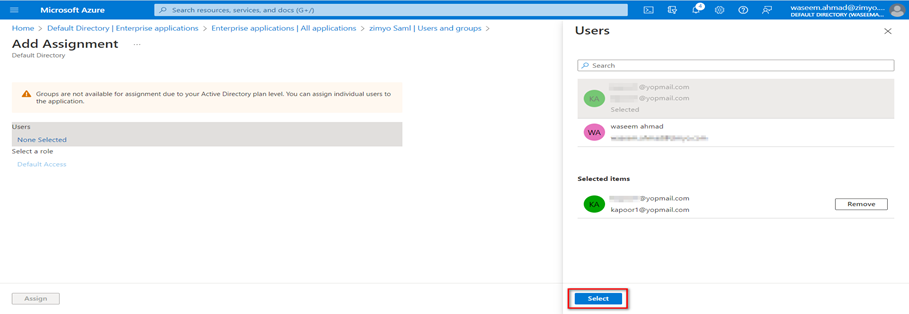
5)Search for users and groups and then select from the result.

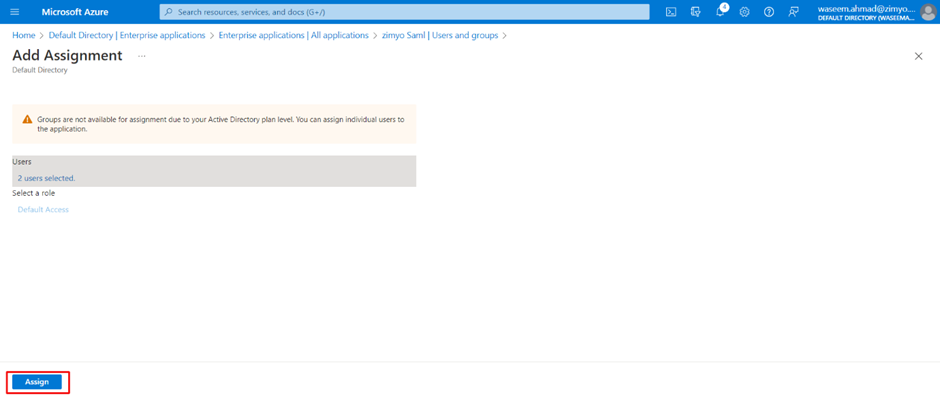
6) Click on the Select button and then Click on the Assign button.