Leave

Overview : Leave

Admin in Zimyo HRMS have the flexibility to create multiple leave rules encompassing various leave types and bringing automation. It enhances efficiency by reducing manual workload, ensures accuracy in tracking leave balances, streamlines approval workflows for leave, provides real-time leave visibility, and contributes to a more organized and compliant leave management system.

Steps for Leave Configuration

In Zimyo HRMS, the admin can configure leave settings by following specific steps.

 Log into your Zimyo account and click “Time and Attendance” It will take you to the “Leave”.

Main Screen

Clicking on the “Leave” tab provides the admin with a complete view of the existing leave rules.

Add leave Rule

Create New Leave Rule

Creating a new leave rule involves clicking on “Add leave rule” to open a popup screen. Here, the admin can add new leave types based on the organization’s standards. As shown below on the screen.

In the popup screen mentioned above, the admin is required to provide the new rule name and add or edit the existing leave type based on the organization’s requirements.

To generate a new leave type, select the “Create Leave Type” button. This action enables the admin to input the new leave type name, specify the disbursement cycle (monthly, quarterly, or yearly), set the leave count for disbursement, and manage the status.

Note💡: Admin can modify the created leave types as needed by selecting the pencil icon located on the right side of the screen.

Clicking on the pencil icon enables the admin to configure the leave type by entering essential details, leave specifics, restrictions, and advanced settings.

Basic Details: In the basic details, the admin is required to enter the leave name and its corresponding abbreviation.

Leave Details: In the leave details section, the admin has the option to configure the leave disbursement cycle, choosing between monthly, quarterly, half-yearly, or yearly cycles. Additionally, the admin can set the cycle time, determining whether the salary disbursement aligns with the start or end of the cycle. Admin can enable tenure-based leave disbursement.

The admin establishes the limit for the number of leaves to be credited per disbursement cycle and probation period.

This leave type is Paid i.e. employees will get paid for that day if on leave

When creating a new leave, the admin has the option to specify whether the leave will be paid or unpaid.

Can employees encash their leave balance at full & final?

In Zimyo HRMS, the admin is provided with two options regarding leave encashment during full and final settlement. They can either mandate leave encashment for unutilized leaves, or the unutilized leave balance will lapse without any payment.

Leave Details

Do you want to recover the excess leave balance of employees at the time of FNF?

The portal provides two options for the admin. They can choose “Yes,” indicating that any excess leave balance assigned to the employee will be recovered during the Full and Final settlement. Alternatively, they can select “No,” indicating that no recovery is required.

Applicability

In the Applicability section, if the leave type is specific to gender or marital status, the admin can configure the applicability based on the employee’s gender (which may be male, female, or other) and marital status (which may be married or unmarried).

Note💡: Please note that the pro-rata based on the date of joining will not be applicable if the leave is gender-specific or marriage status-specific e.g. Maternity leave, Paternity leave or Marriage leave etc.

Carry forward Settings

In the Carry Forward settings, the admin has two options: one allows carrying forward the leave balance to the next disbursement cycle, and the other allows carrying forward the leave balance to the next year. As shown below in the screen.

Carryforward leave

Clicking on the “Next” button proceeds the admin to the next step in the configuration process.

Leave Restrictions

Employees can apply for leaves during Probation ?

Employees can take “n” number of leaves during their probation by checking this box, which grants the administrator permission. The admin prevents the employee from requesting a leave of absence while they are on probation by choosing “No.” 

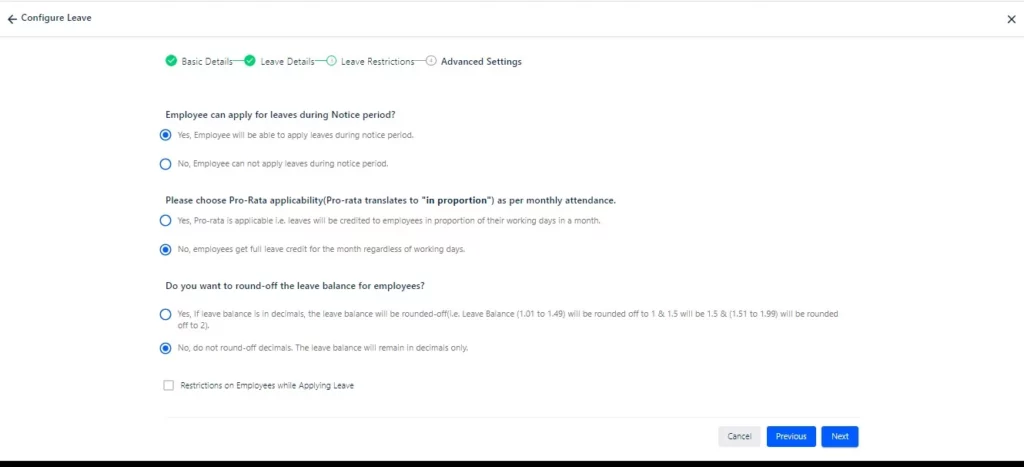
Employee can apply for leaves during Notice period?

In this configuration, opting for the first choice enables admin to permit employees to request leave while serving their notice period. Conversely, selecting an alternative option empowers administrators to limit employees from seeking leave during the probationary period.
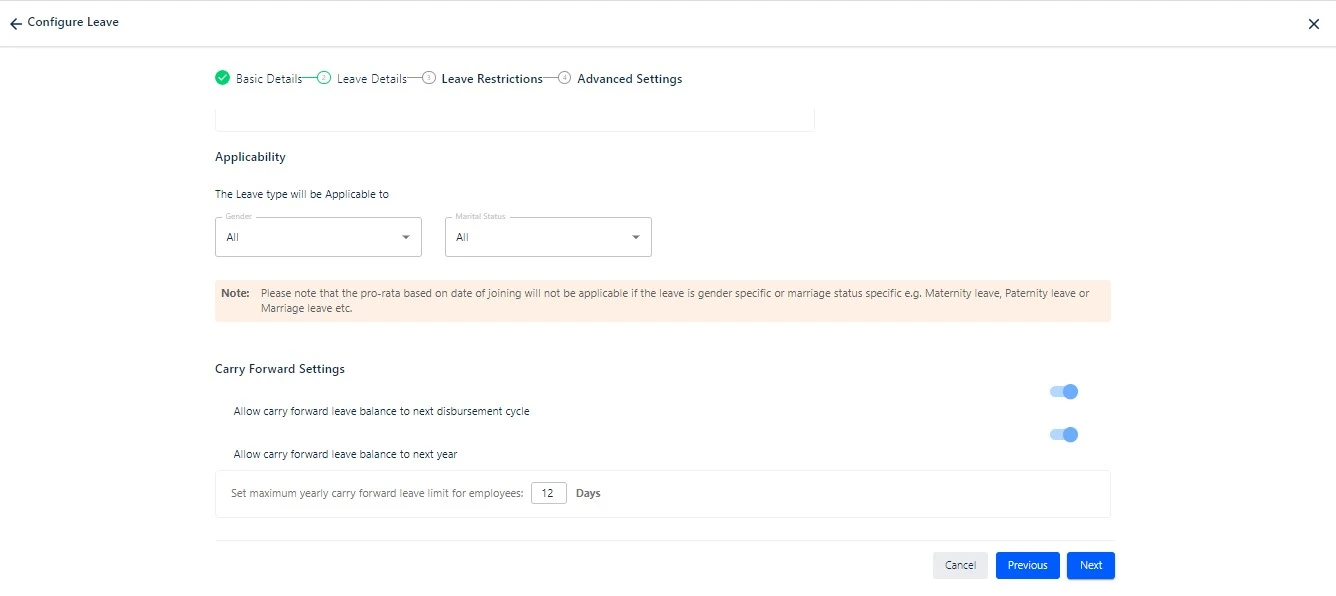
Please choose Pro-Rata applicability(Pro-rata translates to “in proportion”) as per monthly attendance.
 
These configurations provide the admin with the option to activate Pro-Rata applicability based on monthly attendance, or alternatively, employees receive full leave credit for the month irrespective of the number of working days.
 
Note💡 : Under Pro-Rata applicability, leave credits for employees will be allocated in proportion to their working days within a given month.
Do you want to round off the leave balance for employees?
 
 If the leave balance includes decimals, it will be rounded off. For instance, a balance from 1.01 to 1.49 will be rounded to 1, 1.5 will remain as 1.5, and a balance from 1.51 to 1.99 will be rounded to 2.
 
Alternatively, choose not to round off decimals, and the leave balance will be maintained in its decimal form.

Restrictions on Employees while Applying for Leave

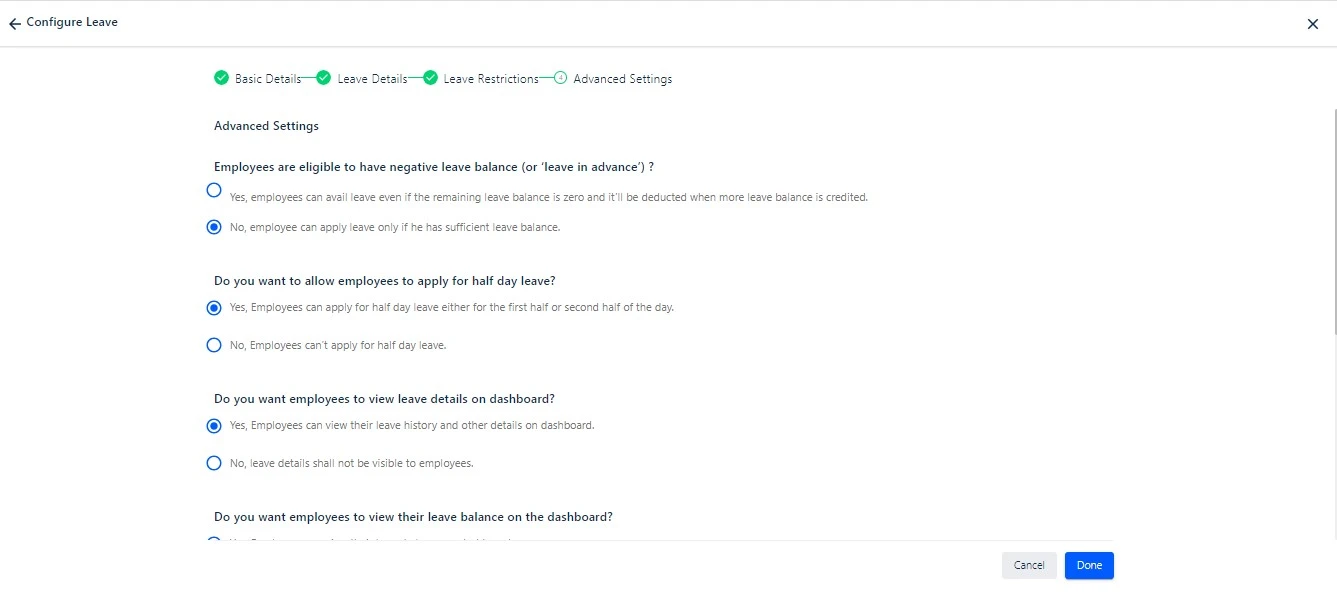
After activating this setting, it unlocks more advanced configurations that empower the administrator to take various actions


Restrict employees to apply for back-dated leaves?

In this configuration, the admin has the flexibility to either enable or disable the restriction on employees applying for leaves for past days within a specified window of n days.


Prior notice is required to apply for future dated leaves? 

Through this configuration, the admin can choose to either enable or disable the restriction on employees applying for leaves with future dates, ensuring a minimum lead time of N days.


Note💡; This configuration will ensure that leaves are intimated in advance and zero indicates leave can be applied on the same day.

 Hence, by enabling this function, the admin needs to describe the Minimum number of leave days for which the above condition will be applicable.


Is there a limit on the maximum number of leaves that can be availed in a month?

Through this configuration, the administrator can choose to either enable or disable the restriction on employees to utilize the maximum days of their leave balance within a month.


In this setting, the admin has the ability to establish a limit for employees to take leave after a specified number of days from their date of joining.


The admin has the option to limit employees to take a minimum of n days of leave at a time.

Is there a limit on the number of consecutive days this leave can be taken?


In this setup, the admin can establish a maximum limit for consecutive days of leave, excluding weekends and holidays, by setting it to a maximum of n days. Alternatively, they may choose to keep it unlimited.

Advance Settings in Leave Configuration

Employees are eligible to have a negative leave balance (or “leave in advance”)?

The admin can activate or deactivate the ability for employees to take leave even when their remaining leave balance is zero, with the deduction occurring once the additional leave balance is credited.

Do you want to allow employees to apply for half-day leave?

In the process of creating a leave, this fundamental configuration provides the admin with the option to enable or disable half-day leave for employees, either for the first half or the second half of the day.

Do you want employees to view leave details on dashboard?

This configuration allows admin to control the visibility of leave balance on the employee dashboard.

Employee is required to submit a document proof or attachment for this leave request?

This Configuration allows the admin to restrict employees from submitting a document proof for a particular leave request.

Do you want to disburse leaves manually to the employee who joins before or after a date in a month?

This setting enables an admin to manually allocate leaves to employees who join before or after a specified date within a month.

Finally, the administrator can establish the limit for the total leave that an employee can take within the year.

Advance settings in leave configuration

Once all configurations are finished, the admin simply needs to click on the “done” button to finalize the process.

Initiate Leave Encashment

When the “Initiate leave encashment” button is clicked, the admin will be directed to a new page. On this page, the admin can perform two functions: initiate encashment and view logs, as illustrated on the screen.

Initiate Encashment

In the “Initiate Encashment” section, the admin is required to choose the leave type they wish to encash for an employee. Additionally, they need to select the balance type, deciding between “current balance” (encashing the entire leave balance) or “custom” (selecting specific days from the total leave balance). The system will then display a list of employees for whom the admin intends to initiate leave encashment.

 
Initiate leave encashment

By clicking on the checkbox located on the left side of the screen, the admin can choose the employee for whom they intend to kickstart the leave encashment process.


To pinpoint an employee from the extensive list, the admin can streamline the search using various filters, including department, designation, entity, status, and leave rule.


Upon selecting the employees by clicking on the checkboxes, the “Initiate Encashment” option becomes available to the admin. Clicking on this button allows the admin to initiate an encashment and navigates them to the log screen for further details.


Note💡 : When opting for the “current balance” type, the admin is restricted from editing the leave balance before initiating encashment. Conversely, in the “custom balance” type, the admin has the flexibility to allocate leave from the total balance that is to be encashed.

Clicking on “Initiate Encashment” will promptly direct the admin to the log screen, providing a comprehensive overview of the actions taken. Within the screen, a highlighted button labelled “View Employee” allows the admin to thoroughly inspect those employees on whom the leave encashment action has been executed.

Encashment timeline

Note💡 : The leave encashment for an employee will be seamlessly integrated into the payroll during the Full and Final settlement process.

Threads