Overview : Timesheet
Timesheets offer several benefits, including accurate time tracking for billing and payroll, improved project management through resource allocation insights, enhanced productivity by identifying time-wasting activities, and better performance evaluation.
They ensure transparent client billing, compliance with labour laws, and efficient resource allocation, leading to cost savings and increased profitability. Timesheets also support project planning, helping teams meet deadlines and deliver high-quality work.
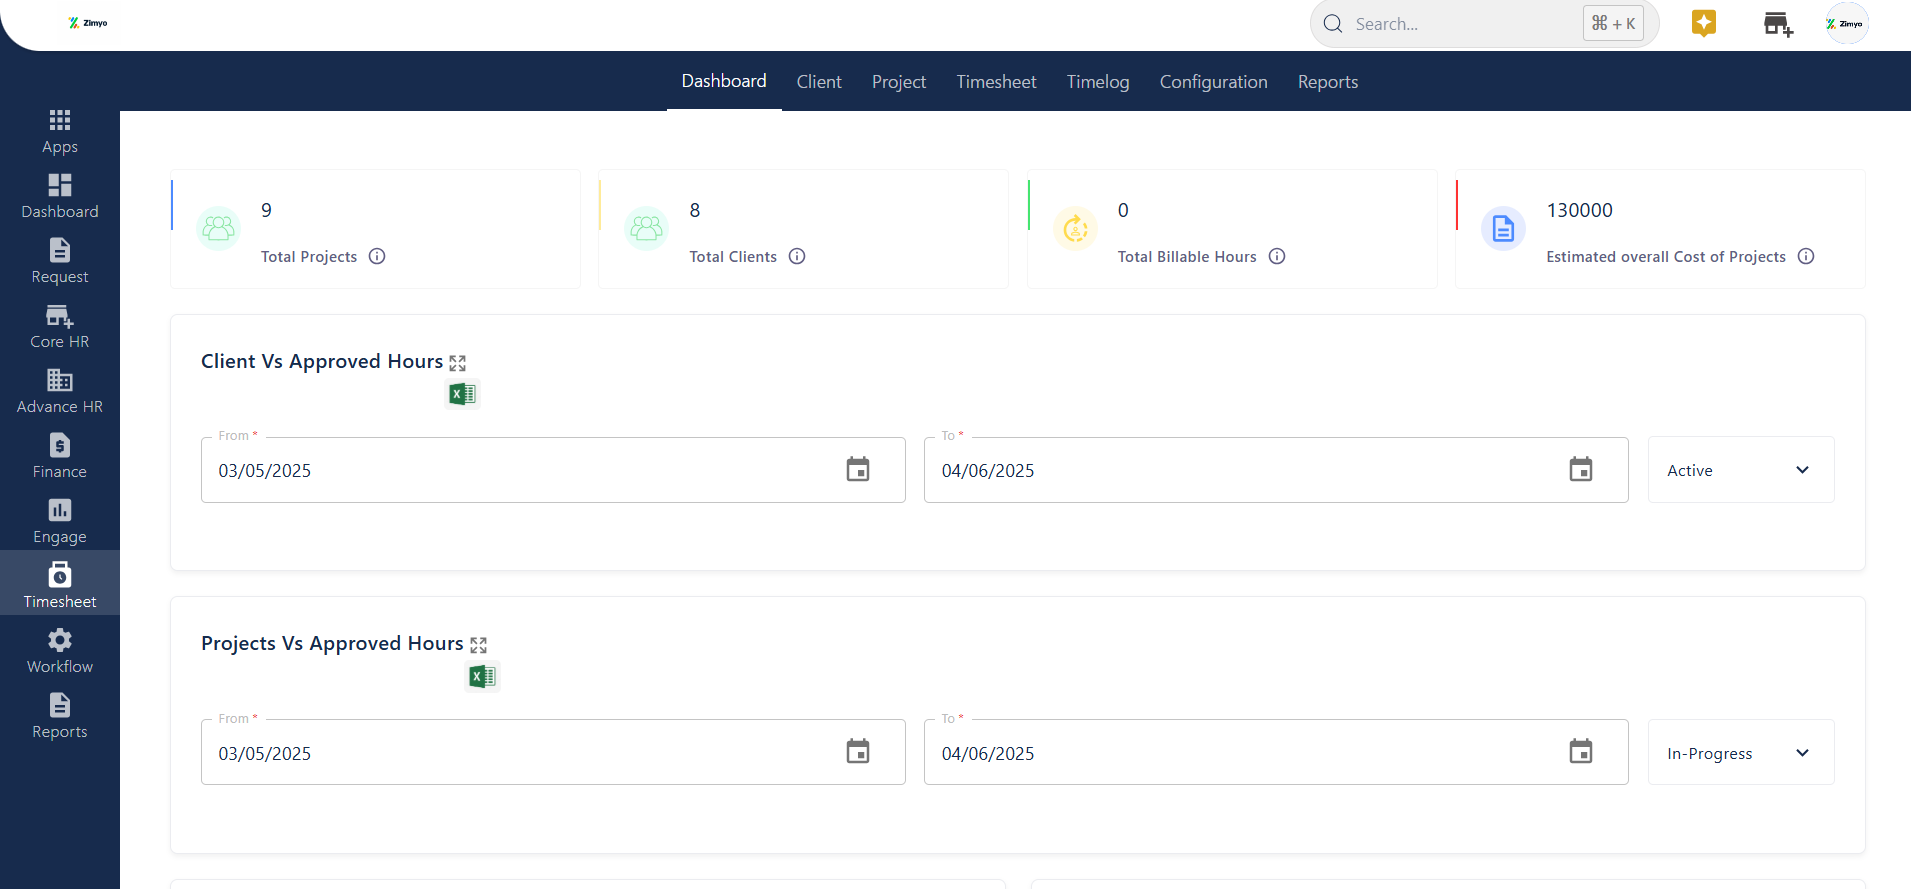
Timesheet Dashboard
The admin can have a holistic view of all projects, all clients, all billable hours, and the estimated total cost of all projects in the timesheet dashboard. The administrator can download reports on clients versus approved hours, projects versus approved hours, projects versus employees, and projects versus approved hours for a lifetime, and they can apply filters based on date and status.
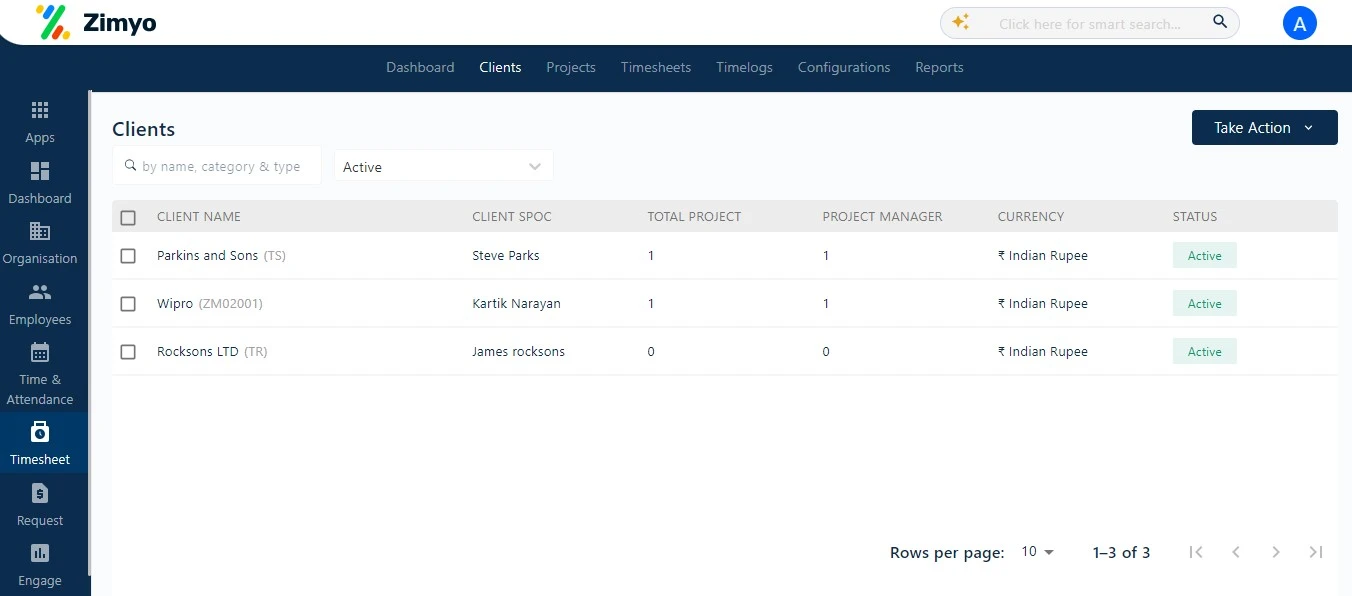
Client
Administrators have the ability to conveniently access an overview of all clients directly on the screen. In our improved Timesheet module, administrators have an access to a centralized view of key client information:
Single Point of Contact (SPOC): You can easily identify the designated single point of contact for each client. This ensures efficient communication and coordination between your organization and the client.
Number of Active Projects: You’ll be able to see the total count of active projects associated with a particular client. This information helps in workload management and resource allocation.
Number of Project Managers: We provide insights into how many project managers are actively working on a specific project. This helps in understanding the project’s management structure and resource distribution.
Mapped Currency for Billing: For billing purposes, Admin can map the currency to each client. This ensures accurate billing for a project.
Client Status: You can quickly manage the status of each client, whether they are active, inactive, or have deleted.
Take Action
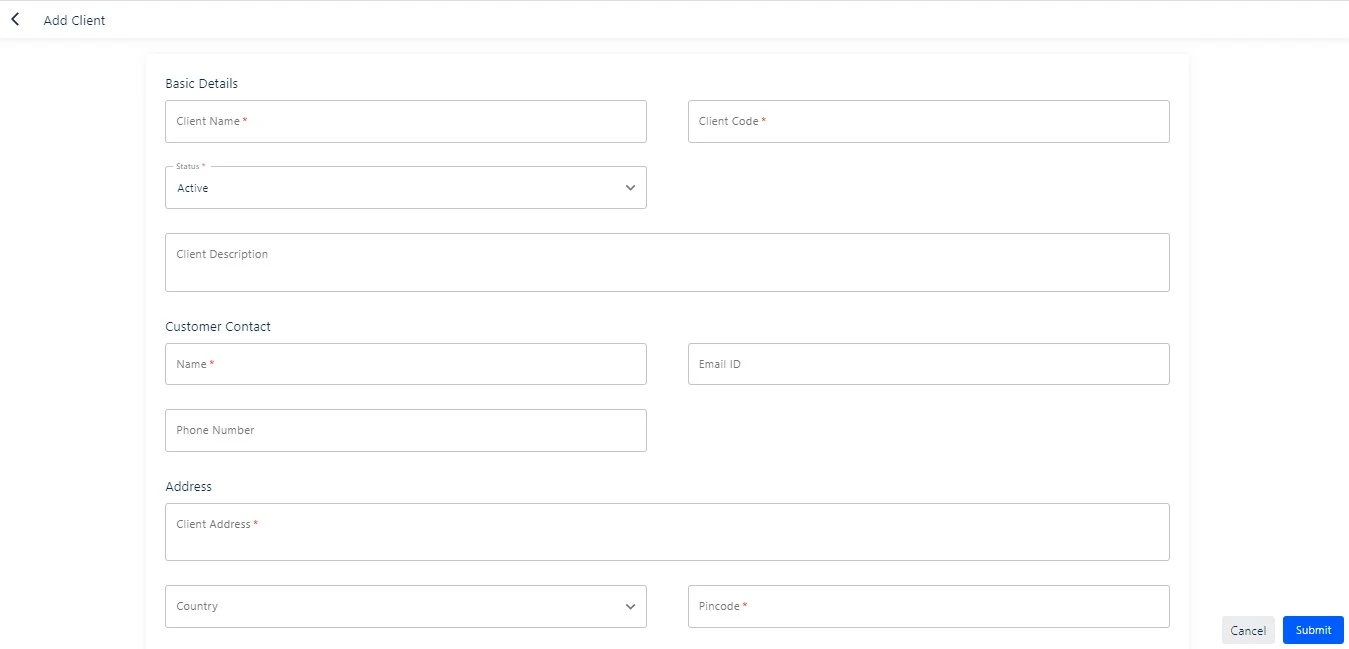
The “Take Action” button is a great step towards enhancing the functionality of your Timesheet module. Here, administrators have the flexibility to create clients either manually or in bulk, making the client management process more efficient and user-friendly.
Add client manually
Go to “Take Actions”  Click on Add Manually Fill in the details given in the Structured Form.
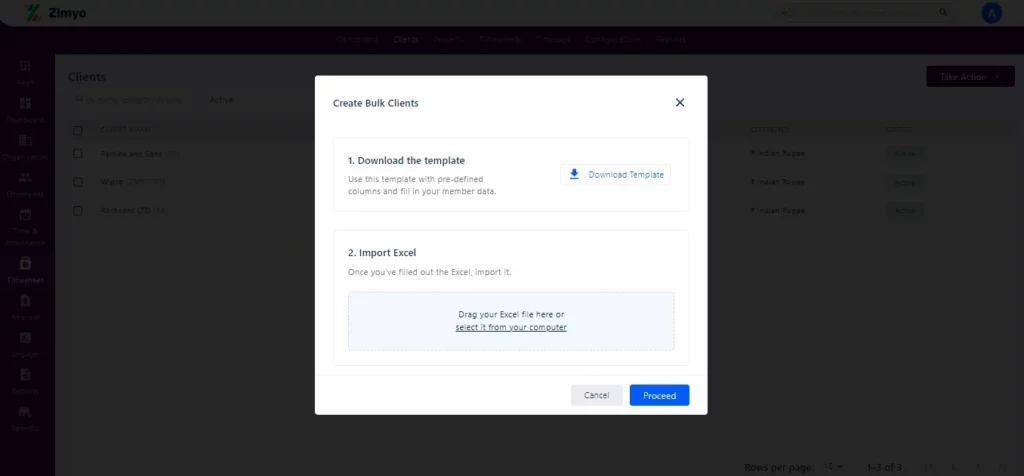
Add client in bulk
Go to “Take Actions” ➡️ Now click on “Create Bulk” ➡️ Download the template given in the Excel format.
Client Details on a click
With this comprehensive view, administrators can efficiently manage client relationships, monitor project-related details, and ensure accurate billing and project management. It streamlines the workflow and enhances the user experience for both administrators and clients.
Details: By simply clicking on the “client” option, you can access comprehensive details for any specific client, providing you with a more in-depth understanding of each client’s information and enabling better management.
Projects: we’ve enhanced the Timesheet module to provide administrators with a comprehensive overview of all the projects associated with a specific client.
Billings: In the Billing section of our enhanced Timesheet module, administrators and users will have the ability to access and review detailed billing information for specific projects associated with clients.
Permissions: The permissions section offers administrators the flexibility to grant specific authorities to different user roles, including Project Managers, Project Coordinators, Reporting Managers, and Team Members.
Go to “client list” ➡️ Now click on “particular client” ➡️ Access the complete client details.
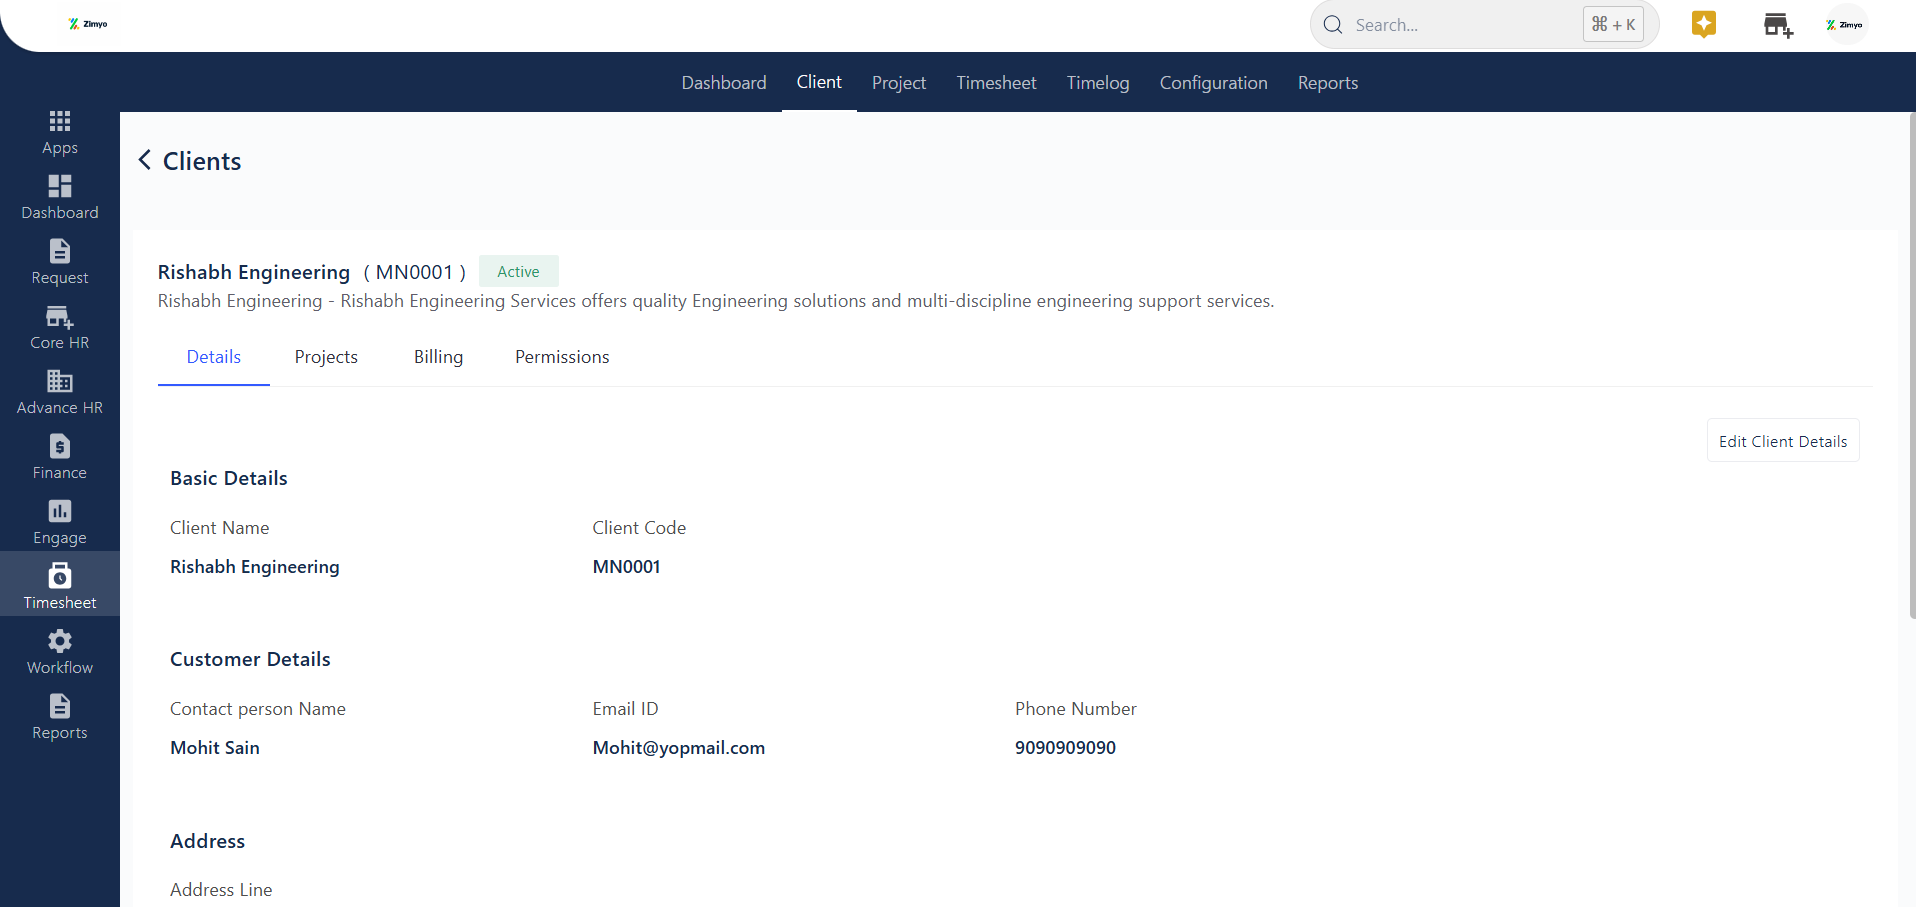
Note💡 : By clicking on “Edit Client Details” the admin can edit and change the details of the client.
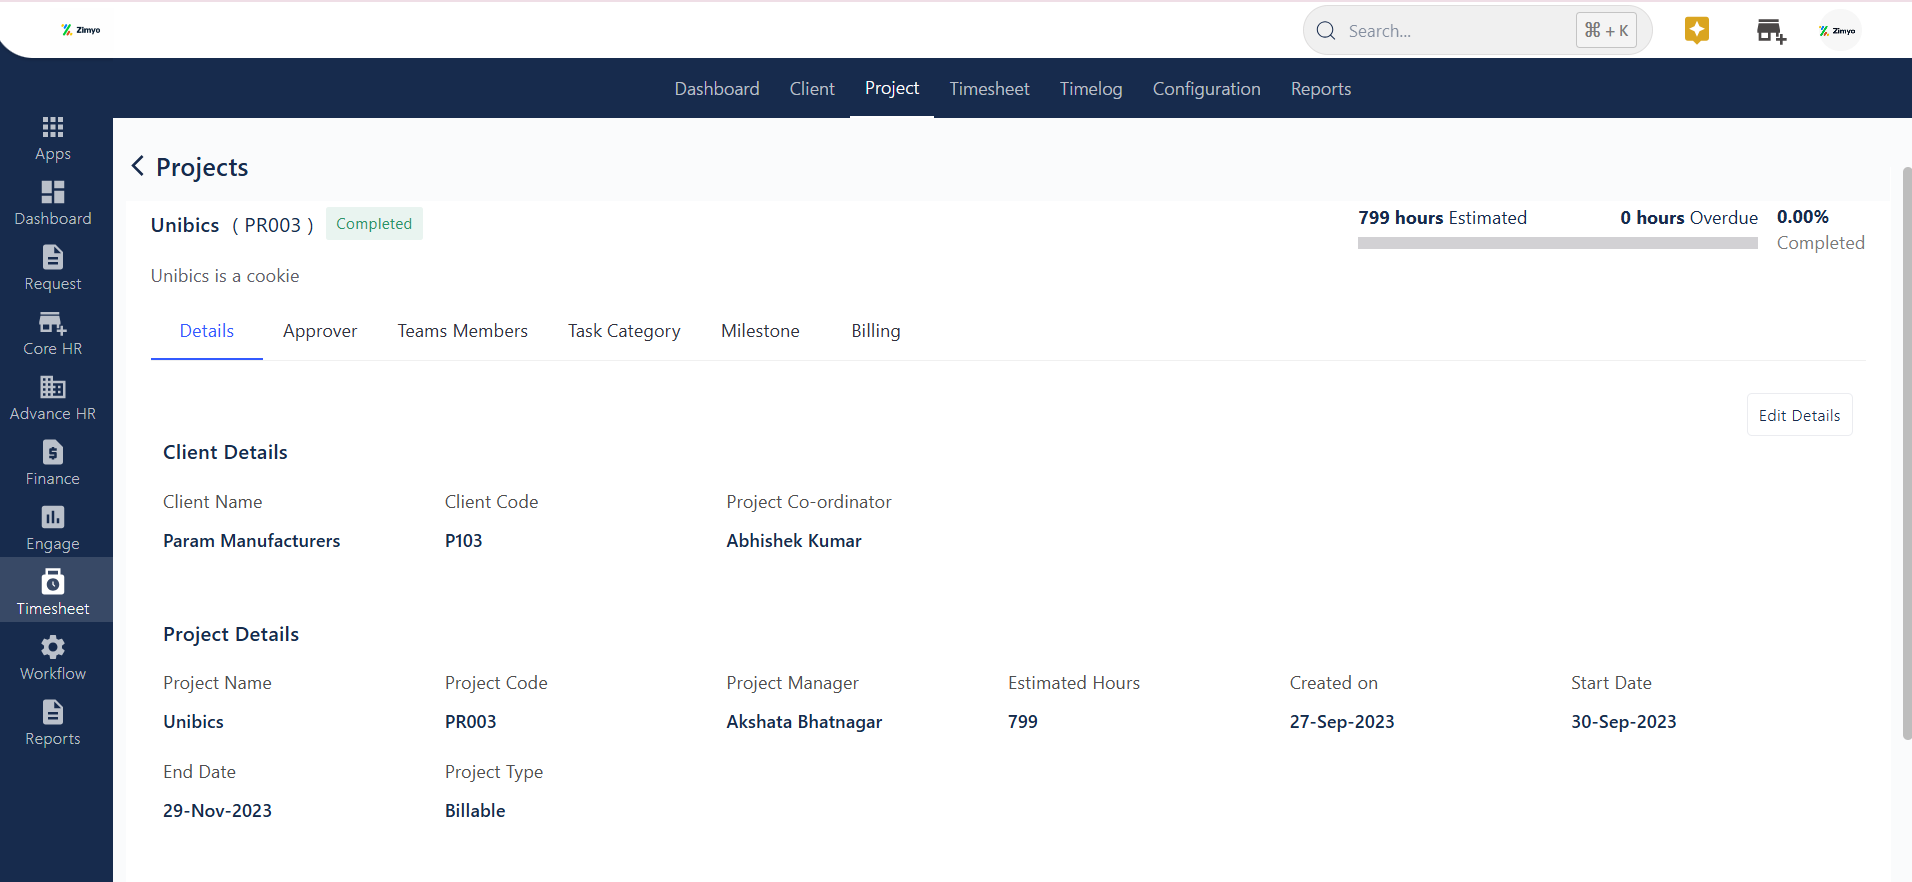
Projects
In the Project Section of Timesheet module, administrators have access to a comprehensive view of project details, facilitating efficient project management. Here’s what you can expect to see:
List of Projects: The interface displays a list of all projects, allowing administrators to quickly review and select a specific project for more detailed information.
Approved Hours Spent: For each project, the system provides information on the total approved hours spent. This metric helps in monitoring project progress and resource allocation.
Number of Team Members: Administrators can see the number of team members assigned to each project. This provides insight into the project’s team structure and helps in resource allocation.
Team Member Details: By clicking on a team member’s name within a project, administrators can access complete details about that team member, including contact information, role, and task assignments.
Project Manager: The name of the project manager responsible for overseeing the project is displayed. This ensures clarity in project ownership and accountability.
Project Status: The system clearly indicates the status of each project, whether it is marked as completed, on hold, or in progress. This allows administrators to easily track the current state of all projects at a glance. An admin can also gain insight into the start date & end date of the project.
Go to “Project list”➡️ Now click on “particular Project” ➡️ Access the complete project details
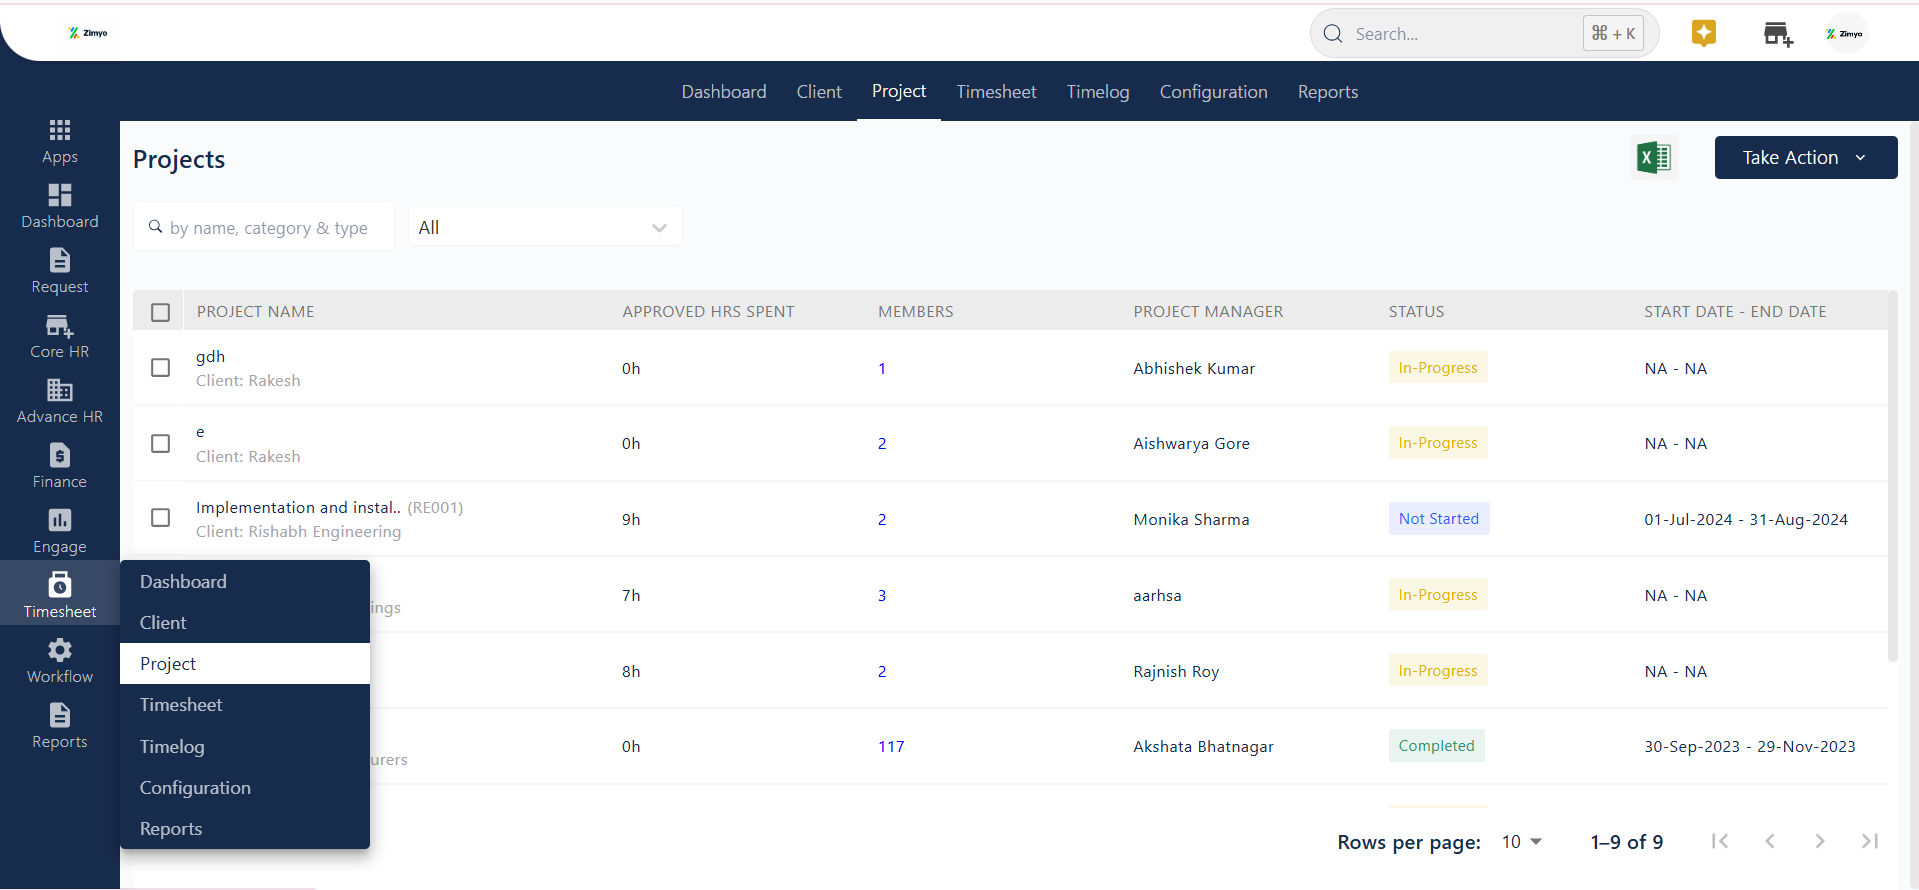
Take Actions
By clicking on the “Take Action” button, admins have the flexibility to create new projects either manually or in bulk, Here admin can also map members for the projects.
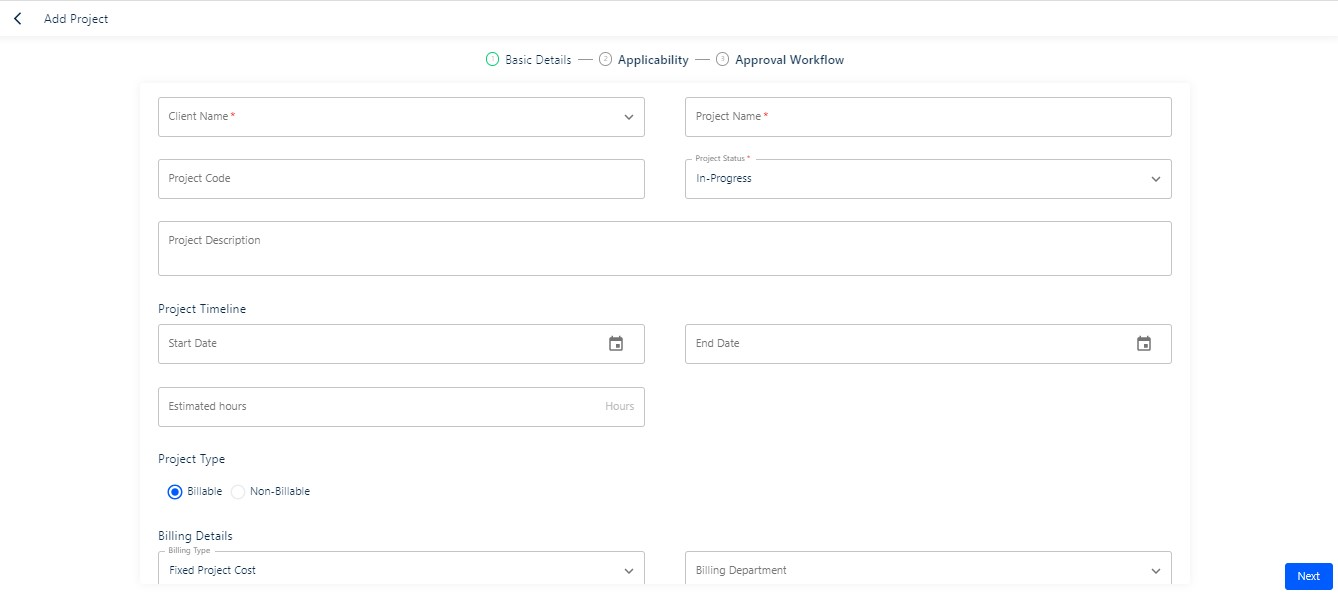
Add Manually
The ability for admins to manually add new projects by filling in essential details. Here’s how this manual project creation process typically works:
Fill in Client Details: The administrator starts by selecting the client for whom the project is being created. This may involve choosing from an existing client list or adding a new client’s details if necessary.
Applicability: here admin can select the project manager, add members manually, and select the project coordinator.
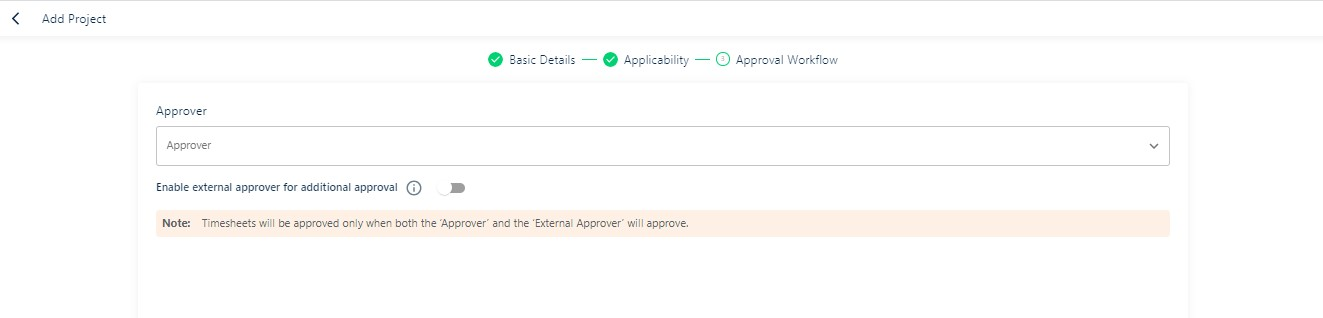
Approval workflow: It allows the admin to create the approval hierarchy for project management. Here admin can also enable external approver for projects.
Go to “Timesheet”➡️ Now click on “Take action” ➡️ Select “Add Manually” and fill in all the necessary fields
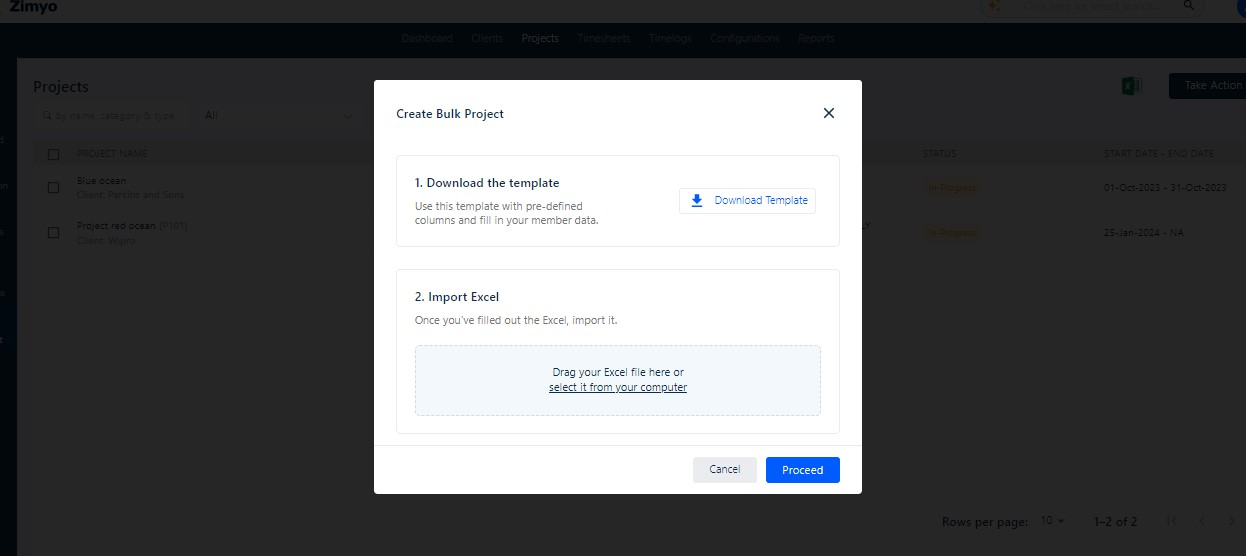
Add Project in bulk
Go to “Take Actions” ➡️ Now click on “Create Bulk” ➡️ Download the pre-defined template given in the excel format and import it
Project details on a click
Clicking on a project allows admins to view:
Project Details: Name, client, timeline, type, manager, and status.
Project Approvers: Individuals with project approval authority.
Task Categories: These task categories can be linked to project milestones, providing a structured way to track progress and align project tasks with key project goals and achievements.
Project Milestones: Project milestones represent significant project achievements or stages that mark progress toward project completion.
Billing Details: Admin can manage Rates, currency, and billing terms and types.
Team Members: Names, roles, contact info, and tasks.
Add Project Milestone
Go to “Timesheet”➡️ Now click on “Project” ➡️ Select “Created project visible in the list and navigate to the Milestone” and fill in all the necessary fields
Note💡 : The admin can add an external approver for the project. As shown below in the screen.
Timesheet Configurations
To initiate the timesheet functionality, administrators must commence by overseeing the configuration section. Here, they are required to establish roles, set up rate cards, add teams, formulate policies, and define task statuses for optimal management.
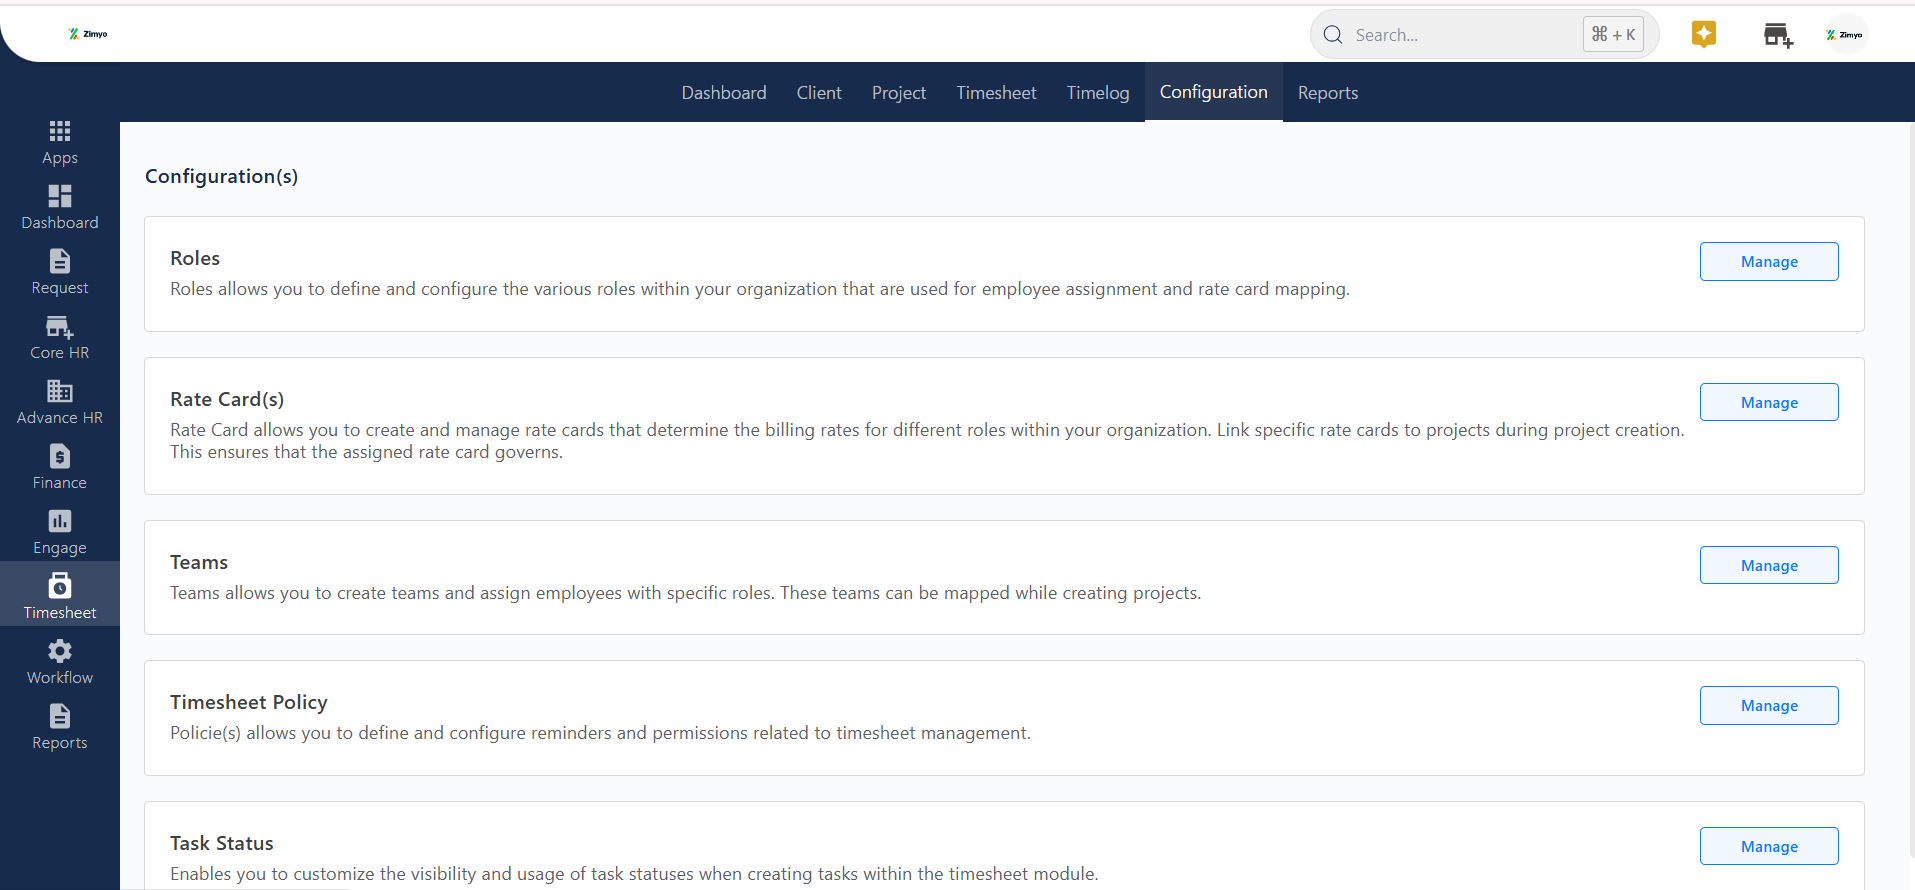
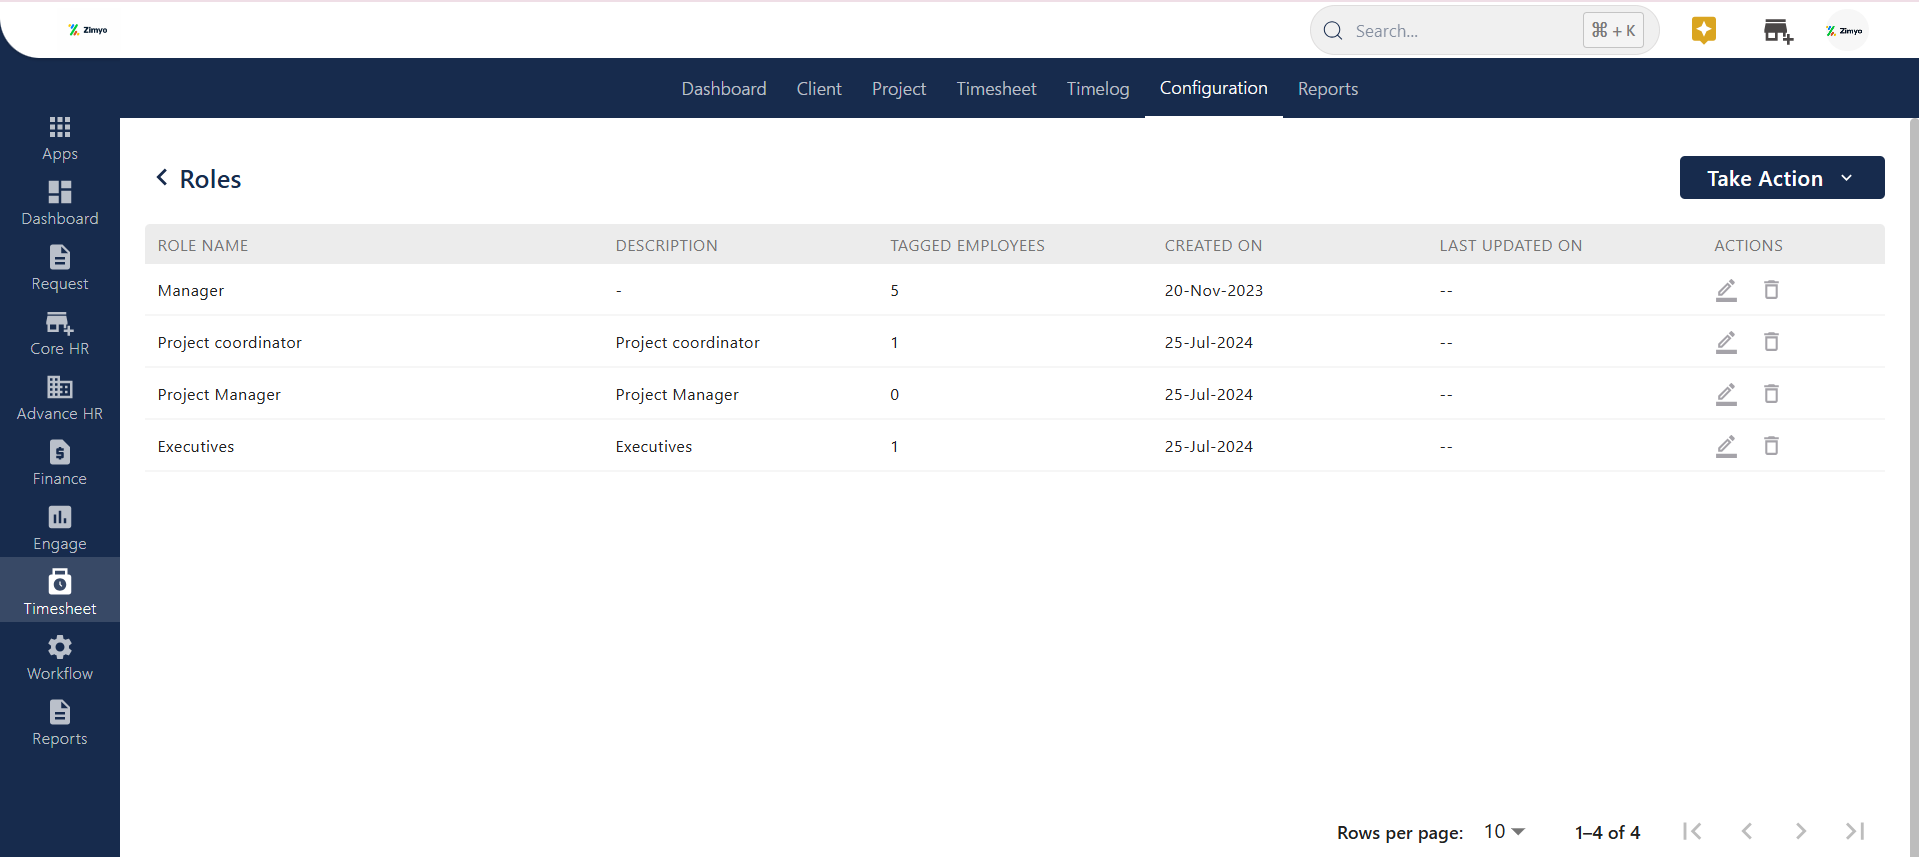
Roles: In the Role section, the admin have the capability to define and create multiple roles tailored to different aspects of project management within the Timesheet module.
Admins can configure “role” settings by clicking on the manage button.
By selecting “Take Actions” admin can manually add a new role.
Rate card: A structured document that outlines the monetary value assigned to each specific role within an organization with the measurable unit. It establishes standardized billing rates for the services provided by employees working on various projects or tasks.
Note: we can delete certain roles but for most created roles, which are tagged with any rate card, that role cannot be deleted.
Go to “Timesheet” Now click on “Configuration” Select “Rate Card” and Click on “Manage”

Add Rate Card
Selecting “Add Rate Card” enables the admin to create a new rate card. The admin must fill in the rate card name, provide the necessary details, and associate the currency with the rate card.
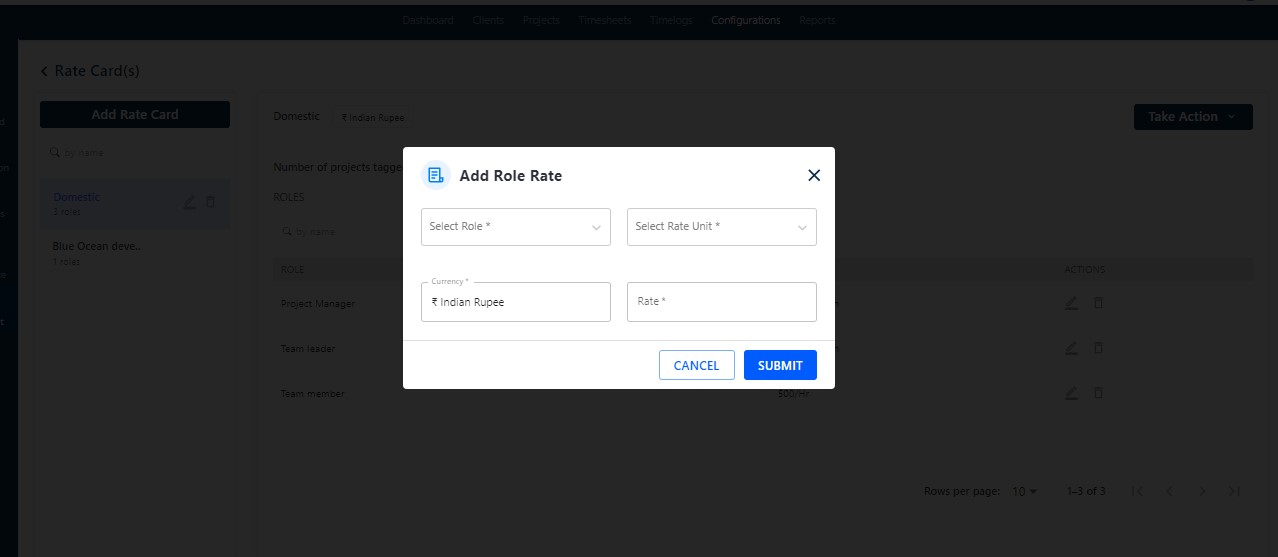
Take Actions
By clicking the “Take Action” button, the admin can manually add role rates.
To manually add a role rate, the admin must choose the role rate from the dropdown menu, select the rate unit (hourly, weekly, or monthly), associate the currency, and specify the rate.
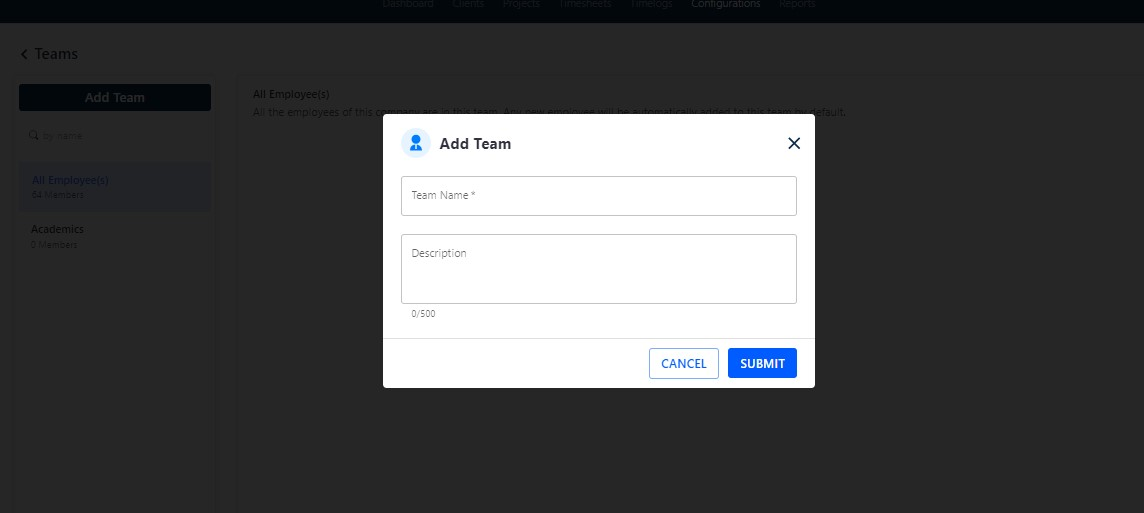
Teams
Admins create teams, add members, and assign roles. Each role has a billing rate defined. Team members log billable hours, and the system calculates payments based on their roles and billing rates. This system streamlines compensation and billing processes with transparency and accuracy.
Go to “Timesheet” Now click on “Configuration” Select “Team” and fill in all the necessary fields
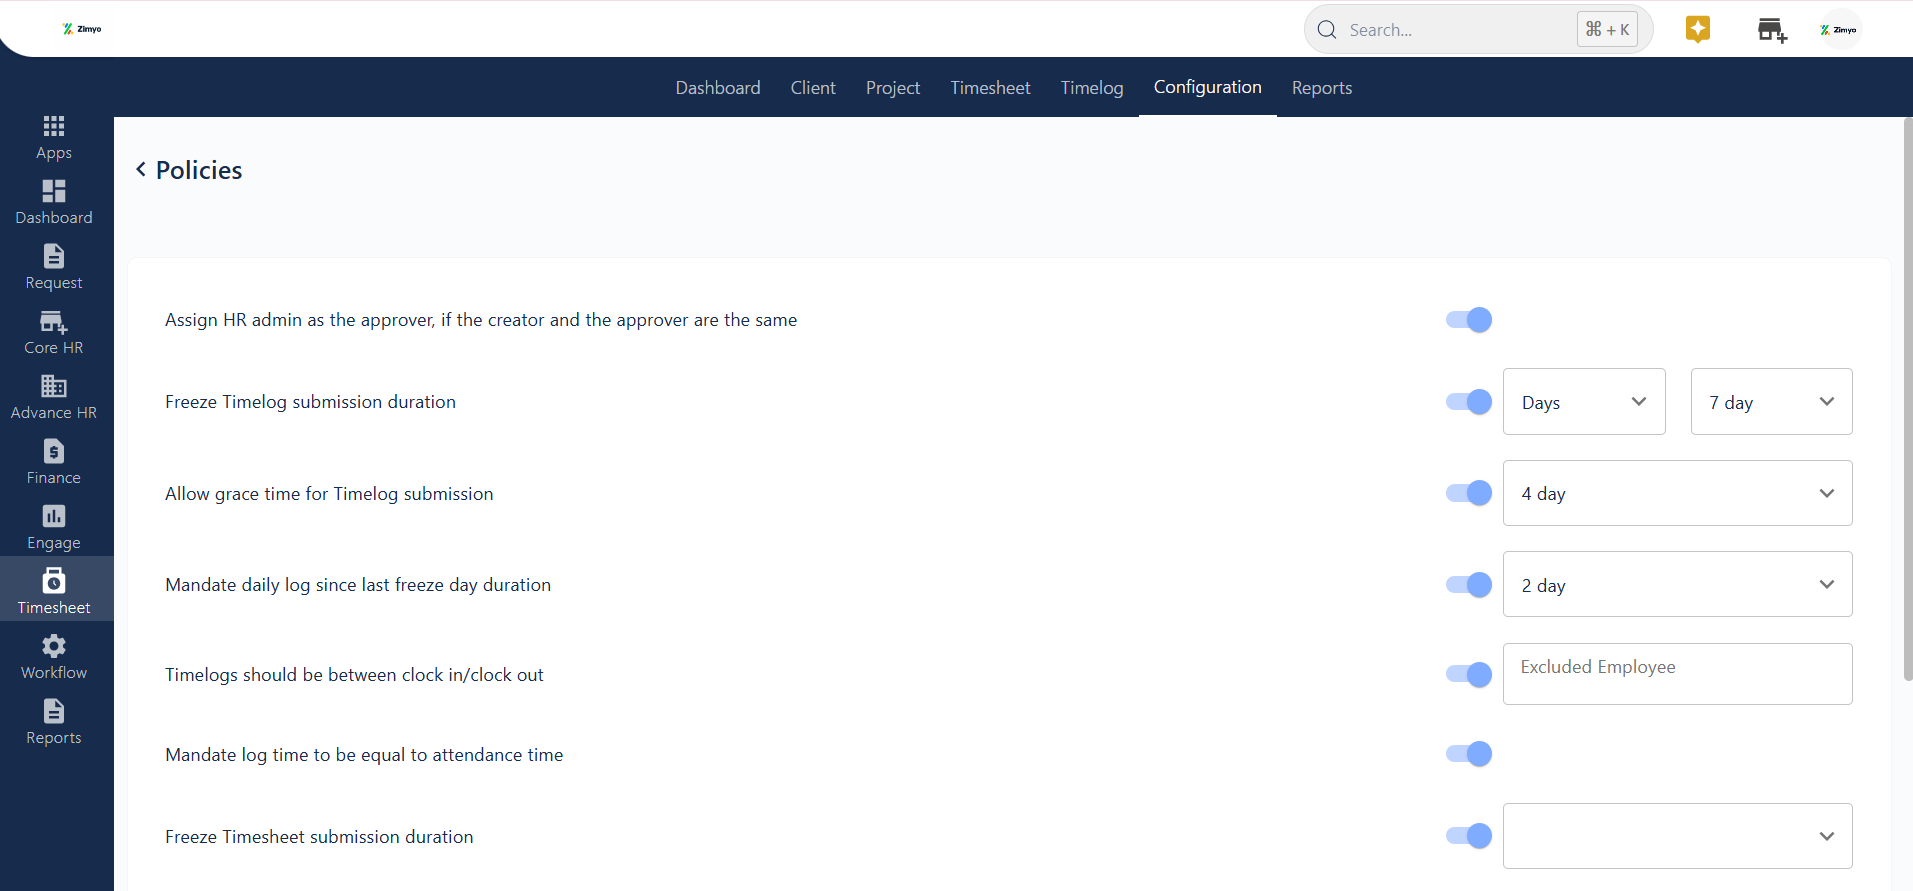
Timesheet Policy
The timesheet policy empowers the admin to establish and customize reminders and permissions pertaining to timesheet management.
Selecting “Manage” enables the admin to configure the policies, as depicted on the screen below.
Task Status
Task status refers to the different stages or states that a task can go through during its lifecycle within a Project. Task status provides an organized way to track and communicate the progress of tasks, allowing team members, managers, and stakeholders to understand the current state of each task and the overall project. Each task status typically represents a specific stage of completion or a certain condition that the task is in.
Admin can set from available task status that will reflect on the ESS view of Tasks in Kanban view.
A toggle view is provided which can hide/show the various status.
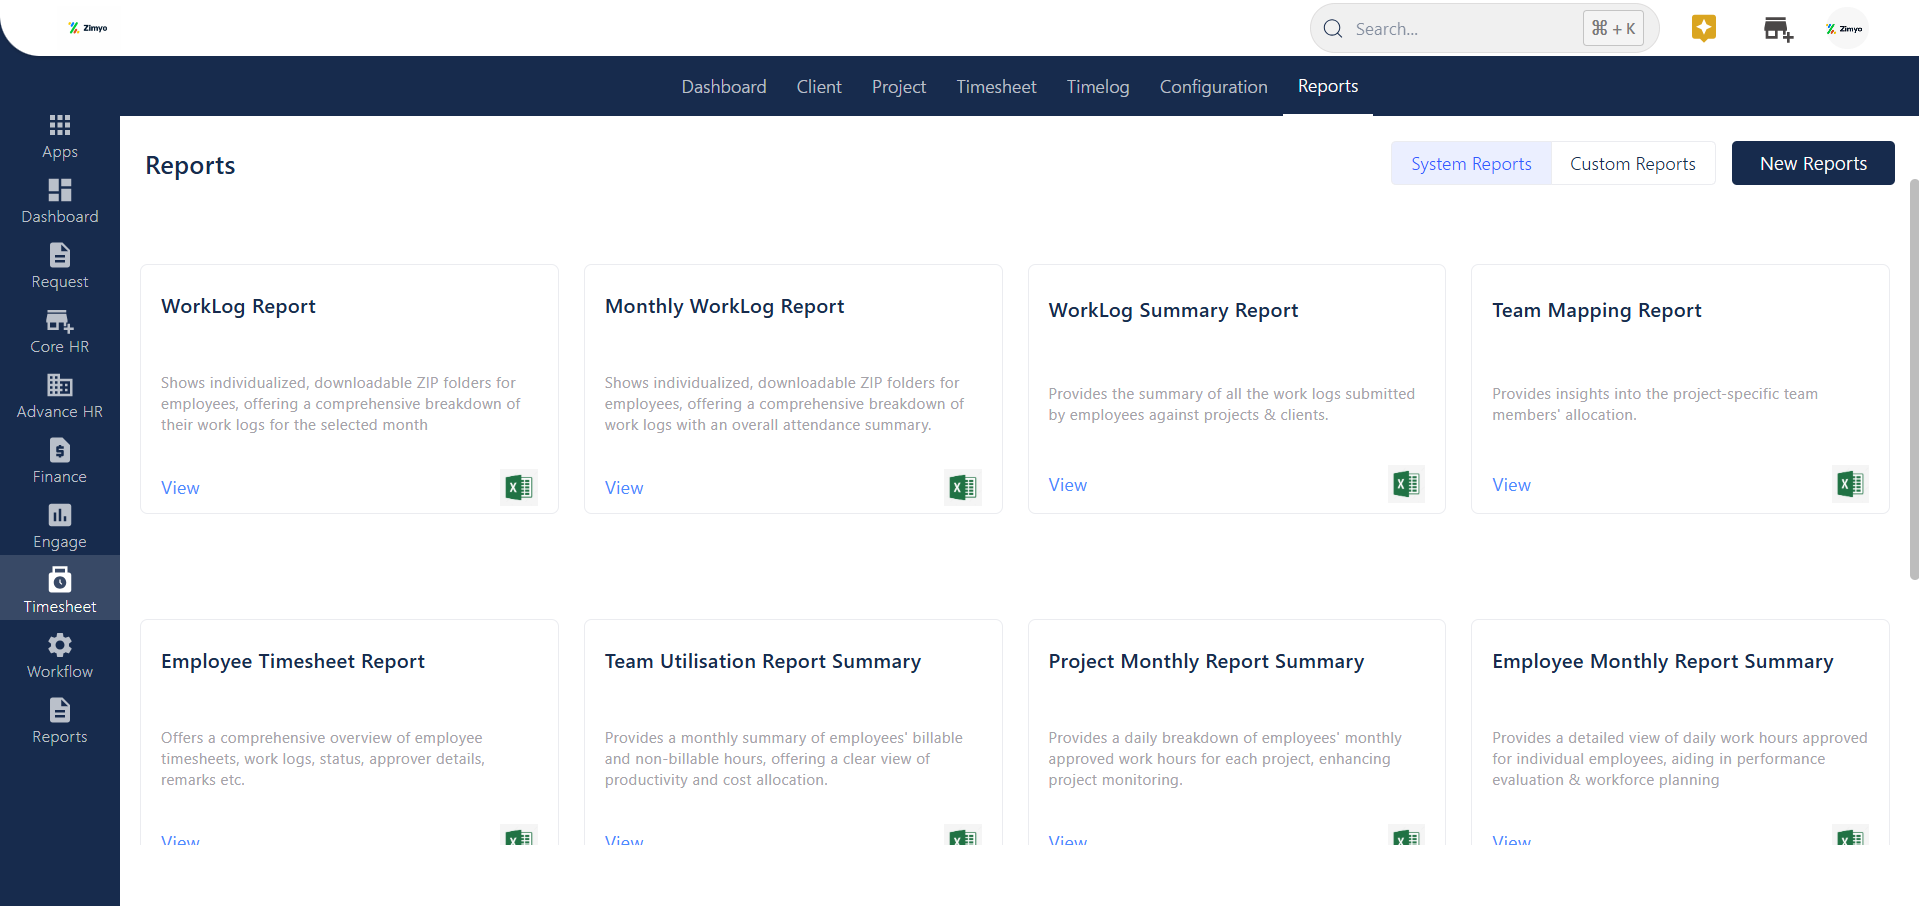
Timesheet Reports
admin have the capability to both view and download diverse reports. These include Employee Timesheet Reports, Work Log Reports, and Work Log Summary Reports, among others. Moreover, administrators have the flexibility to customize reports according to their specific preferences and requirements. This feature empowers them to tailor the reporting process to extract the most relevant insights for efficient project management and resource allocation.
Create New Report
Go to “Timesheet” Now click on “Reports” Select “New report” and fill in all the necessary fields
In the report section, the admin has two options: system reports and custom reports.
In system reports, the admin can view and download reports generated by the system.
Custom reports enable the admin to tailor the reports to meet the specific needs of the organization.
Timesheet for client
The timesheet screen comprises numerous details, providing the admin with a comprehensive overview of:
Employee Details: Includes information such as the employee’s name, department, and entity.
Timesheet ID and Name: Unique identifiers for the timesheet and a descriptive name for easy reference.
Client and Project: Displays the client’s name associated with the timesheet and the specific project linked to the recorded hours.
Logged Hours: Reflects the actual hours dedicated by the employee to a particular task or project, encompassing both billable and non-billable hours.
Approved Hours: Signifies the hours that have undergone review and approval by a manager or supervisor, ensuring precision.
Billable and Non-Billable Hours: Distinguishes between hours that can be invoiced to clients (billable) and those absorbed by the company (non-billable).
Status: Indicates the present state of the timesheet, whether it’s received, under review, or completed.
Timesheet Details
Step 1: Click on the name field of the timesheet you want to view.
Step 2: Access all relevant information on the displayed page.
Step 3: Approve or reject the timesheet directly from this page.
How can you bulk approve/reject time sheets?
Bulk actions streamline the process, saving time and effort for both managers and administrators. Rather than individually reviewing and approving or rejecting each timesheet, managers can process multiple timesheets simultaneously. This is especially beneficial for organizations with a large workforce or a high volume of timesheets.
Step 1: Choose the timesheet you want to approve/reject by clicking the checkbox in the first row.
Step 2: Navigate to the top left corner and click on ‘Action.’
Step 3: Opt for the bulk approve/reject option.
Time log in Timesheet
Time logs serve as comprehensive records or entries that employees generate to document the tasks they’ve worked on, detailing the time allocated to each task, and often including additional information pertinent to the performed work.