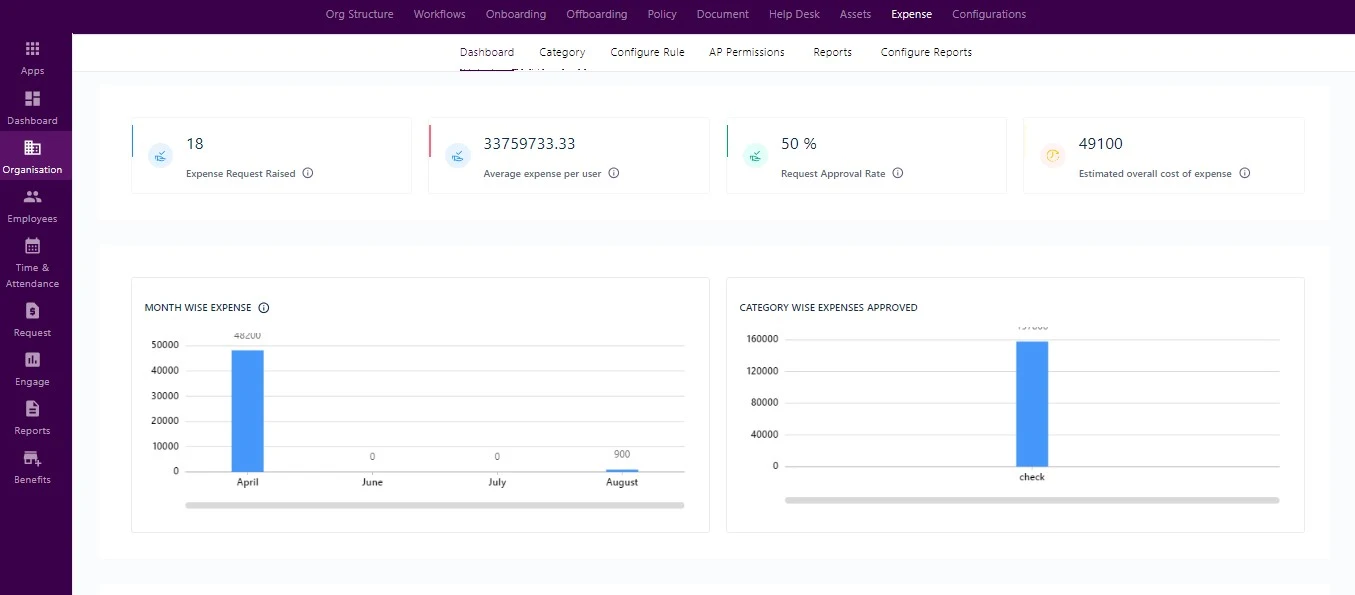
Dashboard
In the Expense Dashboard, administrators have a holistic view of raised expense requests. Key metrics encompass the average expense per user, request approval rate, estimated overall cost, monthly expenses, approved category expenses, and the total raised expense amount for the current month.
Category
In the Expense Module, a category serves as a distinct classification for expenses, facilitating the grouping and labeling of expenses based on their nature or purpose.

Each category generally encompasses the following elements:
Category Name: Designating a unique title to identify the expense category, such as “Meals” or “Office Supplies.”
Icon: Associating visual icons with categories aids swift recognition, aiding users in selecting the appropriate category during expense submissions.
Mapped Rules: Linking categories to specific system rules, dictating the processing of expenses, encompassing approval workflows, spending limits, and other criteria.
Type: Categorizing expenses as “Auto” or “Flat,” with auto-calculation for vehicle-related expenses and flat-calculation for other expense types.
Last Modified: Displaying the date and time of the latest category modification within the system.
Modified By: Identifying the individual responsible for the recent category changes, ensuring transparency.
Actions: Granting users with suitable permissions the ability to edit or delete expense categories.
Create a category
Establishing expense categories is a pivotal and obligatory step within the expense module, ensuring its seamless functionality. The significance of creating categories lies in several key aspects:
Organizing and Classifying Expenses: Categories facilitate the organization and classification of diverse expense types, distinguishing between travel expenses and general expenses. This classification simplifies the tracking and management of expenses, particularly in scenarios with a broad spectrum of expense types.
Policy Adherence: Linking policies to expense categories informs employees about specific guidelines and rules pertaining to each category. This linkage fosters compliance with company policies, ensuring expenses align with organizational culture and regulations.
Visual Representation: Categories are visually represented by icons, aiding quick identification and selection during expense submissions. Icons enhance the user interface, contributing to a more user-friendly experience in the expense submission process.
Customization for Company Needs: Categories offer flexibility in tailoring the expense submission process to meet specific company requirements. Custom fields can be configured, validation types set, and maximum lengths defined for these fields. This customization ensures capturing necessary information for each expense category.
Expense Limits and Documentation Requirements: Limits on spending within each category can be established to prevent excessive spending and support budget management. Categories can specify whether attaching receipts or supporting documents is mandatory or optional, ensuring transparency and accountability in expense reporting.
Reporting and Analysis: Categorized expenses facilitate easy reporting and analysis. Managers and administrators can review expenses by category, streamlining the tracking of spending patterns and enabling informed decision-making.
Create an Expense category
Navigate to the “Category” Screen in the Expense Module: Access the “Category” screen within the Expense Module.
- Initiate the Category Creation Process: Locate and click on the “Create New” button to begin creating a new category.
- Complete the “Create Category” Form: In the “Create Category” form, furnish the following essential details
Category Name: Input a concise and descriptive title for the category.
Calculation Type: Choose from the dropdown menu between “Flat Calculation” (default) or “Auto Calculation”.
- Specify applicable charges, such as INR/km or INR/hour, and select the relevant vehicle type.
- Add a rate if applicable.
Note: Auto Expense Type is intended for employee commuting expenses, calculating transportation costs either on an hourly basis or per kilometer.Flat Expenses should be selected for all other non-travel-related expenses.
Icon Selection: Choose a suitable icon to visually represent the category.
Description: Optionally, provide comments or additional information related to the category.
Attach a Policy:
Upload the company’s expense policy document to associate it with this category. This attachment ensures that employees are informed about specific guidelines and rules related to the expense category.
(For instance, “A policy attachment feature allows administrators to upload company policies at the category level, providing guidance for employees making expense decisions.)
Customize Employee Form Fields:
Tailor the form fields visible to employees during expense submission:
- The attachment field for adding receipts is active by default, and administrators can opt to deactivate it.
- Define field names and choose suitable field types (e.g., Attachment, Input, Text Area etc.)
- Input custom values for checkboxes, dropdowns, and radio buttons.
- Specify details like max-length for character input, allowing a limited response within the designated character count.
- Utilize Input-Numeric for entering additional amounts with a restricted numeric limit, ensuring compliance with specified values.
- Include Text Area for longer sentence inputs, Calendar for date selections, Checkbox for multiple-choice options, and Radio for single-choice selections
- Define validation types and set maximum lengths where applicable.
- Set field status (active or inactive) and make fields mandatory as needed.
- Arrange the custom fields in the desired sequence/order
Category Creation: Click the “Submit” button to finalize and create the category.
Confirmation: The newly created category is now added to the main page of the “Category” screen within the Expense Module.
Edit or Delete Options (if needed): You can take action to edit or delete the created category using the provided options in the interface.

Calculating vehicle related costs
Select calculation type as “Auto calculation” will allow admin to choose the charge type reflecting on the screen.
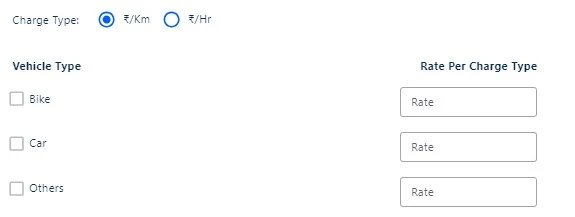
Employees can select multiple vehicle types using checkboxes, facilitating the assignment of rates per charge type for various commute options simultaneously. Subsequently, employees can choose from the available vehicle types when submitting respective expenses.
Configure vehicle-related expenses
When creating a category for vehicle-related expenses, choose “Auto Calculation” from the dropdown menu. This selection prompts the display of fields for specifying applicable charges, either in INR/km or INR/hour, empowering employees to fill in these details.
Within the auto calculation option, administrators can set charges for travel, choosing between INR/km or INR/hour. Employees, on their end, will see these charges when submitting expenses.
The selection of vehicle types is facilitated through checkboxes, allowing admins to make specific travel vehicles applicable under the chosen category.
Note: Additionally, administrators can input a rate, if applicable, to determine the total amount when employees raise expenses.
Modify created category
To modify a created category in the Expense Module, follow these steps:
Access the “Category” Screen: Navigate to the “Category” screen within the Expense Module in your HRMS system, typically located in the administrative panel.
Locate the Category: Identify and select the specific expense category you want to edit based on its name or icon.
Start Editing: Look for an “Edit” option associated with the chosen category, often represented by a pencil icon.
Modify Category Details:
- Edit Category Name.
- Change Category Type if necessary.
- Update the icon representing the category.
- Edit or add comments in the description.
- Replace or update the policy attachment.
- Adjust custom fields, validation types, lengths, statuses, or mandatory settings.
- Modify the sequence of custom fields if needed.
Save Changes: After making modifications, save the changes by clicking a “Submit” button in the category editing interface.
Confirmation: The category is now updated, reflecting the changes applied. These modifications will impact any associated expense submissions.
Why selecting an icon is important?
Choosing an icon during category creation holds significance as it serves as a visual label representing the purpose of the expense. The selected icon acts as a value proposition, enhancing the visual representation of expenses raised. It contributes to a tile on the dashboard, displaying expenses associated with the chosen icons.
How to make uploading a receipt mandatory for employee ?
During category creation, ensure to set the default field type as Attachment and mark it as mandatory. This selection, set as default, ensures that employees are required to attach a receipt when submitting an expense request.
Why should the policy be attached while creating Category ?
Including a policy attachment for each expense category is crucial, offering explicit guidelines to employees for consistent and compliant expense management. Transparent policies empower informed decision-making, fostering accountability and minimizing the reliance on frequent approvals.
Configure Rule
Rule refers to a predefined set of criteria, conditions, and guidelines that dictate how expenses are handled, processed, and approved within an organization. Also manages employees and categorize them on the basis of rule limits. Expense rules are created and configured to ensure consistency, compliance with company policies, and efficient management of financial resources.
Organization → Expense → Configure Rule
Establishing rules within the Expense Module serves several crucial purposes in efficient expense management and ensures compliance with company policies. Here’s why creating expense rules is essential:
Consistent Policy Enforcement: Rules help enforce organizational expense policies consistently, ensuring submissions align with established guidelines.
Legal Compliance: Rules assist in adhering to legal and regulatory requirements, ensuring expenses comply with industry standards and laws.
Employee Categorization: Rule creation facilitates categorization based on employee criteria, streamlining expense management and maintaining hierarchy.
Spending Limits: Rules include spending limits to control expenses within predefined budgets, preventing excessive spending.
Error Reduction: Defining rules reduces the likelihood of errors in expense submissions by incorporating validation checks for accurate and complete data.
Expense Categorization: Rules enable the categorization of expenses based on criteria like type, department, or project, simplifying tracking and reporting.
Transparent Evaluation: Rules provide transparency into expense evaluation and approval criteria, reducing confusion and disputes among employees.
Rules and Category
Expense rules are intricately linked with expense categories, forming a structured framework for the systematic management and processing of expenses within your organization. This connection guarantees uniform and policy-aligned handling of each expense category, meeting the specific requirements and standards set by your organization.
Categorization: Each expense category is linked to specific rules that dictate how expenses within that category are handled. This categorization ensures that expenses are processed according to the type and nature of each category. For instance, an “Office Supplies” category may have associated rules for processing office-related expenses.
Rule Parameters: Rules connected to expense categories establish various parameters and criteria for expense processing. These parameters may include:
Restrictions: Rules offer options to restrict employees from submitting past expenses or during specific time durations.
Spending Limits: Rules can define spending limits for each category, determining the maximum allowable amount for an expense submission. For example, a rule may limit expenses in the “Meals and Entertainment” category to a specific daily, weekly, monthly, or yearly amount.
Assignment: Categories are assigned to rules based on their nature and purpose. For example:
The “auto-calculation” category is typically associated with a rule tailored for vehicle-related expenses, encompassing parameters like mileage rates, hotel accommodations, and meal allowances.
The “Office Supplies” category might be linked to a rule specifically addressing office-related expenses, outlining approval workflows and spending limits for items such as stationery and equipment.
Expense Submission: When an employee submits an expense report, they select the appropriate category for each expense item. The system then applies the corresponding rule based on the chosen category.
Processing and Approval: The expense management system utilizes the rules tied to the selected category to guide the expense through the relevant approval workflow, enforce spending limits, conduct validation checks, and ensure compliance with company policies.
Disbursement: Following approval and adherence to the category’s rule, disbursement is made to the employee in accordance with the specified guidelines.
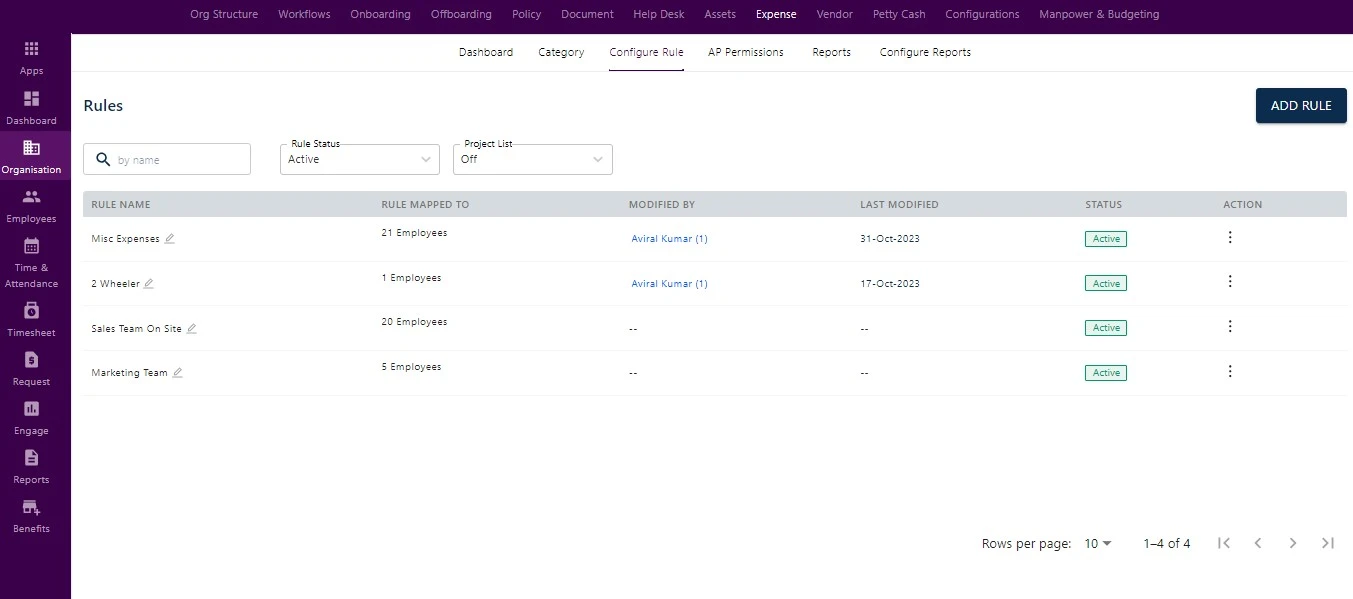
Adding new Rule
By following these steps admin can create new rule in Expense module:
1. Navigate to the “Configure Rule” screen in the expense module.
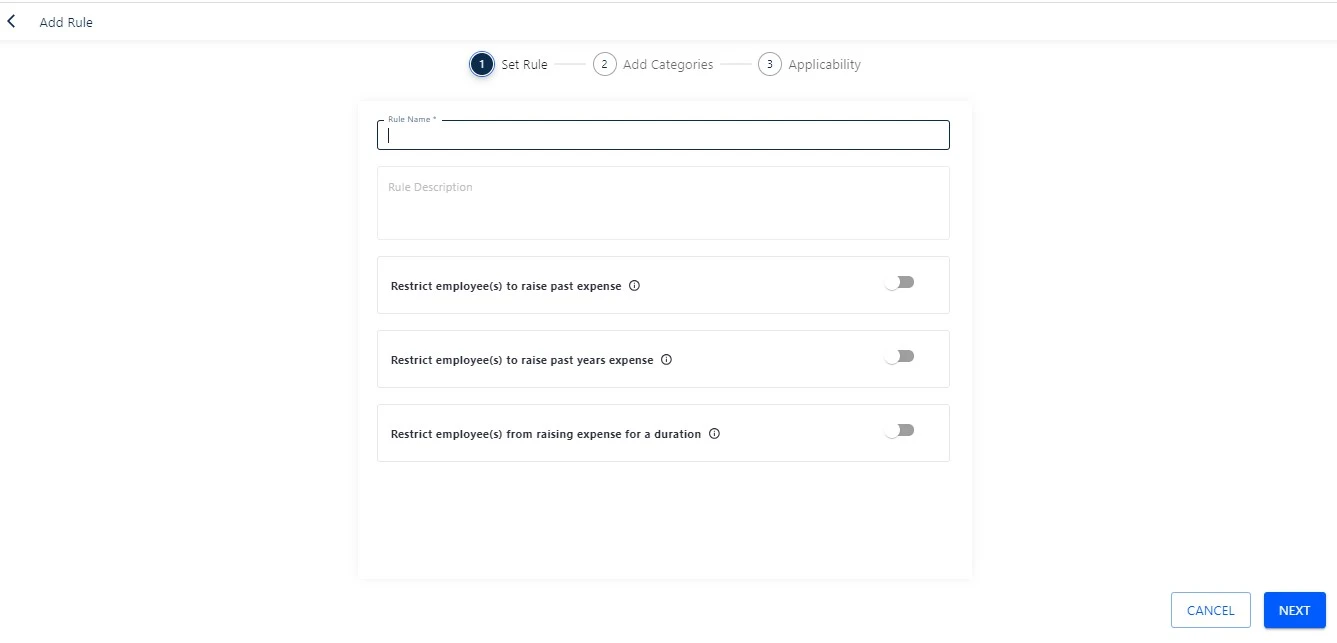
2. Fill in the following details by clicking “Add Rule” button shown on the upper right side of the screen.
Rule Name: Fill the new rule title.
Rule Description: Optionally add comments or short description related to the rule which admin need to create.
Restrict employees to raise past expenses: This control prevents employees from submitting expense claims for transactions that occurred more than a specified number of days ago. For instance, if set to 30 days, employees can only claim expenses for transactions within the last month.
Restrict employees to raise past years expenses: This restriction prohibits employees from submitting expenses for transactions from the previous calendar year. It ensures that only expenses incurred in the current year can be claimed, promoting timely and up-to-date reimbursement requests.
Restrict employee(s) from raising expenses for a duration: Administrators can define specific periods during which employees are restricted from submitting expense claims. For example, to align with monthly payroll processing, a restriction can be configured to halt expense submissions during that timeframe. This ensures a clean slate for financial reconciliation and payroll processes.
Add Category to the rule
Search expense category: Search with a name to find categories.
Category Selection Cards: Categories are displayed as cards, Click to add selected categories to the rule.
Amount Limit: Set the amount limit for the category.
Max Receipt: Specify the time period for employees to raise expense receipts, making the process easier.
1. After adding the different categories to be associated with the rule.
2. Click the “Next” button to proceed, The upper toggle will switch to “Applicability” and it will be highlighted.
Map the member with created expense rule
In Applicability section, the admin can map the members to the “Expense” rule by following the steps.
- Select the level on which the applicability will follow
- Provided a multi-select option to select multiple sub-levels
- After selecting the desired levels, click on submit and the rule will be saved and it can be viewed in the table present in the ‘Rules’ screen.
Adding employee mapped with other rules
To add an existing employee to a rule, follow these steps:
Navigate to the “Configure Rule” menu.
Locate and deactivate the current rule for the employee.
Click on “Add Rule” to initiate the process.
Create the new rule in three steps:
Set rule parameters.
Add relevant categories.
Define applicability settings.
Save the new rule, making it applicable to the specified employee.
AP Access
To facilitate the acknowledgment and processing of expense, vendor, and petty cash claims by the accounts team, navigate to Organization → Expense → AP Permission
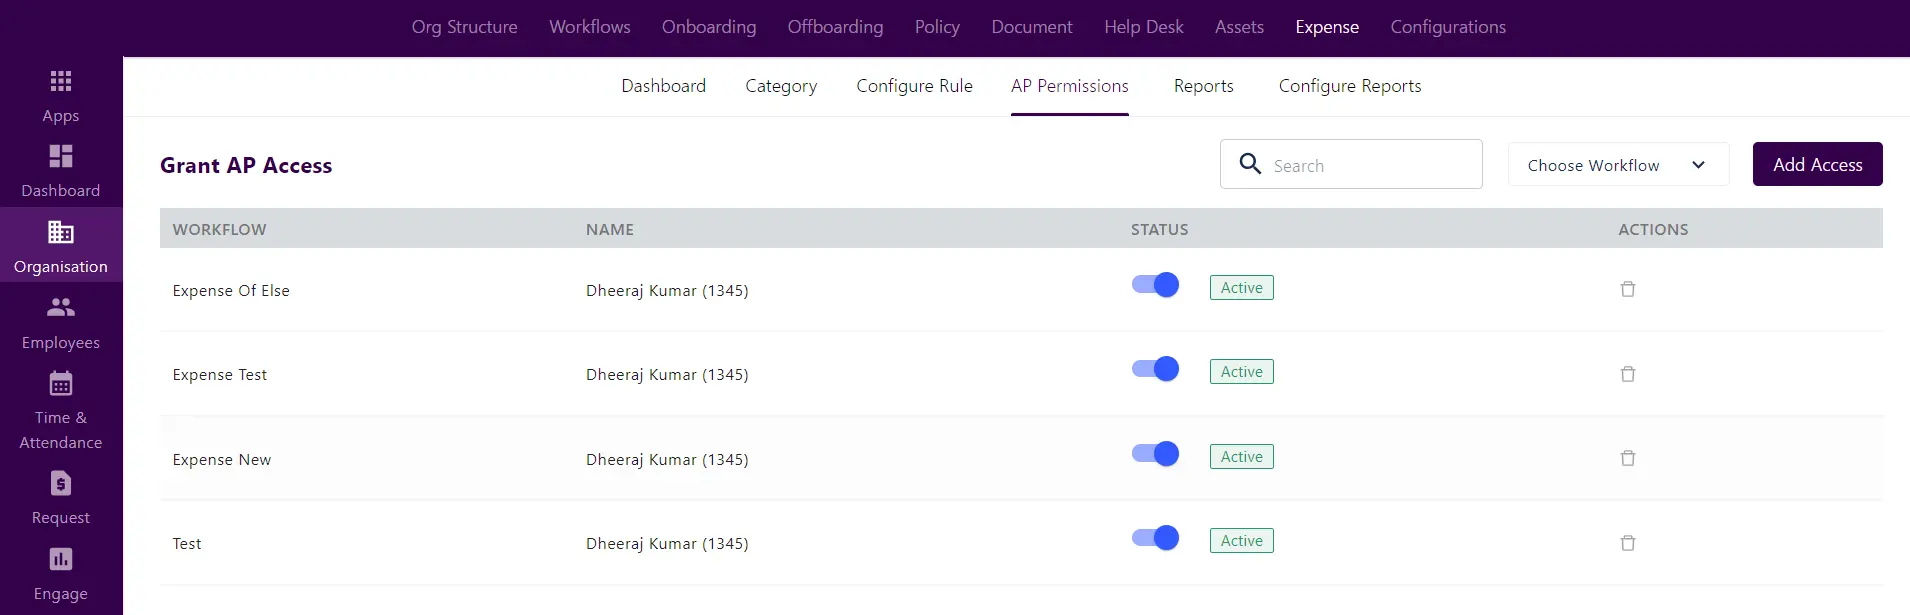
This is a mandatory step for organizations that adhere to the procedure of acknowledging and processing claims subsequent to receiving final approval from approvers.
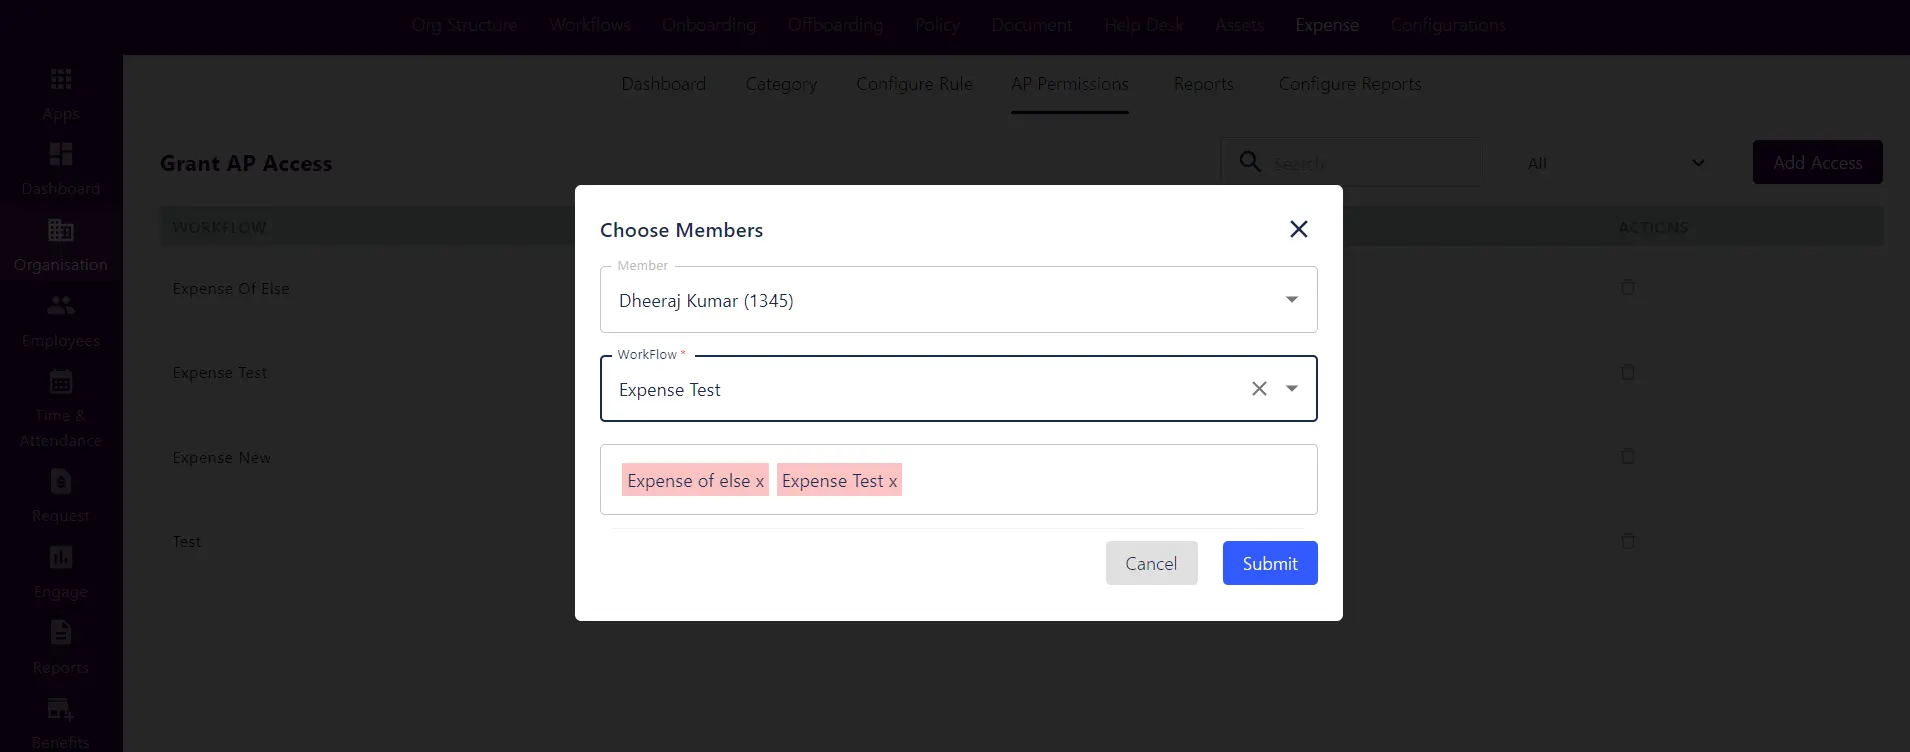
Click on Add Access button, then locate the designated accounts SPOC responsible for claim processing. Next, choose the workflow to ensure all related claims appear in the SPOC’s AP access.
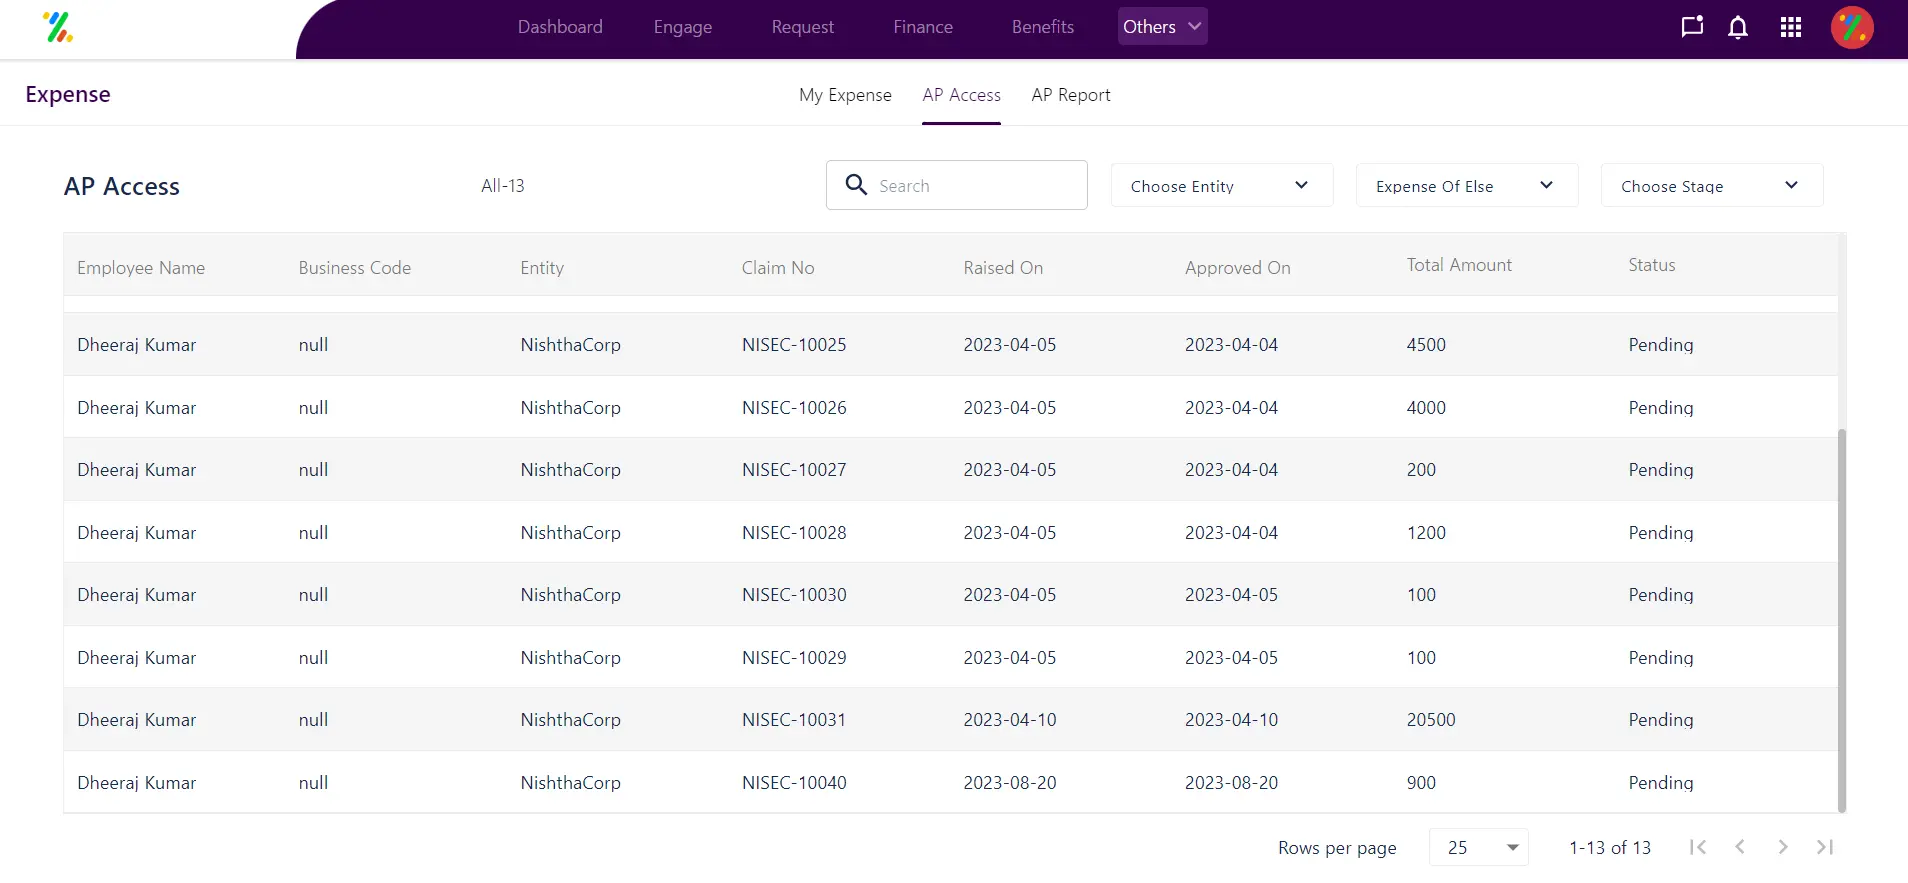
The designated SPOC can now access their Employee Self-Service (ESS) portal, locate the specific module, and view the reflected claims based on their status for necessary action.
Navigation : Others → AP Access
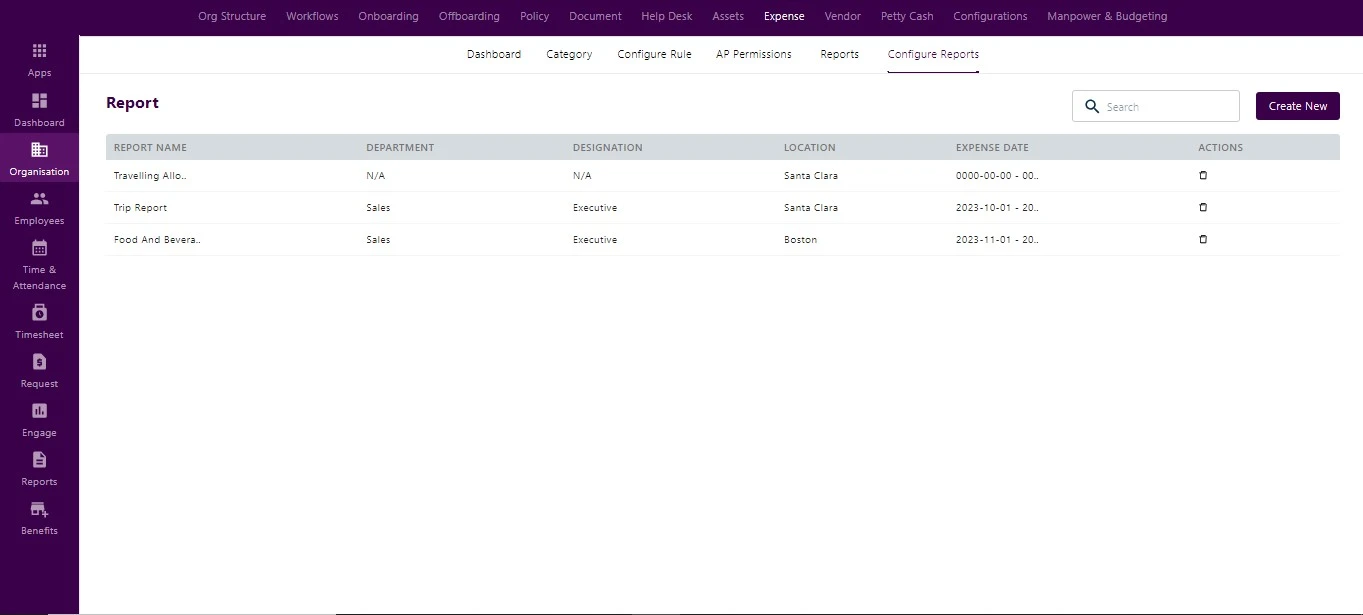
Configure Report
In the “Configure Report” section, the administrator has the capability to generate reports by selecting “Create New” Upon selecting this option, a popup screen will appear, prompting the administrator to input essential details. These details include the report name, entity, department, designation, data type, employee status, and report status.
Organization → Expense → Configure Report
Reports
Custom Report
Within the custom report section, administrators gain visibility into reports they have created in the “configure report” section. Here, administrators can access a comprehensive view of the reports and execute various actions, including downloading the reports.
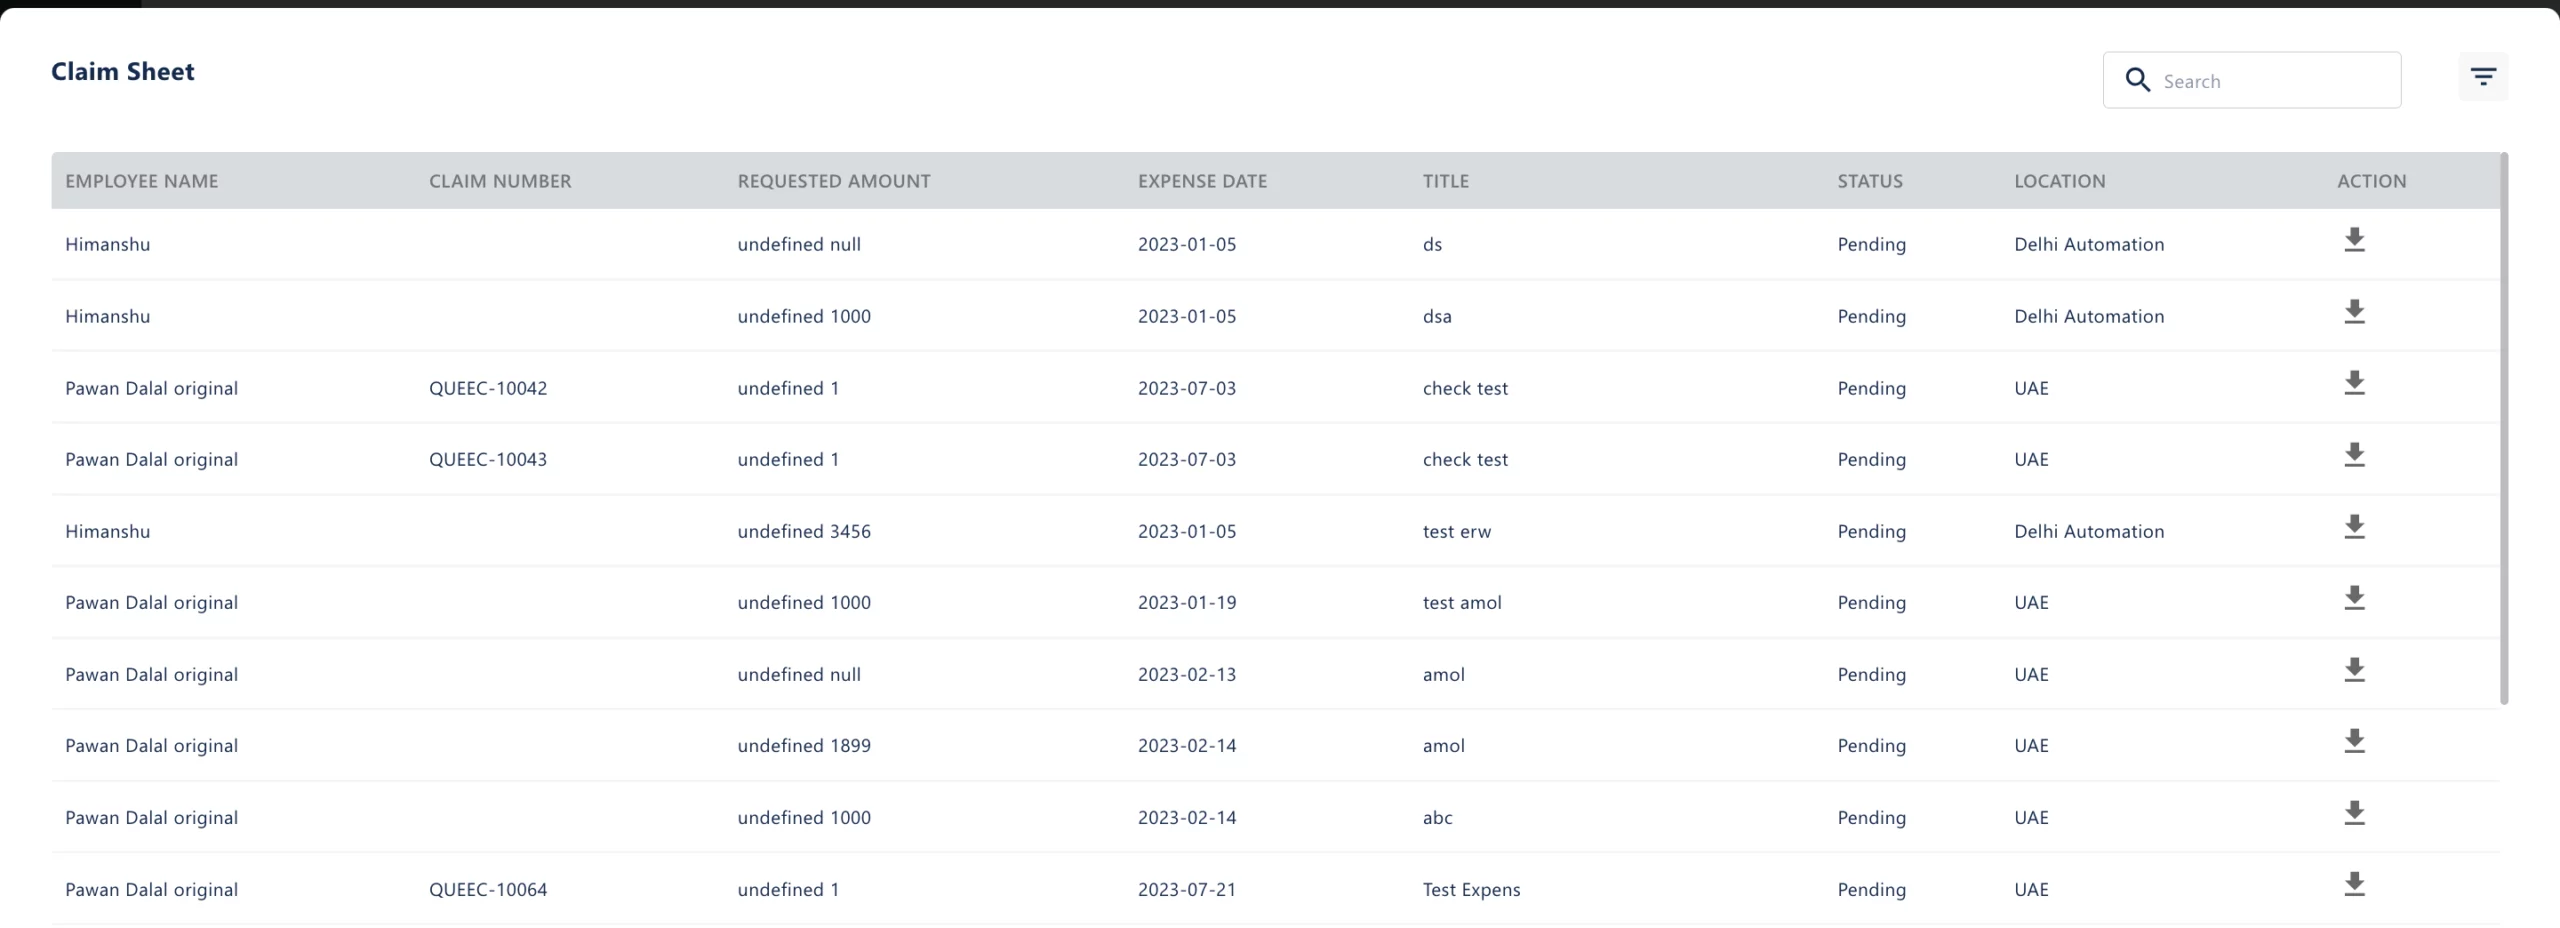
Claim Sheet
In the Expense Requests section, administrators can obtain a holistic overview of expense requests submitted by employees. The admin has the ability to track the claim number, and by clicking on the kebab menu located on the right side of the screen, they can download the claim sheet.
These claim sheets will be visible in the report section under the “Claim Sheet” category, this the repository where admin can download the overall claim sheets of employees.
Organization → Expense → Reports