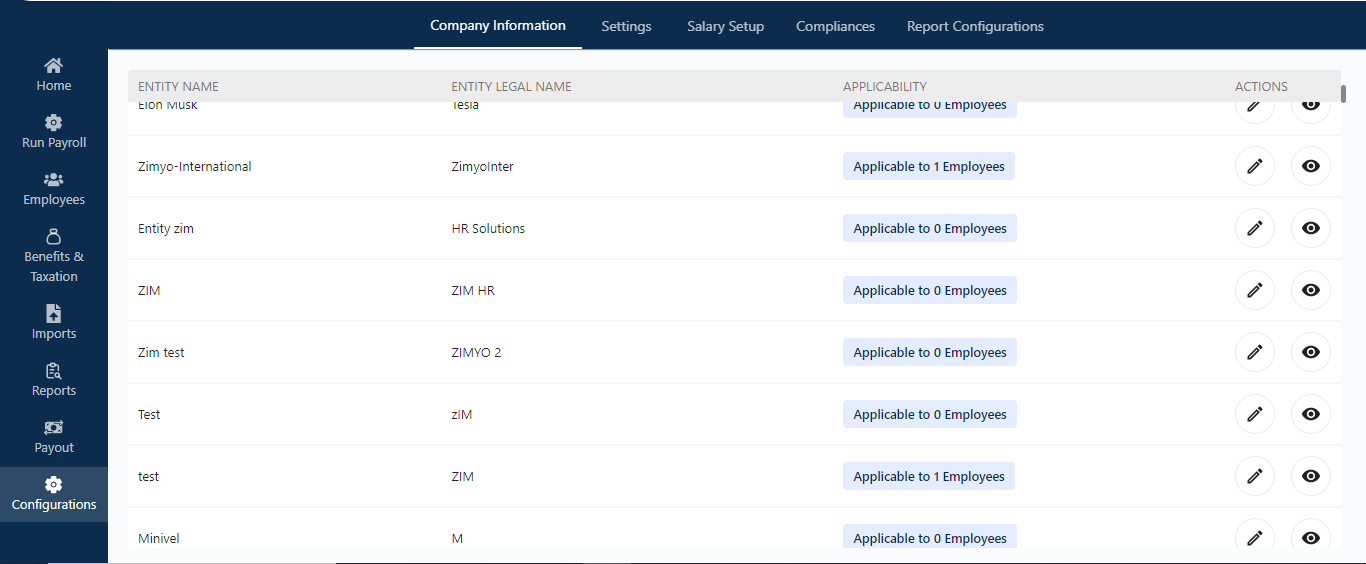
Company Information
This section displays a list of entities along with their applicability to employees within each entity. The admin can edit company information by clicking the pencil icon and view details by clicking the eye icon.
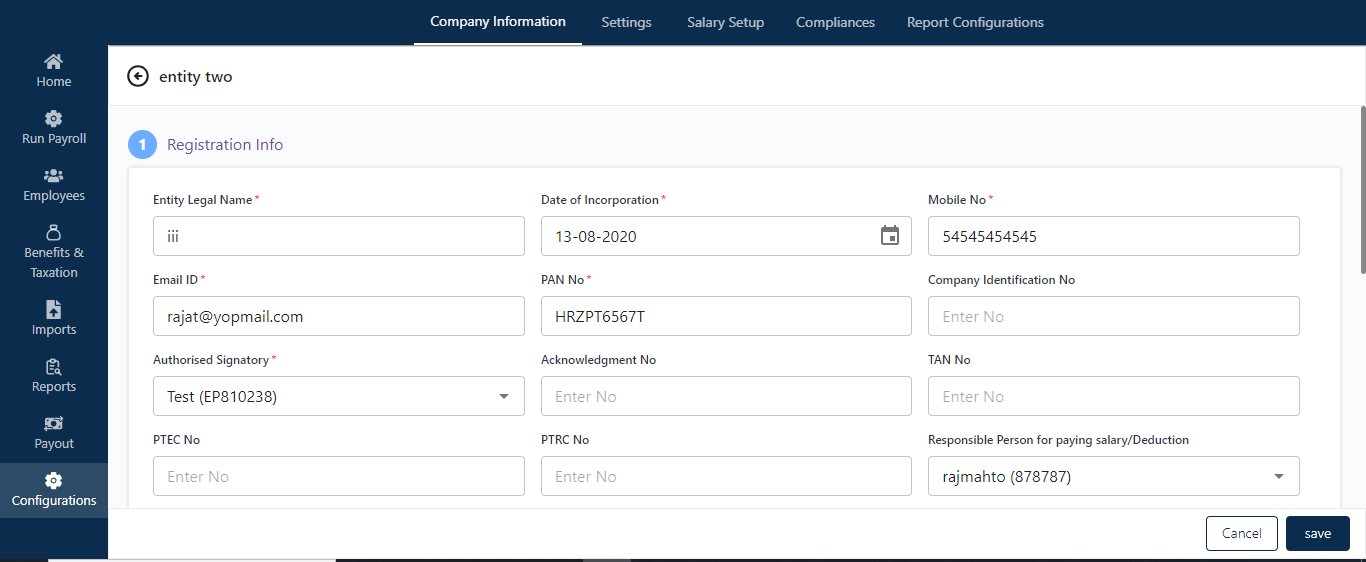
Edit Button
The Edit button allows the admin to modify registration details, bank information, address details, etc. After making the necessary changes, the admin can save them by clicking the “Save” button.
Settings
Entity
Clicking on “Entity” takes the admin to a screen where they can view complete details such as entity name, pay frequency, OT status, applicability, and the action button.
Clicking the action button allows the admin to manage three settings:
- Payroll Settings
- Advance Settings
- F&F Settings

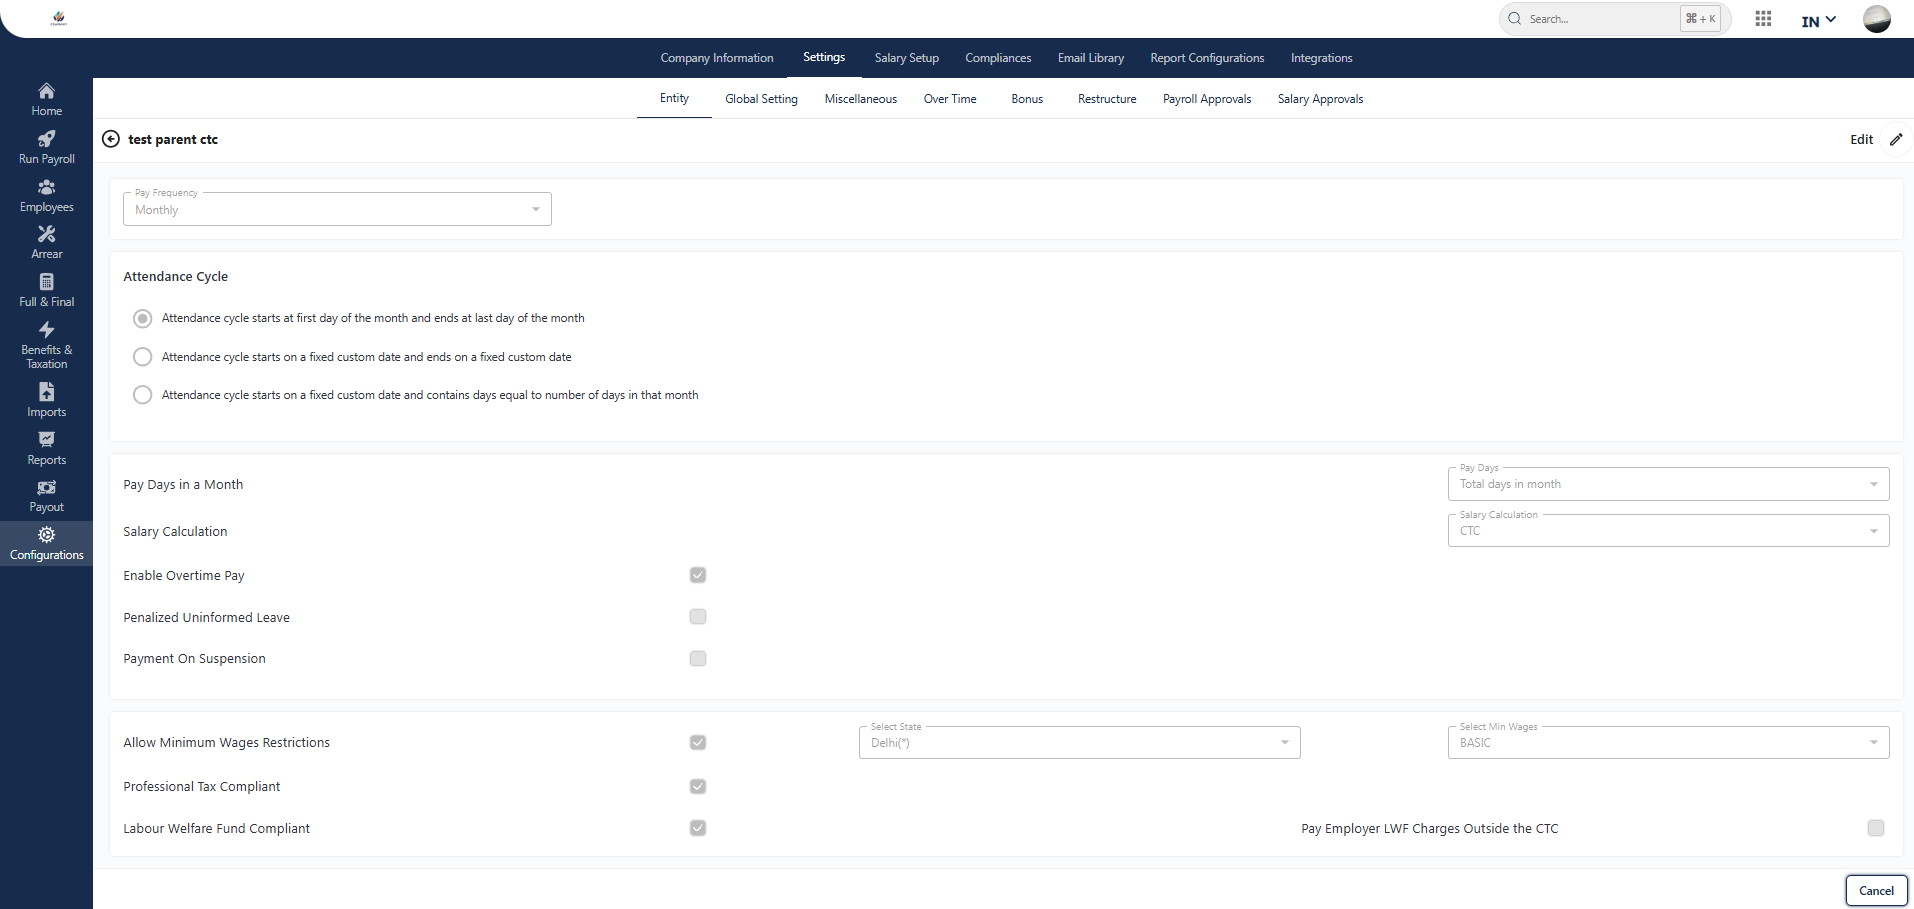
Payroll Settings
Clicking the edit button allows the admin to make various changes. The admin can set the pay frequency, manage the attendance cycle (customizable from the 1st to the end of the month or any custom range), set pay days in a month, and manage salary calculations (based on CTC or gross). Additionally, the admin can enable overtime, penalize uniform leave, and enable LWF for that particular entity.
Understanding Attendance Cycle in Zimyo
The attendance cycle in Zimyo defines the start and end period for tracking employee attendance every month. This cycle determines how employee working days, leaves, and absences are calculated and reported.
Available Attendance Cycle Options
Zimyo offers flexible attendance cycle configurations to match your company’s internal policies:
1. Monthly Cycle (Standard)
Cycle: 1st of the month to the last day of the month
Use Case: Most common setup used by organizations that follow calendar-month payroll and attendance tracking.
2. Fixed Custom Date Cycle
Cycle: Starts and ends on specific dates you define (e.g., 21st of one month to 20th of the next)
Use Case: Ideal for companies that want to align attendance with a non-calendar payroll cycle or project timelines.
3. Custom Start Date with Month-Length Cycle
Cycle: Starts on a fixed date (e.g., 25th) and runs for the exact number of days in that calendar month.
Use Case: Useful when the organization prefers a rolling attendance period that always adjusts to the month’s total days.
How to Configure the Attendance Cycle
Path: Configuration > Settings > Select Entity > Click on the three dots under “Action” > Select Payroll Settings.
Select your preferred cycle type from the dropdown.
Set the start date if you choose a custom cycle.
Click Save to apply changes.
Note: Updating the attendance cycle may impact leave balances, salary calculation, and shift planning, so please consult with your HR/payroll team before making changes.
Pay Days in a Month—Settings & Configuration
The Pay Days in a Month feature in Zimyo allows HR or Payroll Admins to define how salary is calculated based on different working day configurations. These options help tailor payroll processing according to your organization’s attendance and holiday policies.
Pay Days Options
You can customize the salary calculation based on:
✅ 1. Working Days + Holidays
Explanation: Pay days will include total working days plus public holidays.
Use Case: Ideal for companies where holidays are considered payable days even if the employee doesn’t work.
✅ 2. Working Days + Week Off
Explanation: Paydays will include working days plus weekly offs (e.g., Saturdays & Sundays).
Use Case: Commonly used where employees are entitled to paid weekly offs.
✅ 3. Working Days Only
Explanation: Salary will be calculated only on actual working days, excluding holidays and week-offs.
Use Case: Suitable for contract staff or consulting setups where pay is strictly for days worked.
Other Configuration Options
Setting Description
- Enable Overtime Pay: Enables additional pay for approved extra working hours beyond shift timings.
- Penalized Uninformed Leave: Deducts salary for leave taken without approval or intimation.
- Payment on Suspension: Option to withhold or partially pay salary during suspension period.
How to Configure
Navigation Path:
Payroll > Configuration > Settings > Select Entity > Click on the three dots under “Action” > Select Payroll Settings.
Select your preferred Pay Days formula (e.g., Working Days + Holidays).
Enable/disable options like Overtime Pay, Penalized Leave, or Suspension Pay.
Save changes to apply to the current or upcoming payroll cycle.
Note:
Changing paydays affects all calculations, including LOP (Loss of Pay), FNF (Full & Final), and pro-rata salaries. Ensure settings are aligned with company policy before updating.
Payroll Compliance Settings – Minimum Wages, PT, and LWF
Zimyo ensures that your payroll is legally compliant with Indian labor laws and statutory requirements. The following settings help enforce compliance directly within your payroll processing system.
✅ Allow Minimum Wages Restrictions
Description:
When enabled, this ensures that no employee’s wage is processed below the applicable state-wise Minimum Wages as mandated by law.
How It Works:
During payroll run or salary structure configuration, the system checks whether the net wage (Basic + DA + other applicable heads) meets or exceeds the defined minimum wage slab for the employee’s location and role.
If the wage is below the threshold, payroll processing is restricted or an alert is generated.
Use Case:
If your company operates across states (e.g., Maharashtra & Karnataka), this setting ensures compliance with each state’s updated minimum wage structure.
✅ Professional Tax (PT) Compliant
Description:
When this option is turned ON, Professional Tax is automatically calculated and deducted based on the applicable state slab for each employee.
How It Works:
The system identifies the state from the employee’s work location.
It applies the correct PT slab monthly (e.g., Maharashtra – ₹200, Karnataka – ₹250 etc.).
Auto-adjusts for employees below the PT threshold (e.g., ₹7,500).
Use Case:
Ensures timely PT deductions and simplifies monthly and annual PT filings with state authorities.
✅ Labour Welfare Fund (LWF) Compliant
Description:
This feature ensures Labour Welfare Fund contributions are auto-applied for eligible employees in states where LWF is mandatory.
How It Works:
Deduction is made from the employee and employer side as per the LWF cycle (monthly/half-yearly/yearly depending on the state).
The amount and frequency are auto-fetched based on the employee’s location.
Use Case:
In Tamil Nadu, LWF is ₹10 from the employee and ₹20 from the employer, deducted in December. This feature ensures this is auto-applied without manual errors.
How to Enable These Settings
Payroll > Configuration > Settings > Select Entity > Click on the three dots under “Action” > Select Payroll Settings.
Scroll to Compliance Section.
Toggle ON for:
Allow Minimum Wages Restriction
Professional Tax Compliant
Labour Welfare Fund Compliant
Click Save to apply.
Note:
These settings are crucial for companies operating in multiple states or scaling across India.
Zimyo regularly updates state-wise compliance rules, ensuring your business stays compliant.
Advance Settings
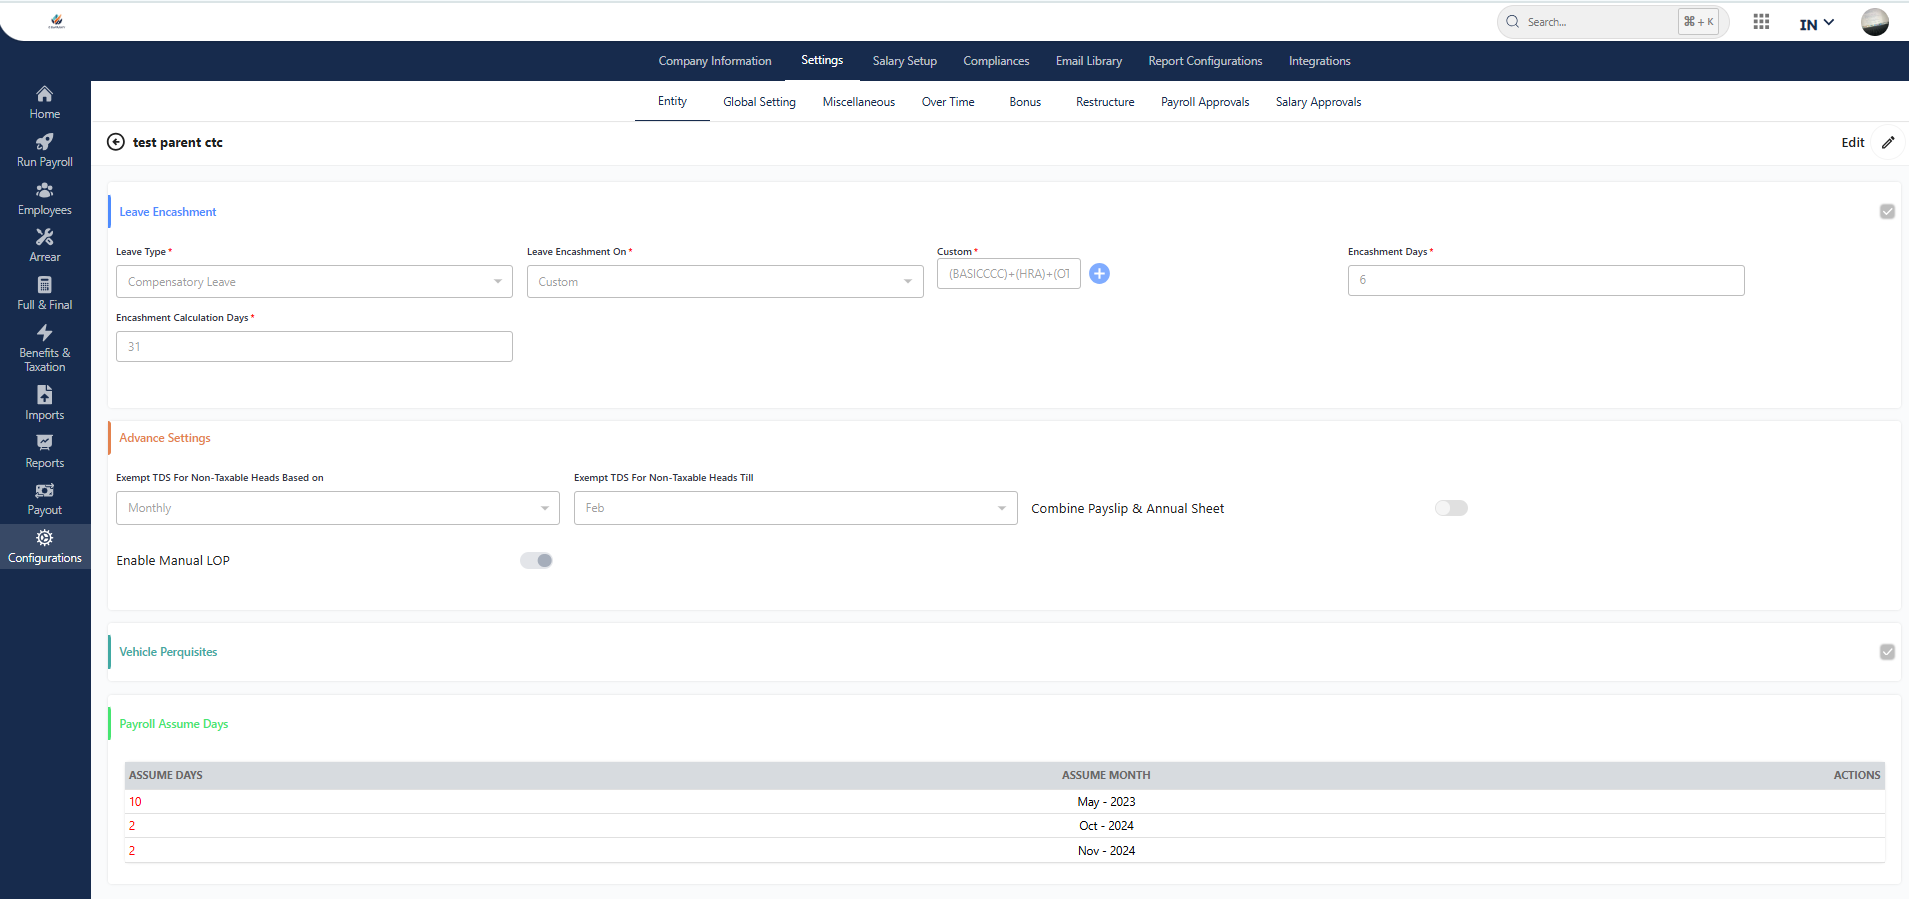
Clicking the Edit button at the top right corner of the screen allows the admin to make various changes under advanced settings. The admin can manually manage leave encashment for that particular entity by selecting the leave type, determining its applicability on CTC or gross, and setting encashment days.
Note: The admin can create multiple leave encashment rules by clicking the add button.
Furthermore, the admin can enable vehicle prerequisites and add payroll assumed days for that particular entity.
Clicking on “Payroll Assume Days” allows the admin to set payroll assume days, which cannot exceed 10 days for the selected month.
Advance Settings
In this section, the admin can manage TDS exemptions on non-taxable heads, either monthly or based on declarations, and set deadlines in terms of months. The admin can also enable options for a combined payslip and annual sheet, as well as manual LOP (Loss of Pay).
Payroll Advance Settings – Leave Encashment & Compliance Configurations
📍 Path:
Payroll > Configuration > Settings > Select Entity > Click on the three dots under “Action” > Advance Settings
This section enables HR/Admin to configure payroll behavior with custom rules for leave encashment, tax compliance, perquisites, and payslip structure.
🔁 Leave Encashment Configuration
1. Leave Type
Select the applicable leave types eligible for encashment. Common options include
- Earned Leave (EL)
- Casual Leave (CL)
- Medical Leave (ML)
- Privileged Leave (PL)
- Maternity/Paternity Leave
- Compensatory Off
- Probation/Compassionate Leave
- Marriage Leave
2. Leave Encashment On
Choose the base component on which encashment will be calculated:
- Basic Salary
- CTC
- Gross Salary
- Custom Value (as per defined policy)
3. Encashment Days
Specify the number of leave days that are eligible to be encashed.
👉 Example: If set to 10, only up to 10 days of unused leave can be encashed per cycle.
4. Encashment Calculation Days *
Define the basis for the daily rate used in encashment:
- Calendar Days
- Working Days
- Custom Days (e.g., 26)
📊 Advance Tax Compliance Settings
5. Exempt TDS for Non-Taxable Heads Based on:
Choose whether exemption is calculated based on:
- Monthly (per payslip cycle)
- Declaration (employee-declared amounts at the start of the year)
6. Exempt TDS for Non-Taxable Heads Till:
Set the last month till which TDS exemption is applied.
📅 Options include: January to December (select the applicable cutoff month for projections).
🧾 Payslip & Manual Adjustments Settings
7. Enable Combine Payslip & Annual Sheet
Toggle ON if you want to merge monthly payslips with annual income summary in a single downloadable document for employees.
📄 Useful during annual tax filing season.
8. Enable Manual LOP (Loss of Pay)
Allows HR/Admin to manually adjust LOP days in payroll, overriding system-calculated LOP for flexibility.
🚗 Perquisites & Calculation Preferences
9. Vehicle Perquisites
Enables calculation of car lease or company vehicle benefits as part of the employee’s taxable salary, as per IT guidelines.
10. Payroll Assume Days
Set the default number of assumed working days used for payroll calculation.
Example: 30, 31, 26 days depending on company policy or industry standards.
✅ Why Use Advanced Settings?
Enforces policy consistency across payroll components.
Supports customizable salary behavior aligned with tax regulations.
Offers flexibility for mid-year changes, exemptions, or unique company benefits.
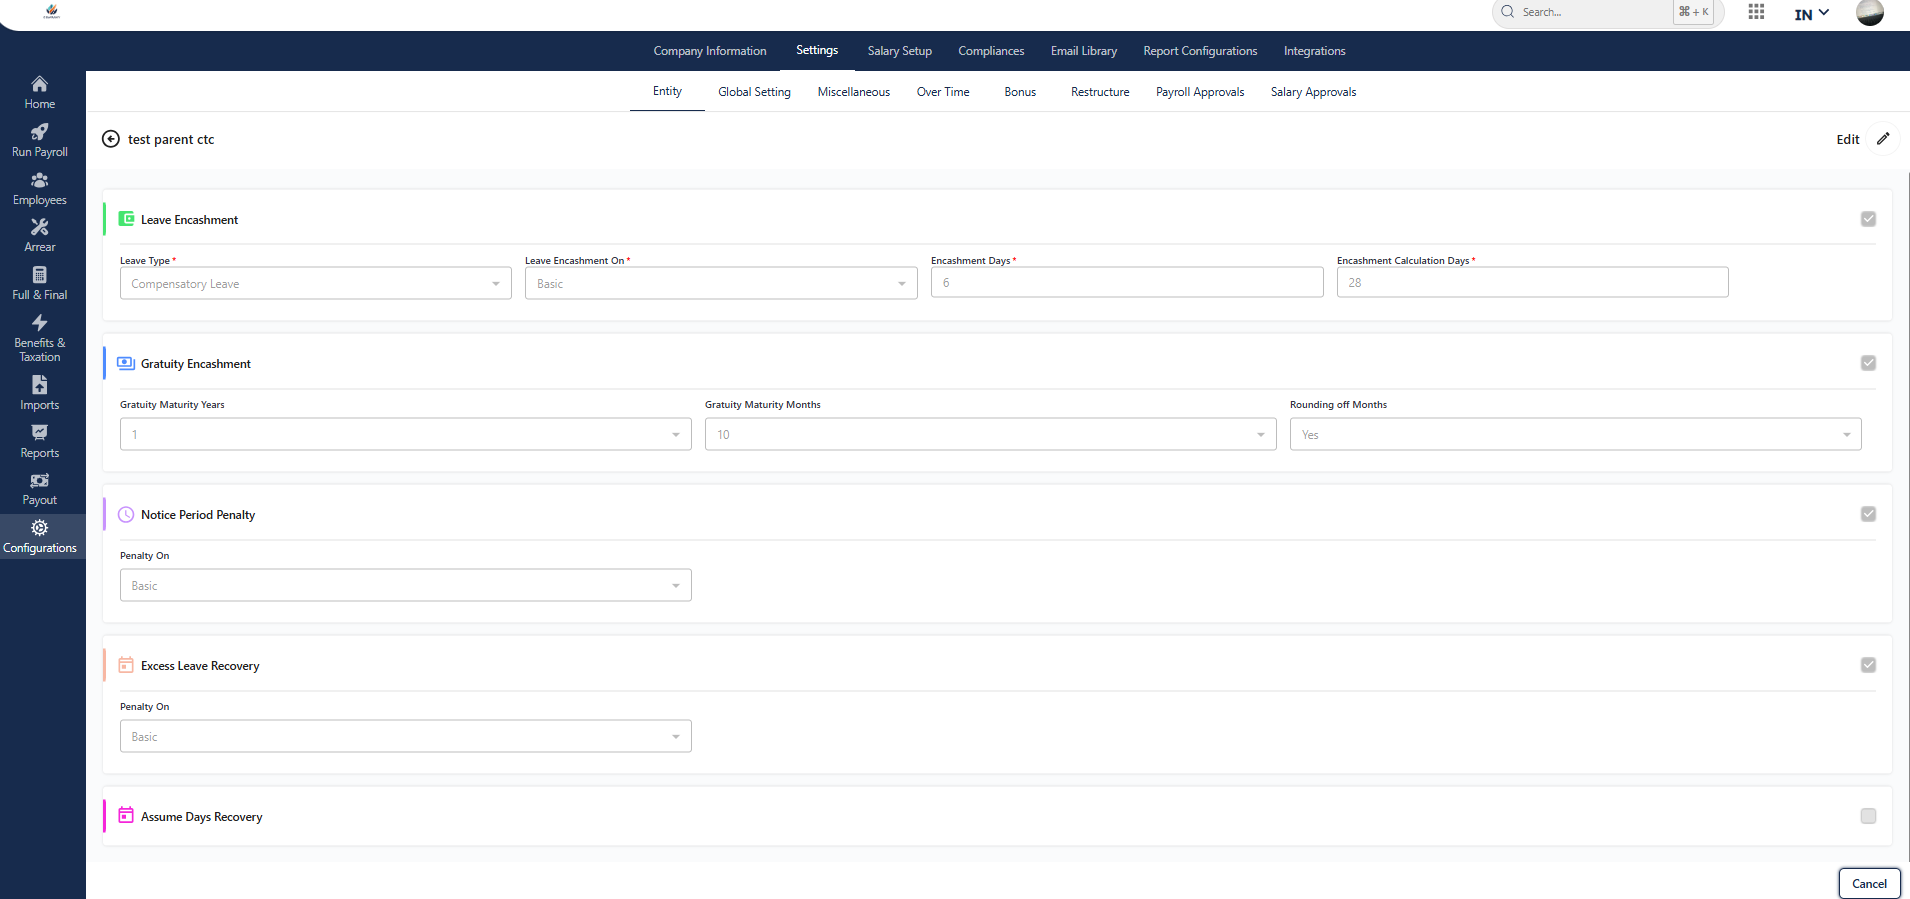
F&F Setttings
In F&F Settings, the admin can create multiple leave encashment rules for F&F by selecting leave types, their applicability, and encashment days. The admin can also enable various settings, including gratuity settlement, notice period penalty, excess leave recovery, and assumed day recovery.
Full & Final (F&F) Settings Configuration Guide
📍 Path: Payroll > Configuration > Settings > Select Entity > Click on the three dots under “Action” > F&F Settings
This section helps you configure Full & Final settlement rules, including leave encashment, gratuity, notice period penalties, and excess leave recovery — crucial for ensuring accurate and policy-aligned final payouts for departing employees.
Leave Encashment Settings
1. Leave Type
Select the leave category eligible for encashment during F&F.
📝 Example: Earned Leave (EL) is commonly encashable.
2. Leave Encashment On
Define which salary component the leave encashment is based on.
Options may include:
- Basic
- CTC
- Gross
- Custom (as per policy)
3. Encashment Days
Set the number of unused leave days to be considered for encashment.
Example: 10 days will be encashed in F&F.
4. Encashment Calculation Days
Specify the divisor used in per-day salary calculation.
Common values: 26, 30, or actual calendar days.
Gratuity Encashment Settings
5. Gratuity Maturity Years:
Set the minimum number of years an employee must complete to be eligible for gratuity.
Example: 5 years
6. Gratuity Maturity Months:
Add any additional required months over years for gratuity eligibility.
Example: 11 months
7. Rounding off Months:
Define if service months should be rounded off for gratuity eligibility calculation.
Example: 1 month rounding off means 4Y 11M rounds to 5 years.
Notice Period Penalty Settings
8. Penalty On:
Specify which salary component the notice period recovery is calculated on.
Options may include:
- Basic
- Gross
- CTC
- Custom
Example: If set to 1 (Basic), the penalty is based on the basic salary.
Excess Leave Recovery Settings
9. Assume Days for Recovery:
Choose the number of days to be used when calculating per-day recovery for excess leave taken.
Common assumptions: 26 or 30 days
Why This Matters:
Ensures compliance with labor laws (e.g., gratuity eligibility)
Promotes fairness and transparency in settlements
Reduces manual errors during exit processing
Saves time and improves payroll accuracy during F&F
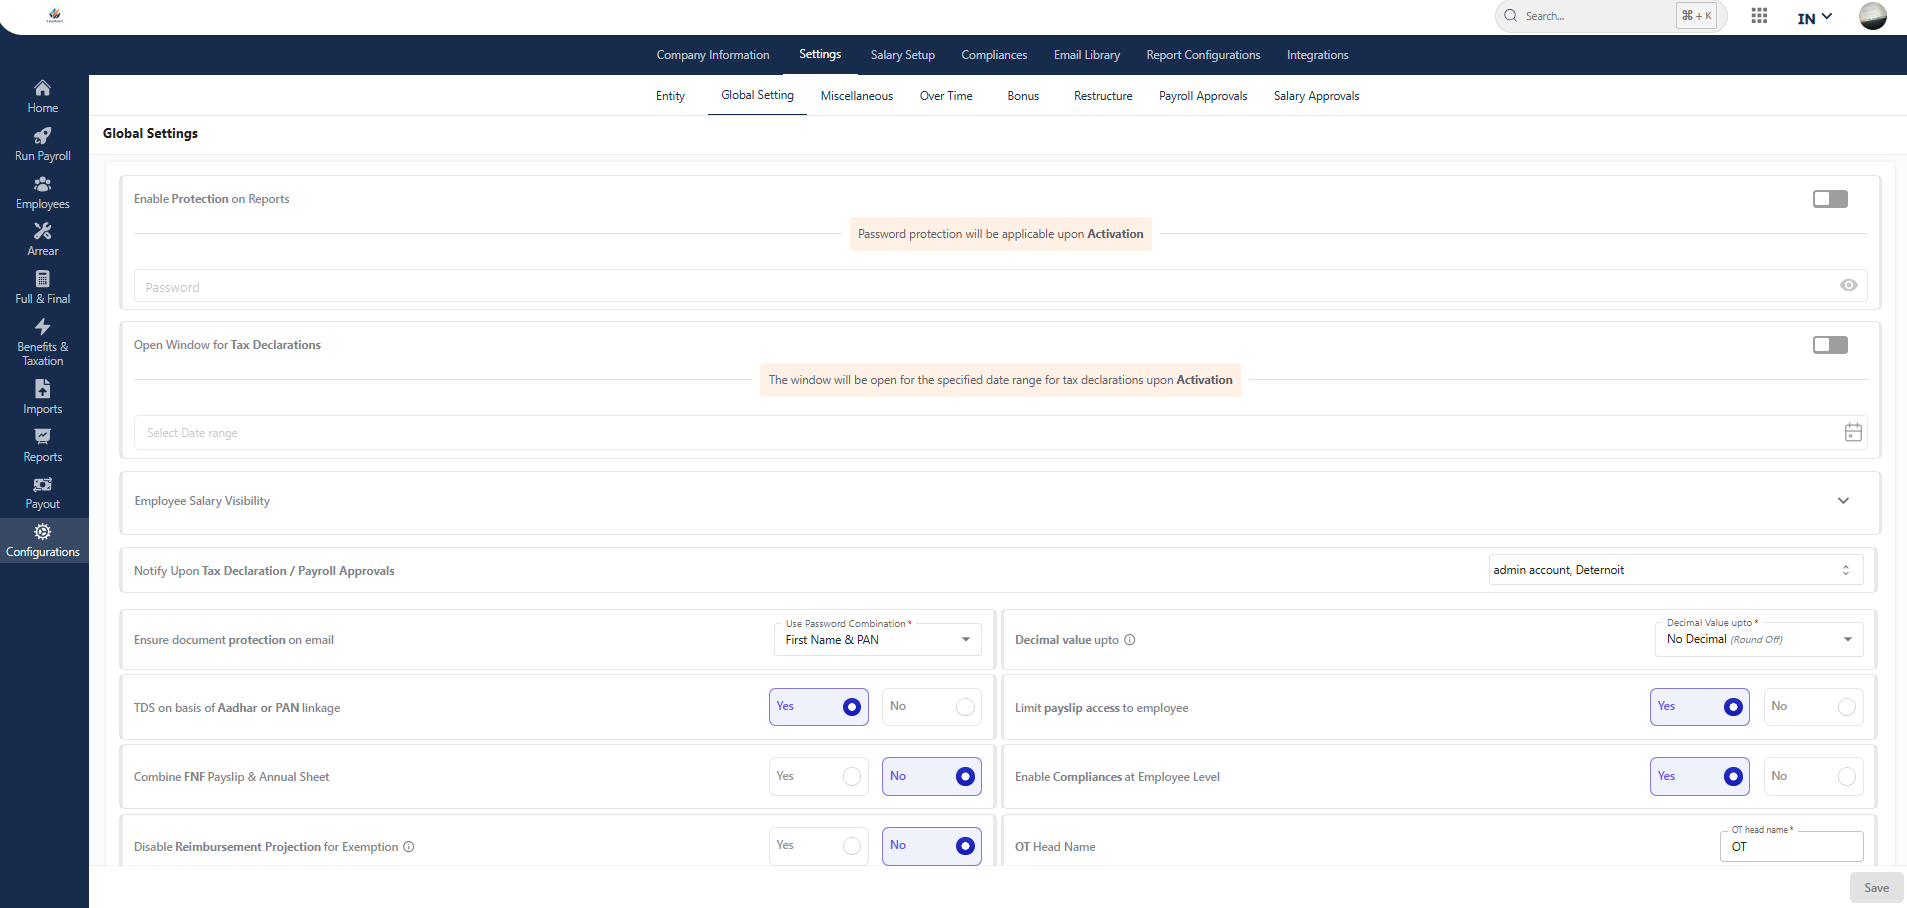
Global Settings Configuration
Customize your organization’s payroll and compliance preferences with precision. Use the options below to tailor security, declarations, reimbursements, and statutory compliance features to your specific needs.
Path:
Payroll > Configuration > Settings > Global Settings
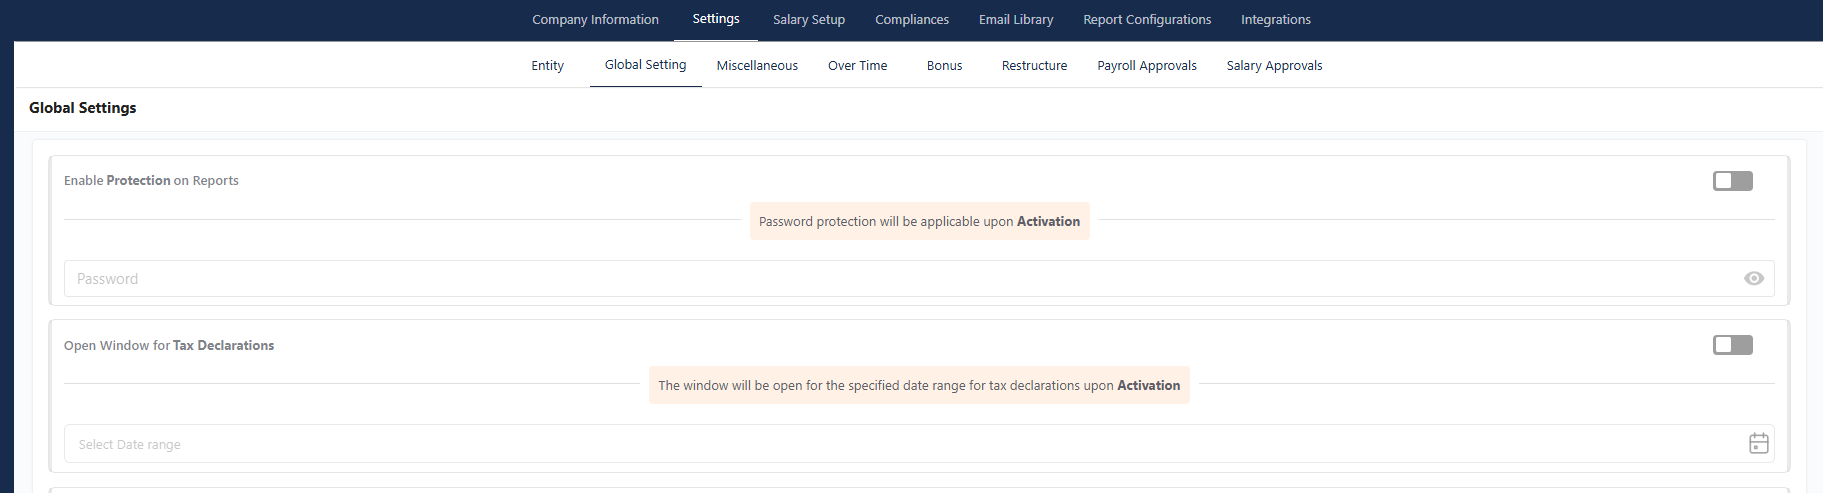
Security & Protection Settings
Enable Protection on Reports: Activate password protection for sensitive reports.
Set Password: Define a secure password to restrict access to confidential data.
Email Document Protection: Secure payslips and reports sent via email using a custom password combination.
Path:
Payroll > Configuration > Settings > Global Settings > Enable Protection on Reports
Tax Declaration Settings
Open Tax Declaration Window: Select the start and end dates during which employees can submit tax declarations.
- Notify Admin: Automatically alert the admin (Deternoit account) upon tax declarations or payroll approvals.
Disable Reimbursement Projection: Choose whether to exclude projected reimbursements from exemption calculations.
TDS Basis: Apply TDS deductions based on employee Aadhaar–PAN linkage.
Path:
Payroll > Configuration > Settings > Global Settings > Open Window for Tax Declarations
Employee Salary Visibility Controls
Path: Payroll > Configuration > Settings > Global Settings > Employee Salary Visibility
- Hide all compliances—hides statutory heads (PF, ESI, PT) in payslips
- Hide all Deductions – Hides deductions like loans or taxes from the payslip
- Hide Components with Zero (0) Amount – Hides unused heads
- Hide all Bonuses – Omits bonus lines from salary views
- Hide Outside Salary Components – Hides any non-salary amounts paid
Use Case: Customize what employees can see on their payslips.
Notify Upon Tax Declaration / Payroll Approvals
Path: Payroll > Configuration > Settings > Global Settings > Notify Upon Tax Declaration / Payroll Approvals
Purpose: notifies approvers when an employee submits a tax declaration or when payroll is ready for approval.
Use Case: Keeps payroll and compliance workflows timely and transparent.
Payslip & Salary Configuration
- Decimal Precision: Define decimal values up to ‘0’ or more for salary components.
Limit Payslip Access: Restrict payslip visibility strictly to employees.
Combine FNF, Payslip & Annual Sheet: Merge full-and-final statements with payslips and annual summaries.
Salary Restriction After Contract Expiry: Automatically restrict salary disbursement after contract termination.
Show Arrear Without CTC Change: Choose whether to display arrears even without a change in CTC.
Path:
Payroll > Configuration > Settings > Global Settings > Payslip & Salary Configuration
Compliance & Modifications
Enable Compliances at Employee Level: Activate individual-level statutory compliance management.
Allow FNF Modification: Permit modifications during Full and Final settlement processing.
Overtime Configuration
OT Head Name: Define your standard Overtime (OT) head label.
Extra OT Head Name: Set a custom label for additional OT beyond standard hours.
Housing Rent Allowance (HRA)
Proportionate HRA: Enable HRA calculation based on the employee’s joining date.
Your global settings ensure streamlined operations, compliance accuracy, and secure data handling.
Configure once, stay compliant always.
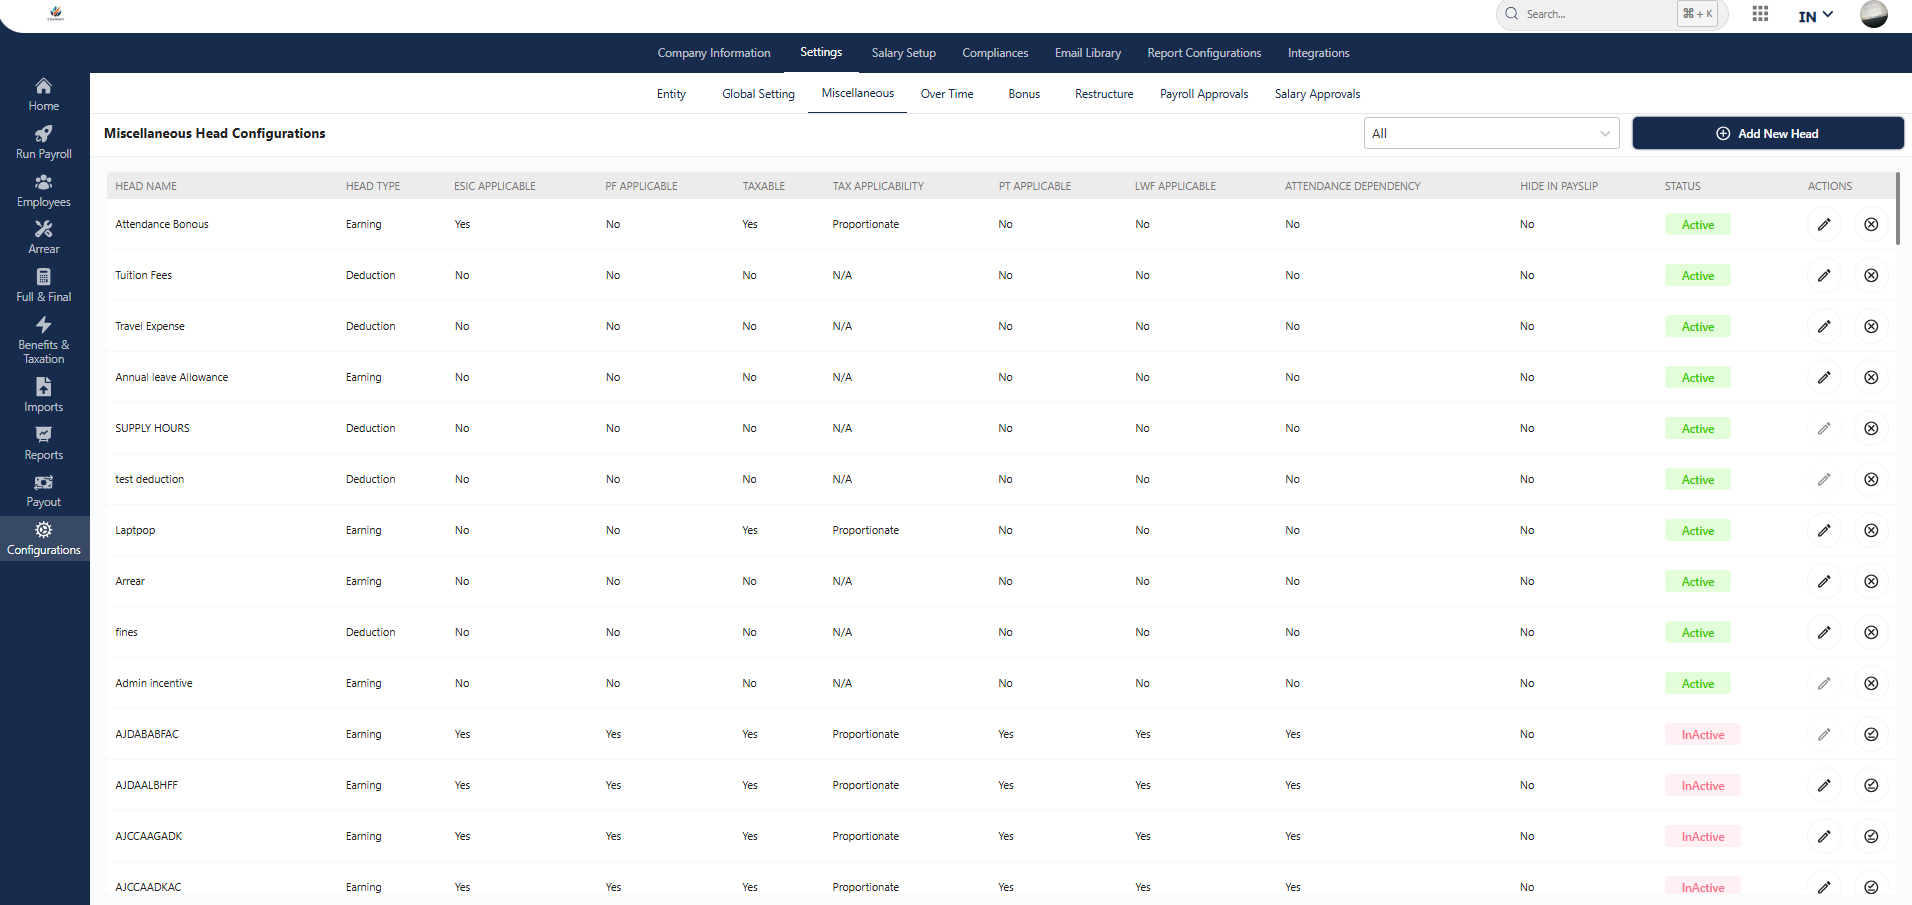
Miscellaneous
This section allows the Admin to create and manage custom payroll components tailored to organizational needs, beyond the standard salary structure.
In this section, the admin can create multiple miscellaneous heads by clicking on “Add New Head.”
This will open a popup screen where the admin must fill in all the required fields, such as the head name and head type (earning or deduction).
The admin can also set ESIC and PF applicability, determine if the head is taxable, and set PT, tax, and LWF applicability.
Additionally, the admin can set attendance dependency status and toggle the button to activate or deactivate the head.
Path: Payroll > Configuration > Settings > Miscellaneous
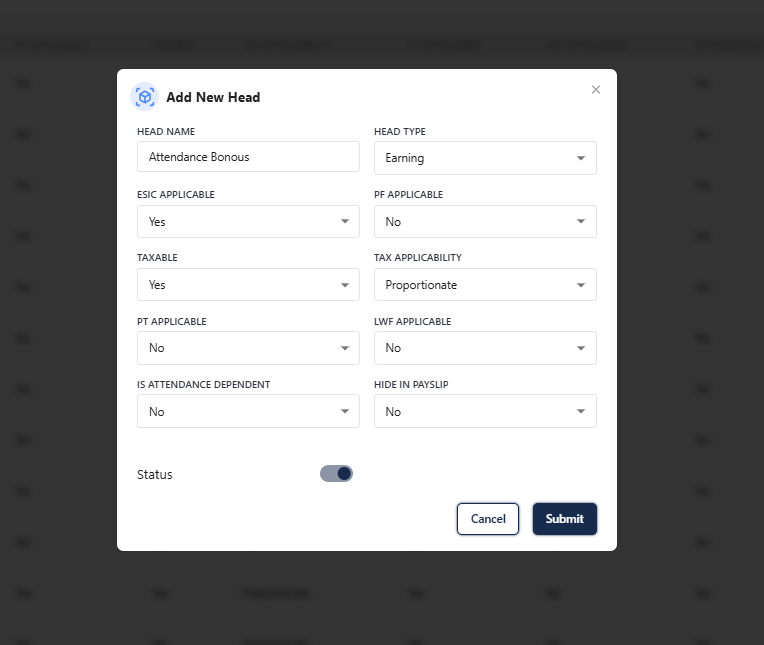
Add New Head
Path: Payroll > Configuration > Settings > Miscellaneous > Click on the “Add New Head” button to open a configuration popup, where you can define the details of the new component.
Fields to Configure:
- Head Name: Enter a unique and identifiable name for the head (e.g., “Night Shift Allowance” or “Uniform Deduction”).
- Head Type: Select whether this head is an Earning or a Deduction.
- ESIC Applicable: Toggle ON if this head contributes to ESIC.
- PF Applicable: Toggle ON if this head is part of Provident Fund calculations.
- Taxable: Specify whether the amount under this head is taxable under Income Tax.
- PT Applicable: Mark if this head should be included for Professional Tax.
- LWF Applicable: Enable if this head contributes to Labour Welfare Fund.
Attendance Dependency: Set whether the calculation of this head depends on employee attendance (e.g., per day-based earnings).
Activation Status: Use the toggle to activate or deactivate the head as needed. Only active heads will reflect in payroll processing.
Let’s say you want to introduce a “Meal Deduction”:
- Set it as a Deduction head
- Mark it non-taxable
- Make it attendance dependent
- Deactivate it when not in use
This provides flexibility to manage unique payroll components specific to your organization’s policies.
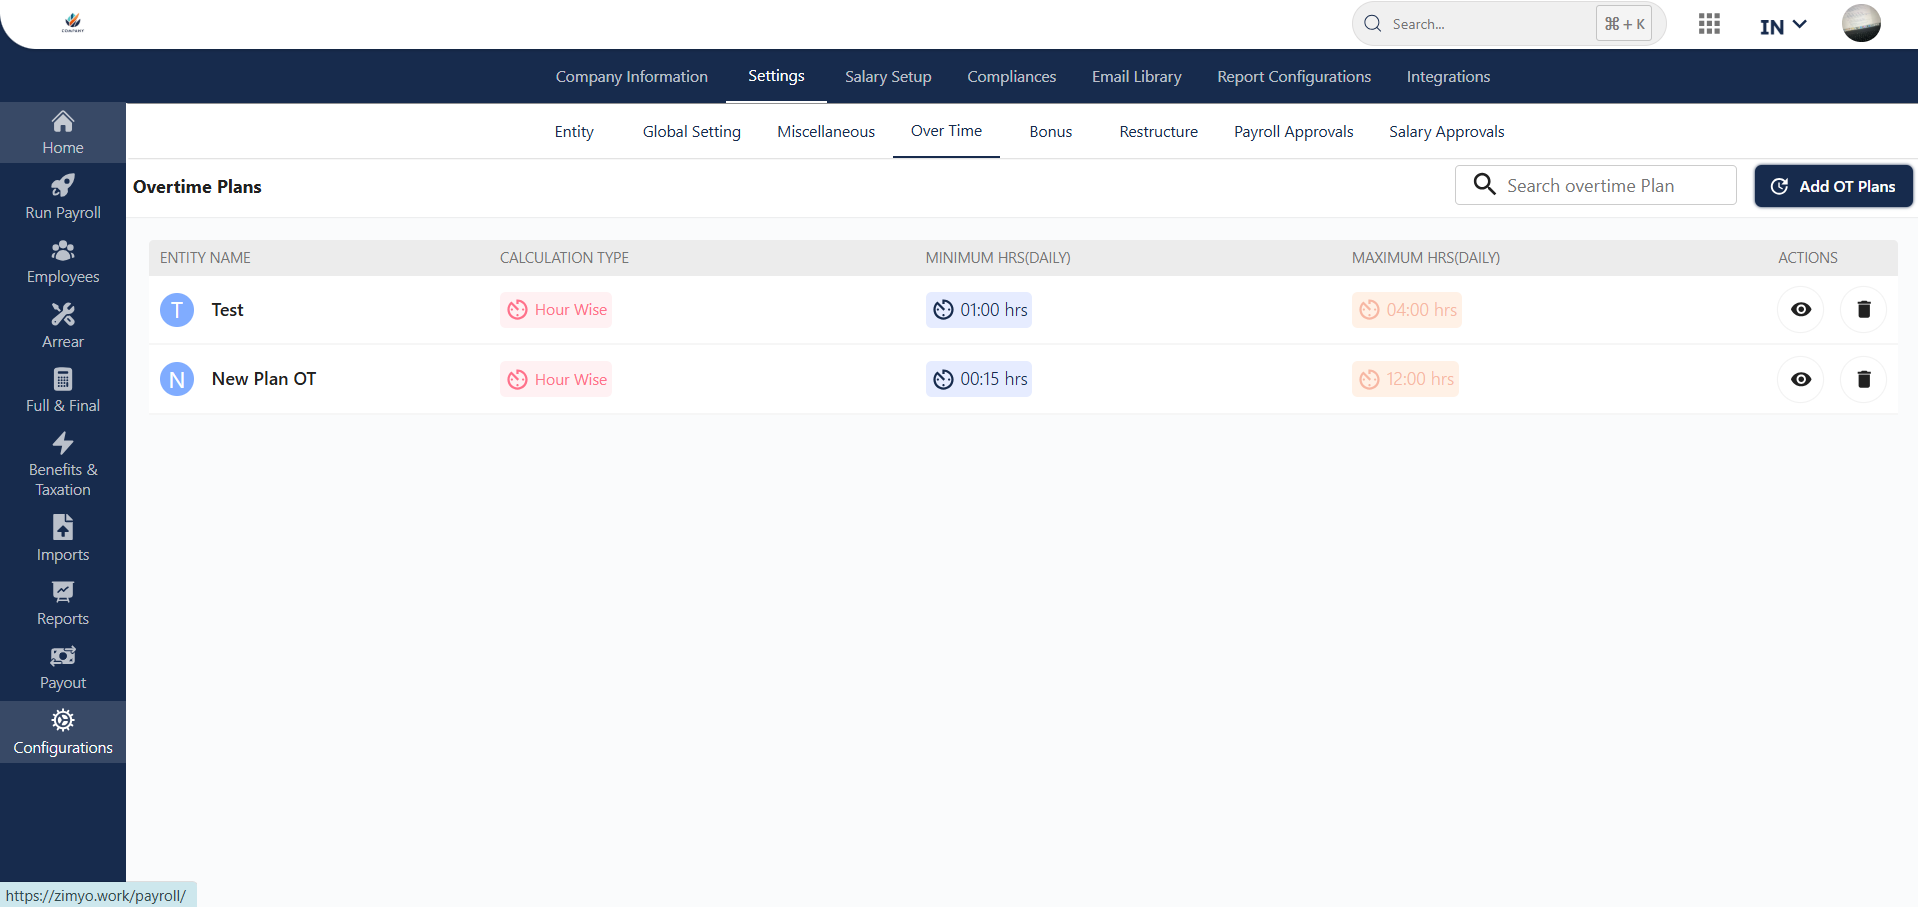
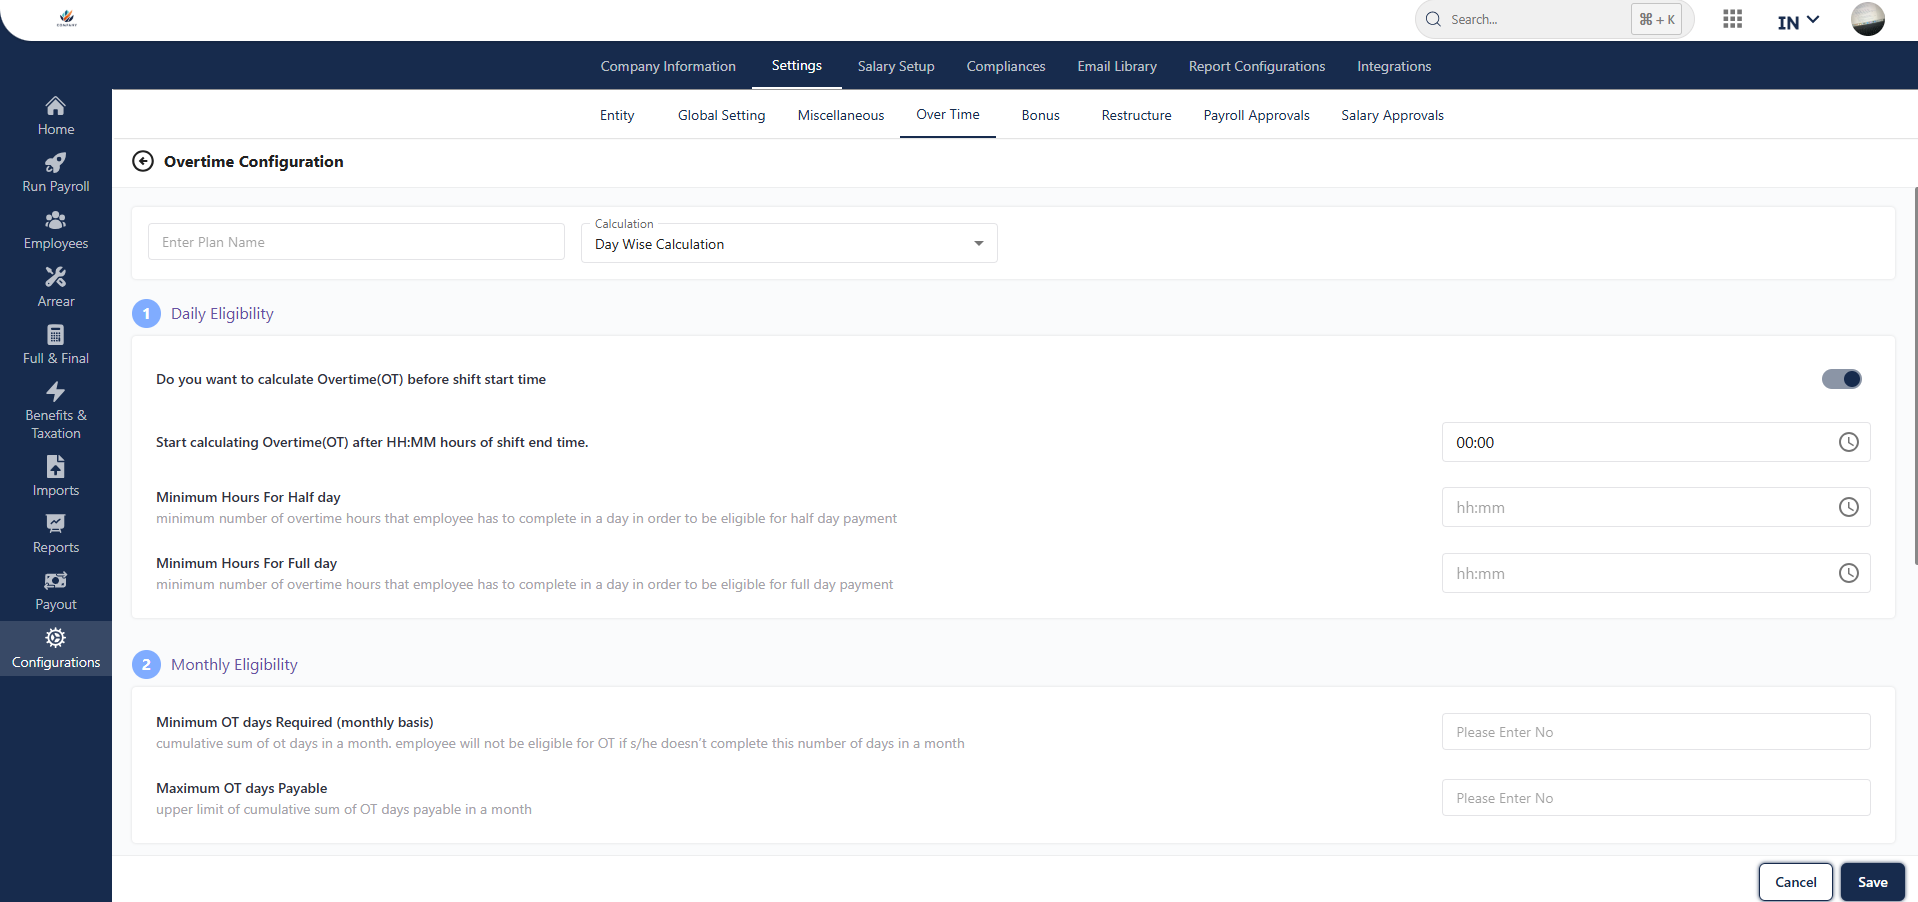
Overtime (OT) Plans & Configuration Guide
Overtime (OT) Plans & Configuration Guide
Click the “Add OT Plan” button to begin configuring a new overtime plan.
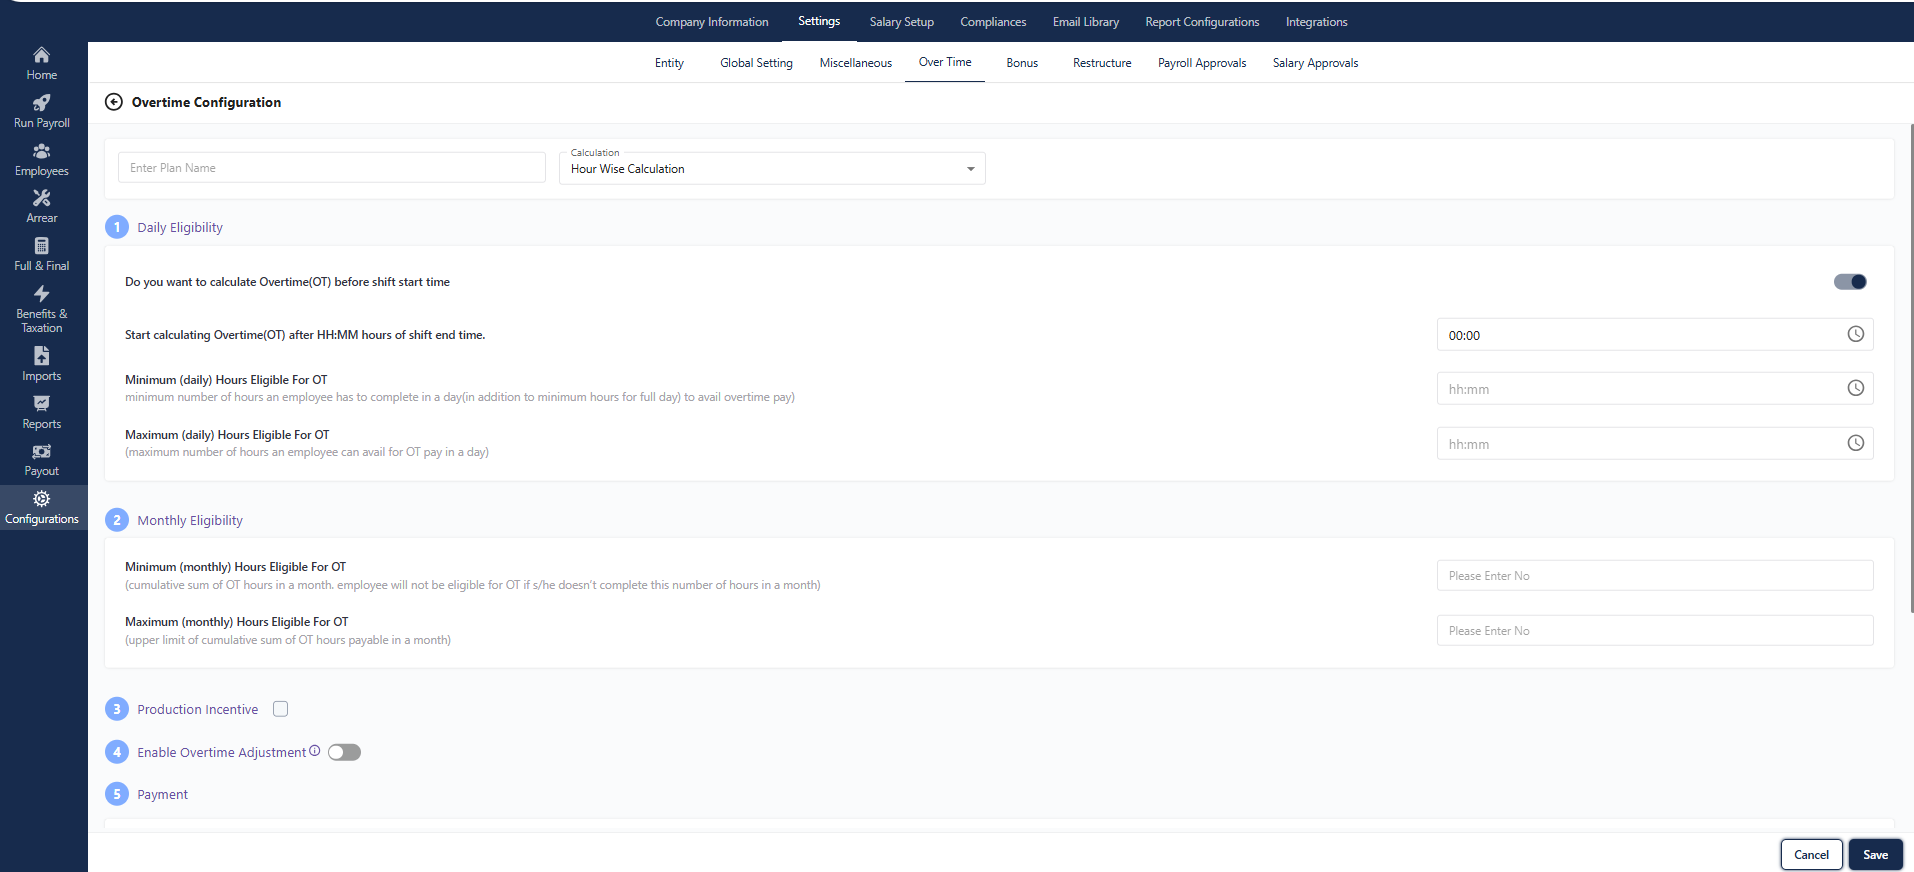
Step 1: Plan Name & Calculation Type
Enter Plan Name (e.g., Weekend OT, Night Shift OT)
Select Calculation Type:
Hour-wise: OT calculated based on time worked beyond regular hours.
Day-wise: OT calculated based on additional days worked.
Hour-wise OT Configuration
1️⃣ Daily Eligibility
- Before Shift Start Time: Option to include OT before shift starts.
- After Shift End Time: Define delay (e.g., after 00:30) to start OT calculation.
- Minimum Daily OT: Set minimum extra hours required per day to qualify for OT.
- Maximum Daily OT: Define upper limit of OT payable per day.
2️⃣ Monthly Eligibility
- Minimum OT Hours (Monthly): Cumulative threshold below which OT won’t be paid.
- Maximum OT Hours (Monthly): Cap on payable OT hours in a month.
3️⃣ Production Incentive
Option to enable and customize incentives based on monthly/daily performance or specific milestones.
4️⃣ Overtime Adjustment
Enable/disable OT adjustment feature to auto-balance OT with other payable components.
5️⃣ Payment Configuration
OT Paid On: Choose basis for OT calculation: CTC, Gross, Fixed Amount, or Custom Formula
- Weekdays
- Week-offs
- Holidays
6️⃣ Round-Off Function
Day-wise OT Configuration
1️⃣ Daily Eligibility
- Before Shift Start Time: Option to include pre-shift OT.
- After Shift End Time: Set post-shift delay before OT starts.
- Minimum Hours for Half-Day OT
- Minimum Hours for Full-Day OT
2️⃣ Monthly Eligibility
- Minimum OT Days Required: OT payable only if this number is met in a month.
- Maximum OT Days Payable: Cap to control OT payout per month.
3️⃣ Production Incentive
4️⃣ Payment
Configure OT payout conditions for:
- Weekdays
- Week-offs
- Holidays
5️⃣ Round-Off Option
Use to standardize time-based payments and avoid fractional payouts.
View and Manage OT Plans
The main OT Plans dashboard displays:
Entity Name
Calculation Type (Hour-wise or Day-wise)
Minimum & Maximum Daily Hours
Actions: Edit, Deactivate, or Delete plans
By leveraging these settings, admins can build a highly flexible OT policy that adapts to operational needs, ensures legal compliance, and motivates employees through timely rewards and incentives.
Bonus
Path: Payroll > Configuration > Settings > Bonus
The admin can manage two sections: Rule Configuration and Head Configuration.
Rule Configuration:
In the Rule Configuration section, the admin can view a list of created rules, displaying the rule name, status, applicability, and actions. Clicking the “Action” button allows the admin to edit existing rules.
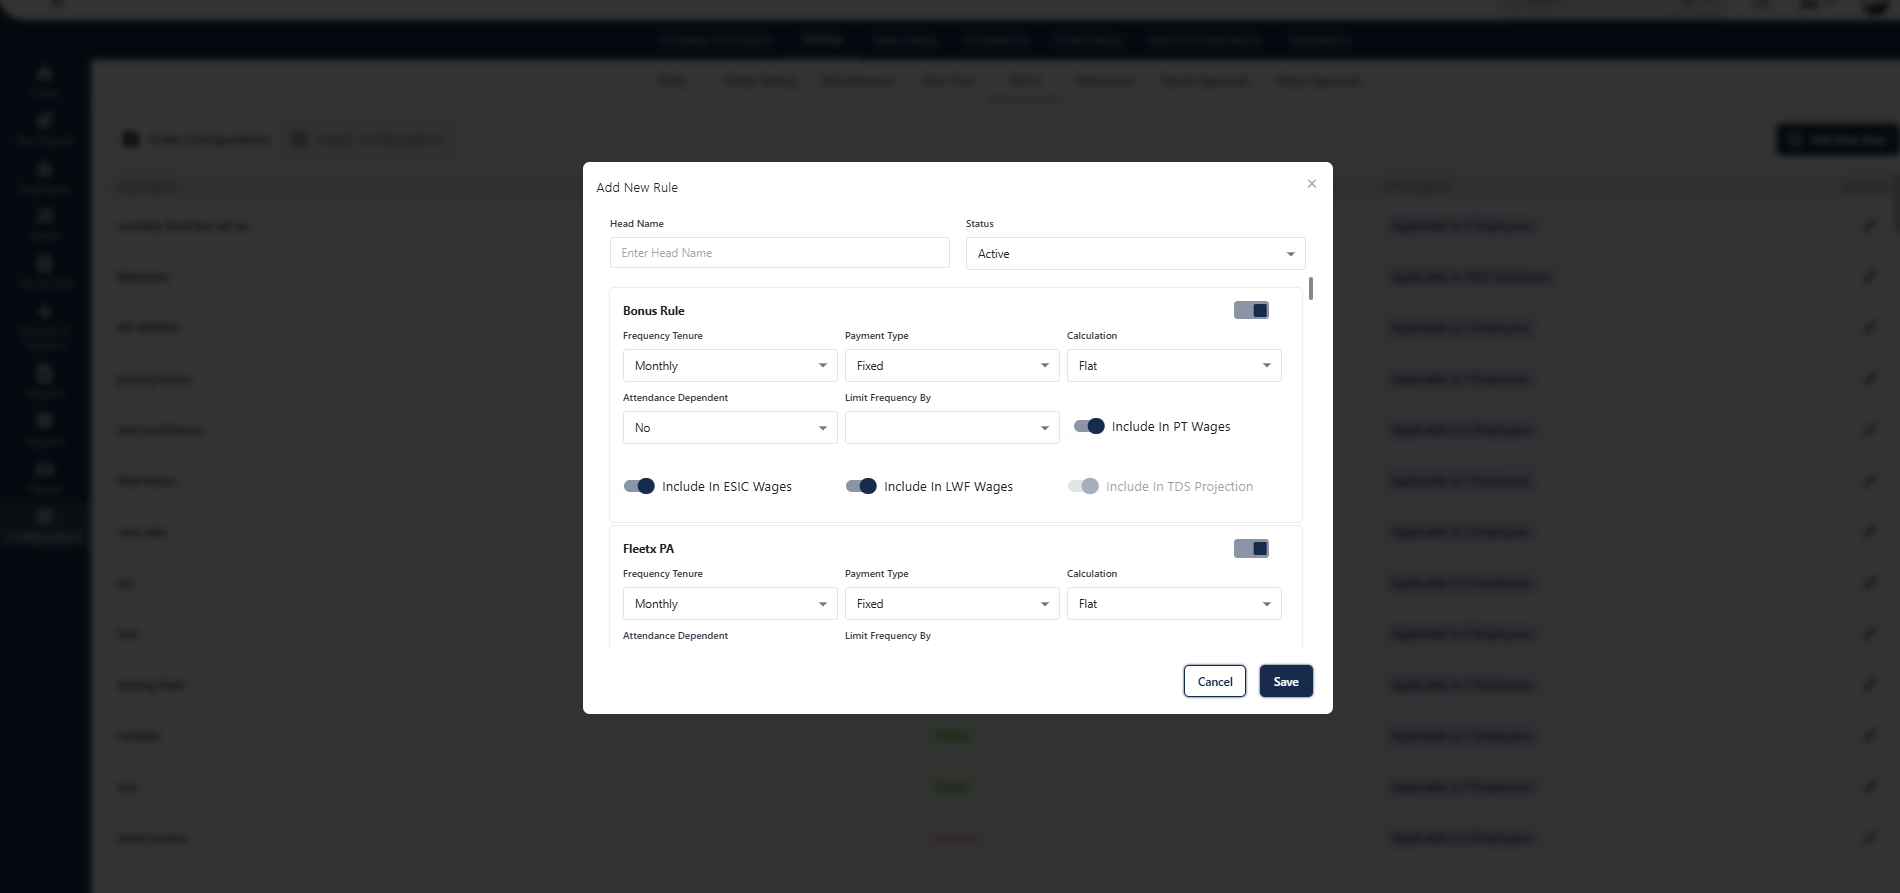
Add New Rules:
Clicking this button enables the admin to create a new bonus rule by filling in the head name and status and setting the tenure, payment type, and attendance dependency.
Path: Payroll > Configuration > Settings > Bonus > Select Rules Configuration > Add new Bonus.
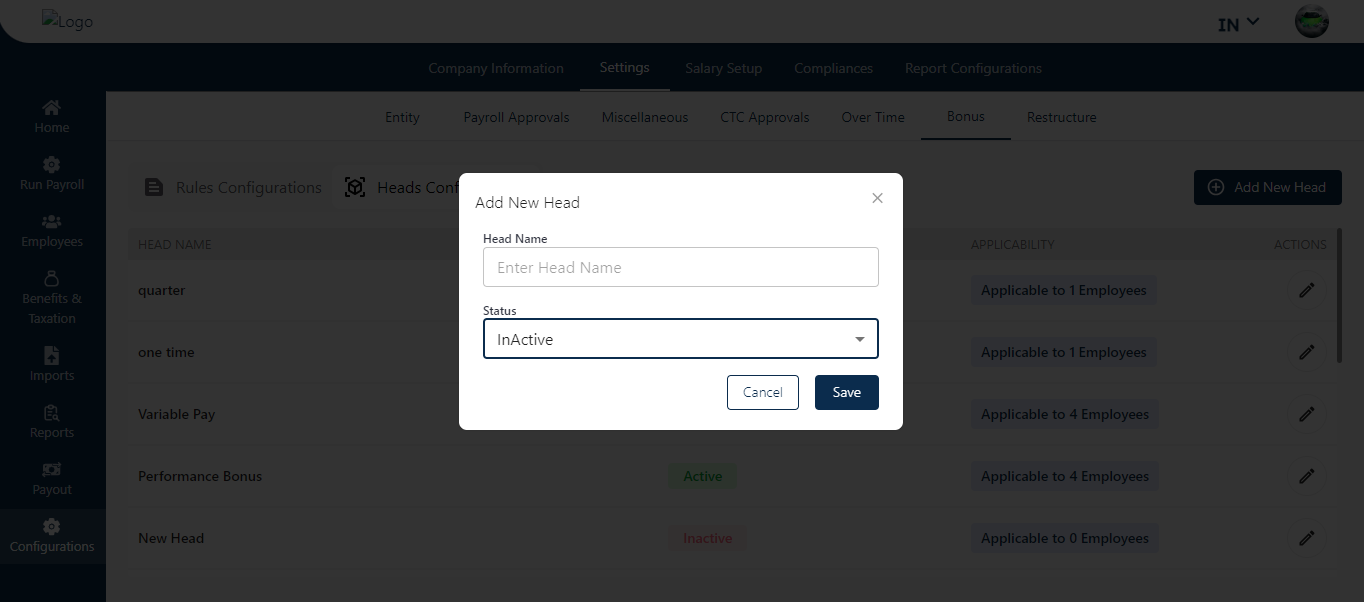
Head Configuration:
Similar to the Rule Configuration section, the admin follows the same steps in Head Configuration but can create multiple new heads by clicking the “Add New Heads” button.
Path: Payroll > Configuration > Settings > Bonus > Select Head Configuration > Add new head.
Salary Structure
In the Salary Structure section, the admin can manage CTC and Gross calculations.
For CTC Calculation, the screen displays a comprehensive list of salary structures, detailing the structure name, PF rule name, created date, applicability, and actions.
The Action button includes four functions:
- View: Allows the admin to see the created salary structure.
Clone: Recreates the same salary structure with identical configurations.
Edit: Enables the admin to make changes to the existing salary structure.
Delete: Removes the selected salary structure.
Path: Payroll > Configuration > Settings > Restructure
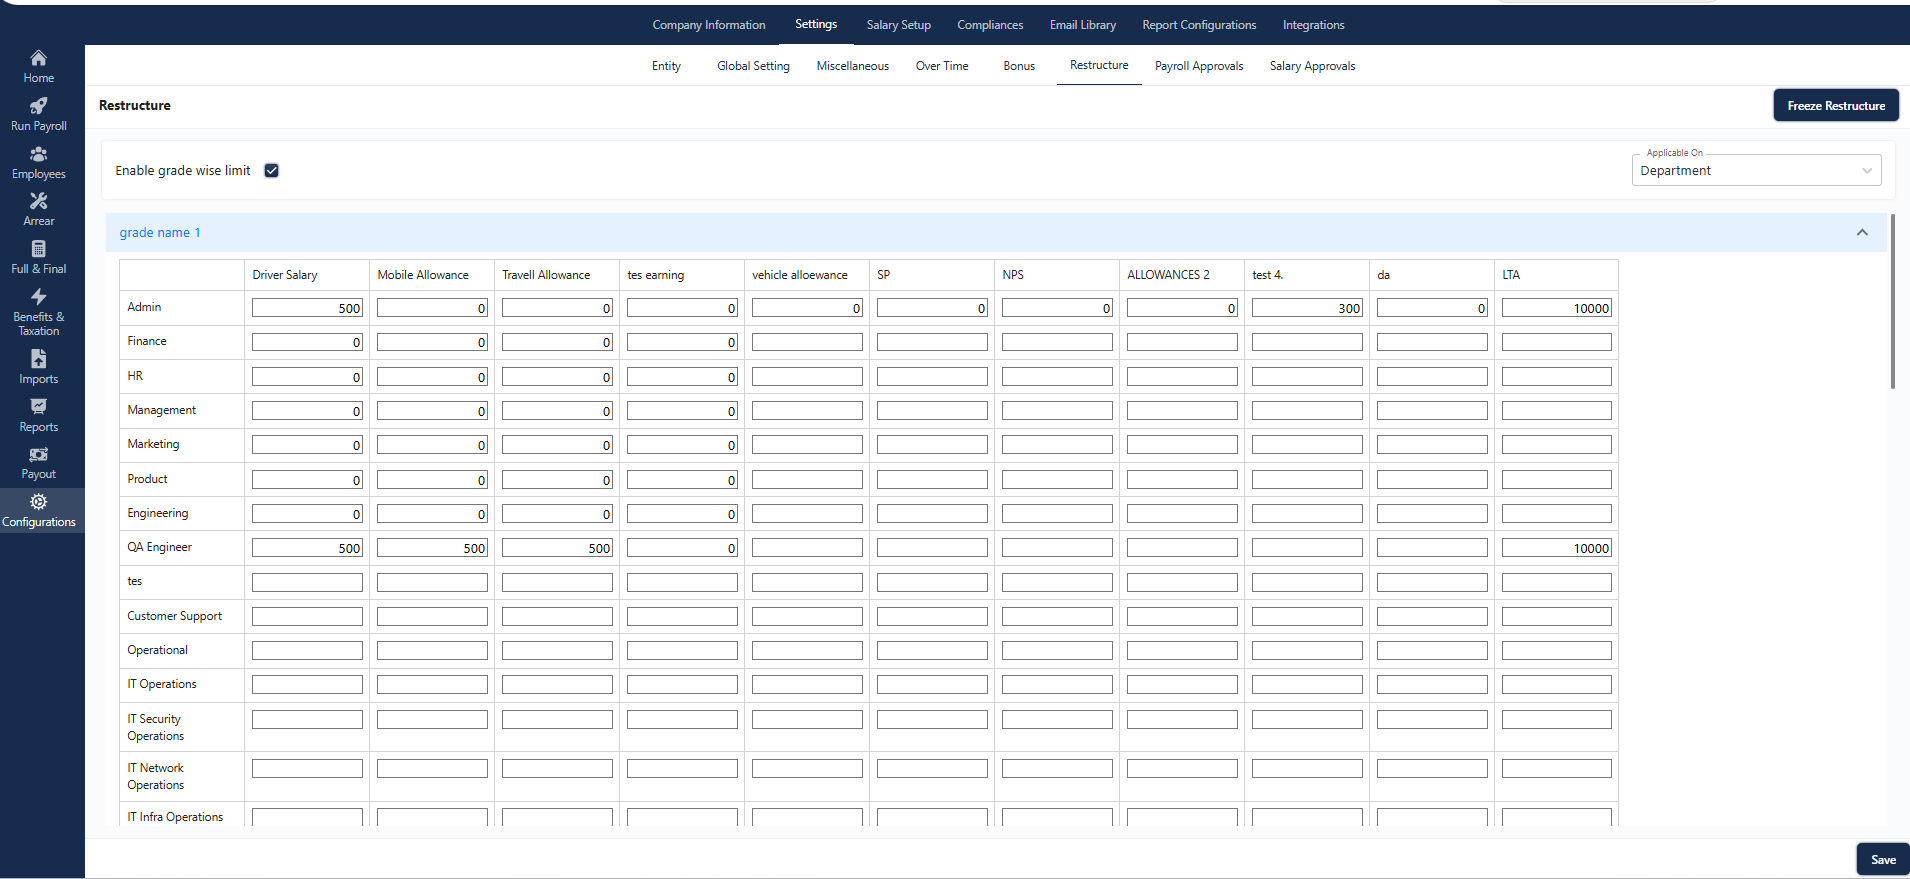
Restructure: Grade-Wise Limit Configuration
Enable Grade-Wise Limit
Toggle this option to activate limits based on specific grades or departments for allowances such as Driver Salary, Mobile Allowance, Travel Allowance, etc. Once enabled, only the configured amounts will be allowed during payroll processing for employees within that grade or department.
Department-Wise Allowance Configuration
Here, each department (e.g., Admin, Finance, HR, Management, etc.) can be assigned predefined limits for various allowances like:
- Driver Salary
- Mobile Allowance
- Travel Allowance
- Test Earnings
- Vehicle Allowance
- Special Pay (SP)
- National Pension Scheme (NPS)
- Allowances 2
- Test 4
- Dearness Allowance (DA)
- Leave Travel Allowance (LTA)
These values ensure that no individual within that department exceeds the set limits, maintaining cost control across different business functions.
Example: The Admin department has a defined limit of ₹500 for Driver Salary and ₹10,000 for LTA.
Use Case Example
Let’s say you want to limit mobile allowances for the QA Engineering team to ₹500 per employee. You configure it under the QA Engineer section, freeze the restructure, and it ensures during payroll processing that no one in that team gets a higher amount unless re-approved.
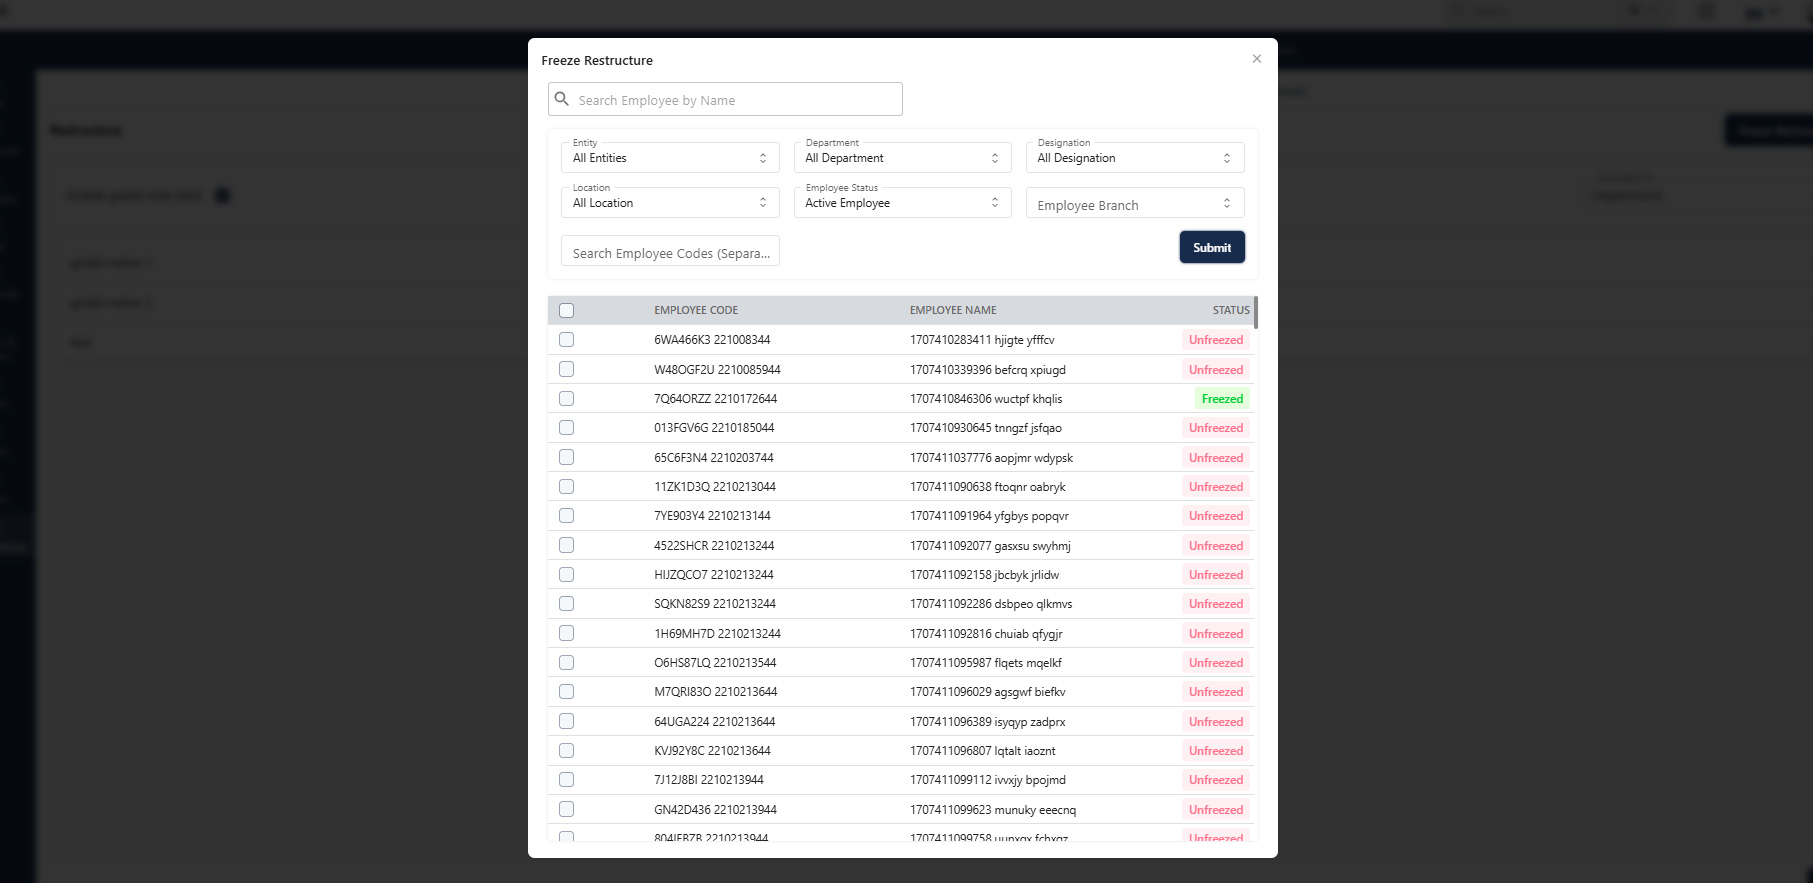
Freeze Restructure Button
Once all values are finalized, click “Freeze Restructure” to lock the configuration. This prevents further edits and ensures payroll integrity. Only authorized roles will be able to unfreeze or make changes post-freeze.
Advanced Employee Search Filters
To fine-tune visibility and configuration, use the search and filter panel:
- Search Employee by Name – Quickly locate individual employees.
- Entity / Department / Designation / Location – Filter records based on organizational attributes.
- Employee Status – Choose between active or inactive employees.
- Employee Branch – Filter by office or operational branch.
- Search by Employee Codes – Enter multiple employee codes separated by commas to bulk search specific individuals.
These filters ensure targeted configuration and review, especially helpful for large organizations with multiple roles and branches.
Path: Payroll > Configuration > Settings > Restructure > Freeze Restructure
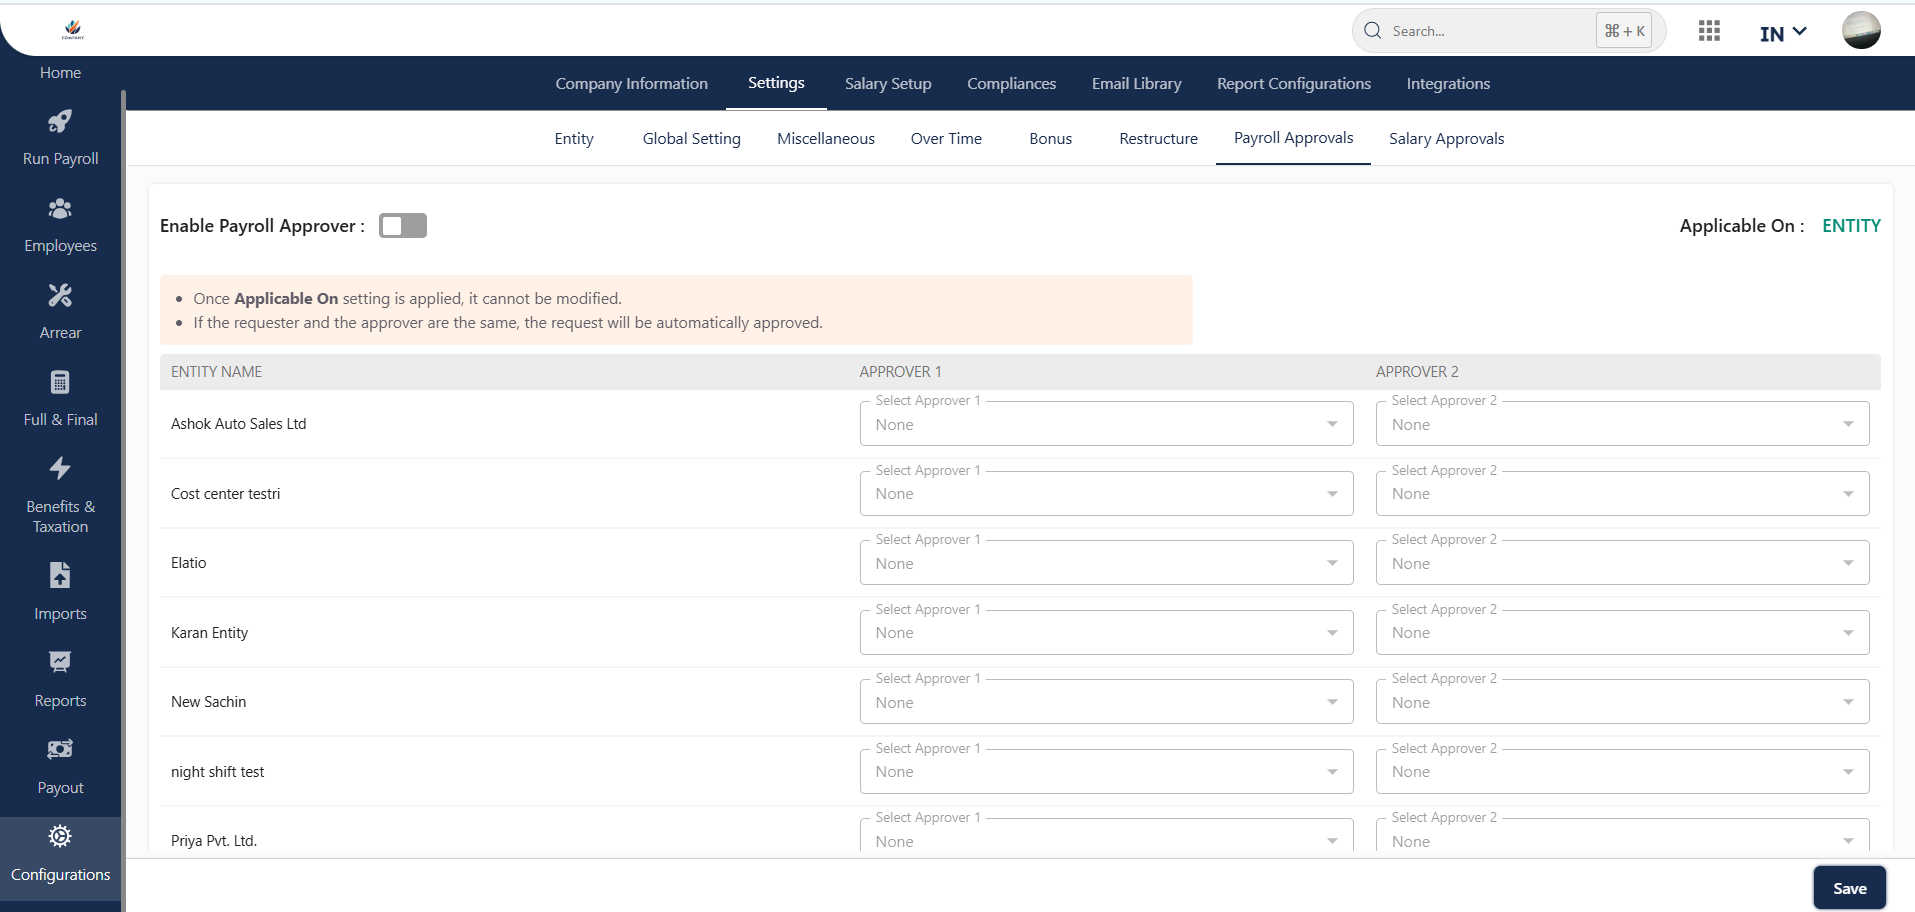
Payroll Approver—Configuration Guide
Enable Payroll Approver – Configuration Guide
This section allows you to assign payroll approvers at the entity level, ensuring that payroll actions are validated and authorized before execution.
Key Setting: Enable Payroll Approver
Toggle this option to activate the payroll approval workflow. Once enabled, payroll actions (like processing or releasing salaries) will require approval from designated personnel.
Applicable On: ENTITY
This setting determines the organizational level at which approvers will be assigned.
Important Note: Once the “Applicable On” field is set to ENTITY, it cannot be changed later. This ensures consistent governance across payroll processes.
Entity-Wise Approver Assignment
You can assign up to two approvers per entity. Each entity listed below will have:
- Approver 1: Primary approver of payroll actions
- Approver 2: Optional secondary approver (can act as backup or additional validator)
Entities include examples like:
- Ashok Auto Sales Ltd
- Elatio
- Priya Pvt. Ltd.
- Zimyo Tech
- Zoho …and others.
Use the dropdown menus next to each entity to select the designated approvers from the available user list.
Example:
For Ashok Auto Sales Ltd, you can assign:
- Approver 1: Mr. Amit Kumar
- Approver 2: Ms. Priya Shah
Auto-Approval Logic
If the requester and the approver are the same person, the system will auto-approve the request to avoid duplicate validation loops.
Best Practices
- Choose senior or finance-authorized personnel as payroll approvers.
- Ensure approvers are different from payroll processors to maintain checks and balances.
- Assign Approver 2 for continuity during leave/absence of Approver 1.
“Freeze” Option (If Applicable)
Once approvers are selected and finalized for all entities, use the Freeze option (if provided) to lock settings and prevent unauthorized changes.
Path: Payroll > Configuration > Settings > Payroll Approvals > Enable Payroll Approvals
Salary Approvals
Enable CTC Approver – Configuration Guide
This feature allows admins to enable a structured approval workflow for CTC (Cost to Company) changes, ensuring transparency, accountability, and compliance with organizational policies.
Applicable On: ENTITY
CTC approvals will be applicable at the entity level across your organization.
⚠️ Note: Once you set “Applicable On” to ENTITY, this setting cannot be modified later. Ensure the structure suits your approval process before proceeding.
Assigning Approvers per Entity
For each listed Entity Name, you can assign:
Approver 1: Primary approver for any CTC change requests
Approver 2 (Optional): Secondary approver for backup or multi-level approval
Use the dropdown menus to select users from your organization’s list.
Example:
For Zimyo Tech, you can assign:
Approver 1: HR Head
Approver 2: Finance Manager
Auto-Approval Rule
If the requester and the approver are the same person, the request will be automatically approved by the system to avoid redundant workflows.
Pro Tip: Keep it Clean
Only assign CTC approvers who are authorized to approve salary structures and changes to ensure consistency and auditability.
Path: Payroll > Configuration > Settings > Payroll Approvals > Enable Salary Approvals

Salary Setup
Salary Heads
In this section, the admin can manage salary components such as earnings, deductions, compliance, and allowances. The admin can reorder these components after creating them and can also activate or deactivate them as needed.
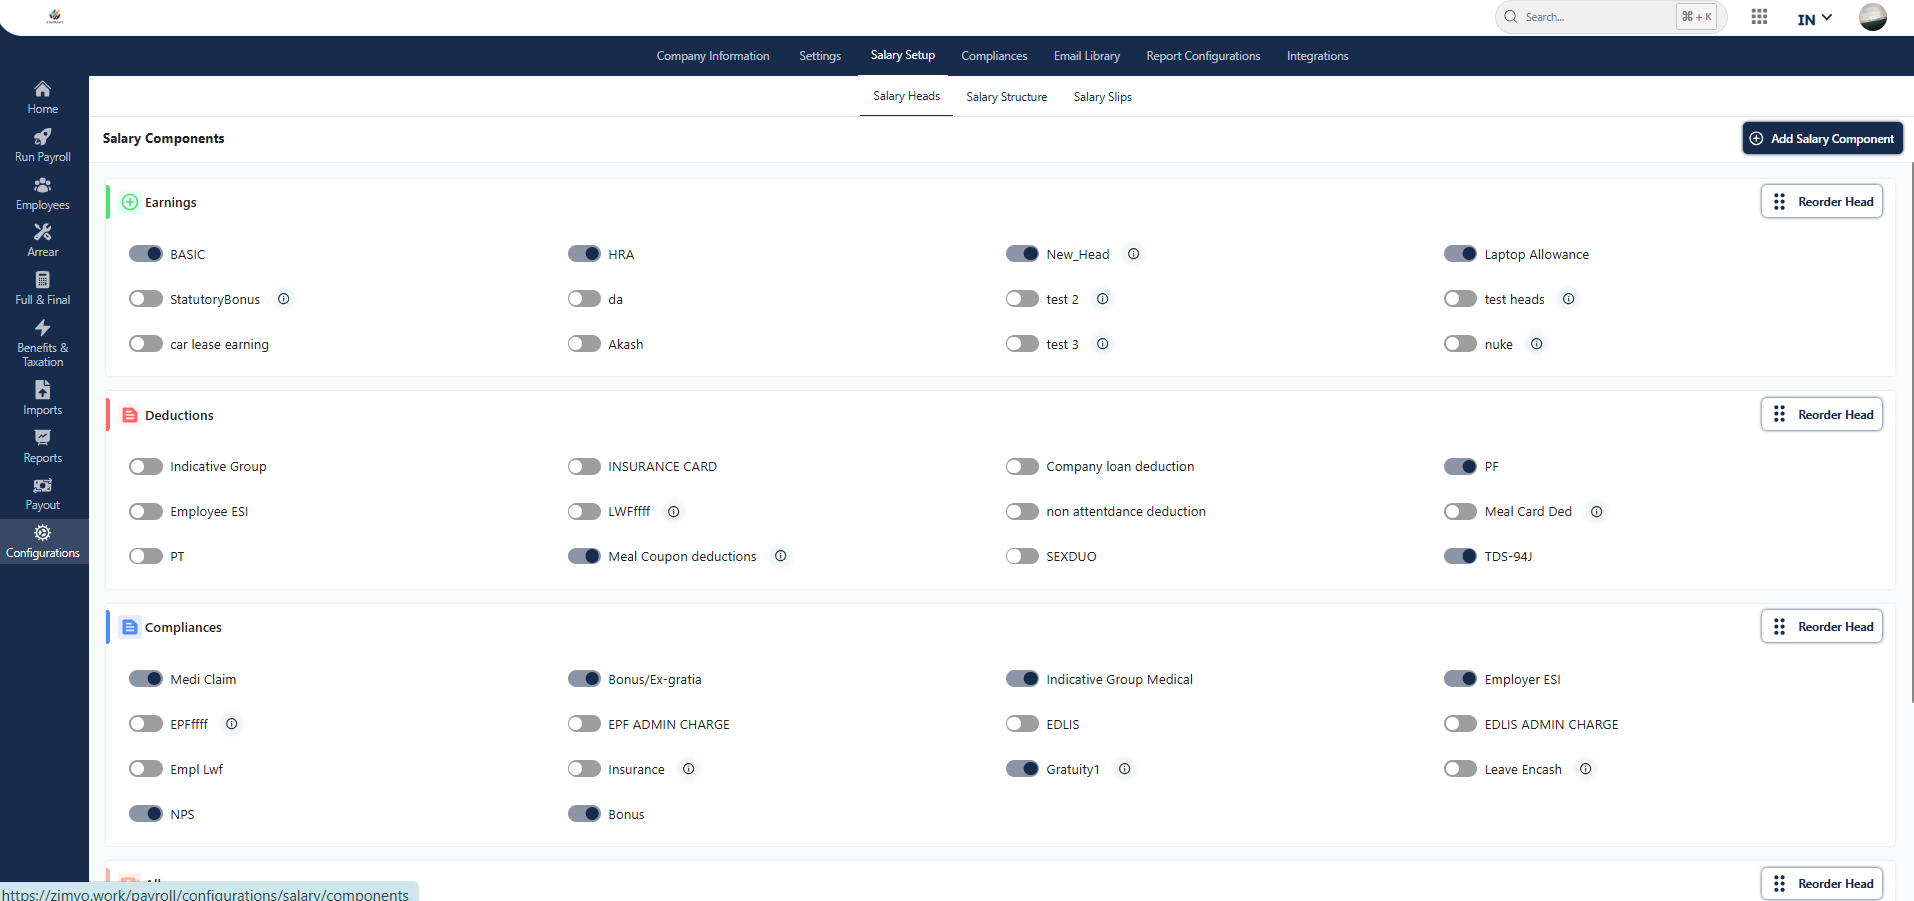
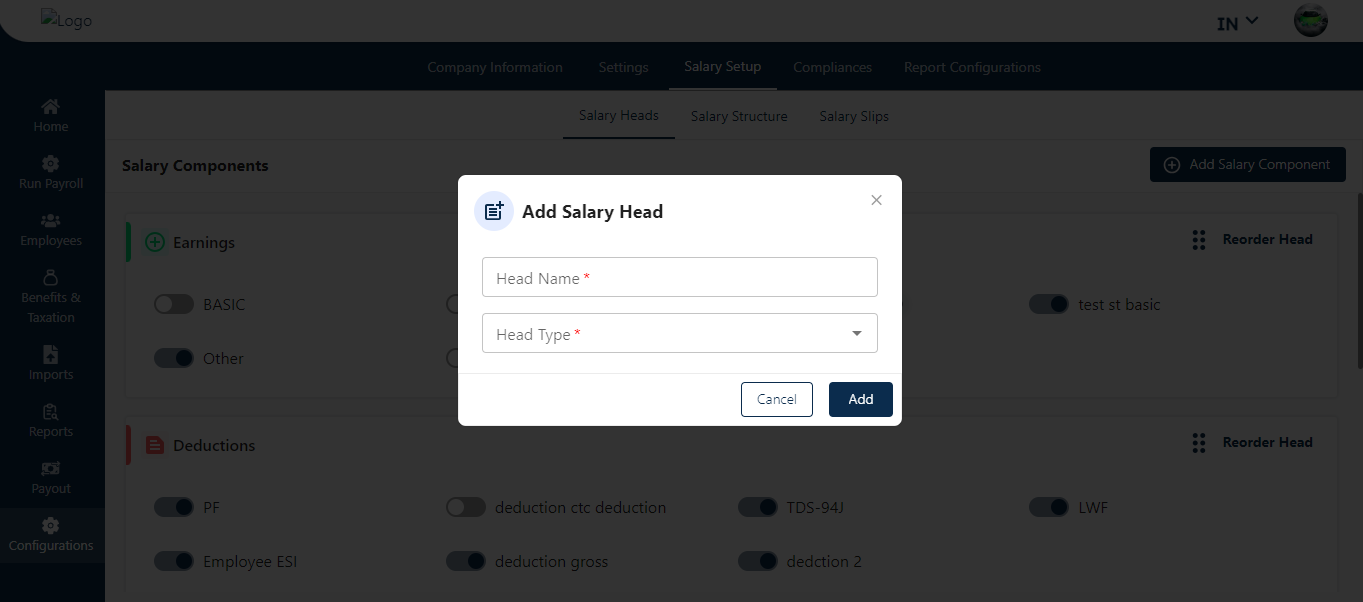
Add salary Component
Clicking on this button takes the admin to the pop-up screen where the admin creates multiple salary components by giving the head’s name and selecting the head type.
As shown below in the given screen.
Clicking on this button takes the admin to the pop-up screen where the admin creates multiple salary components by giving the head’s name and selecting the head type.
As shown below in the given screen.
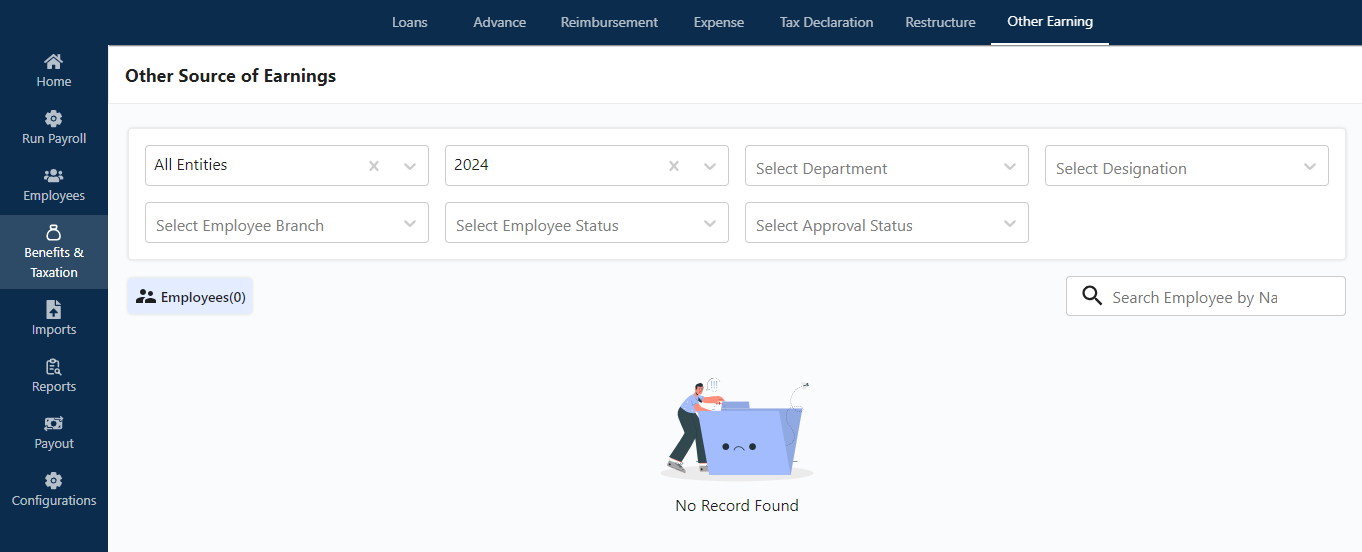
Once saved, the request will be raised and will be visible to the admin under the Benefit and Taxation section.
By applying filters such as Department, Designation, Entity, and Branch, the admin can further refine the search by employee name. Clicking the search button will display a list of employees who have raised requests.
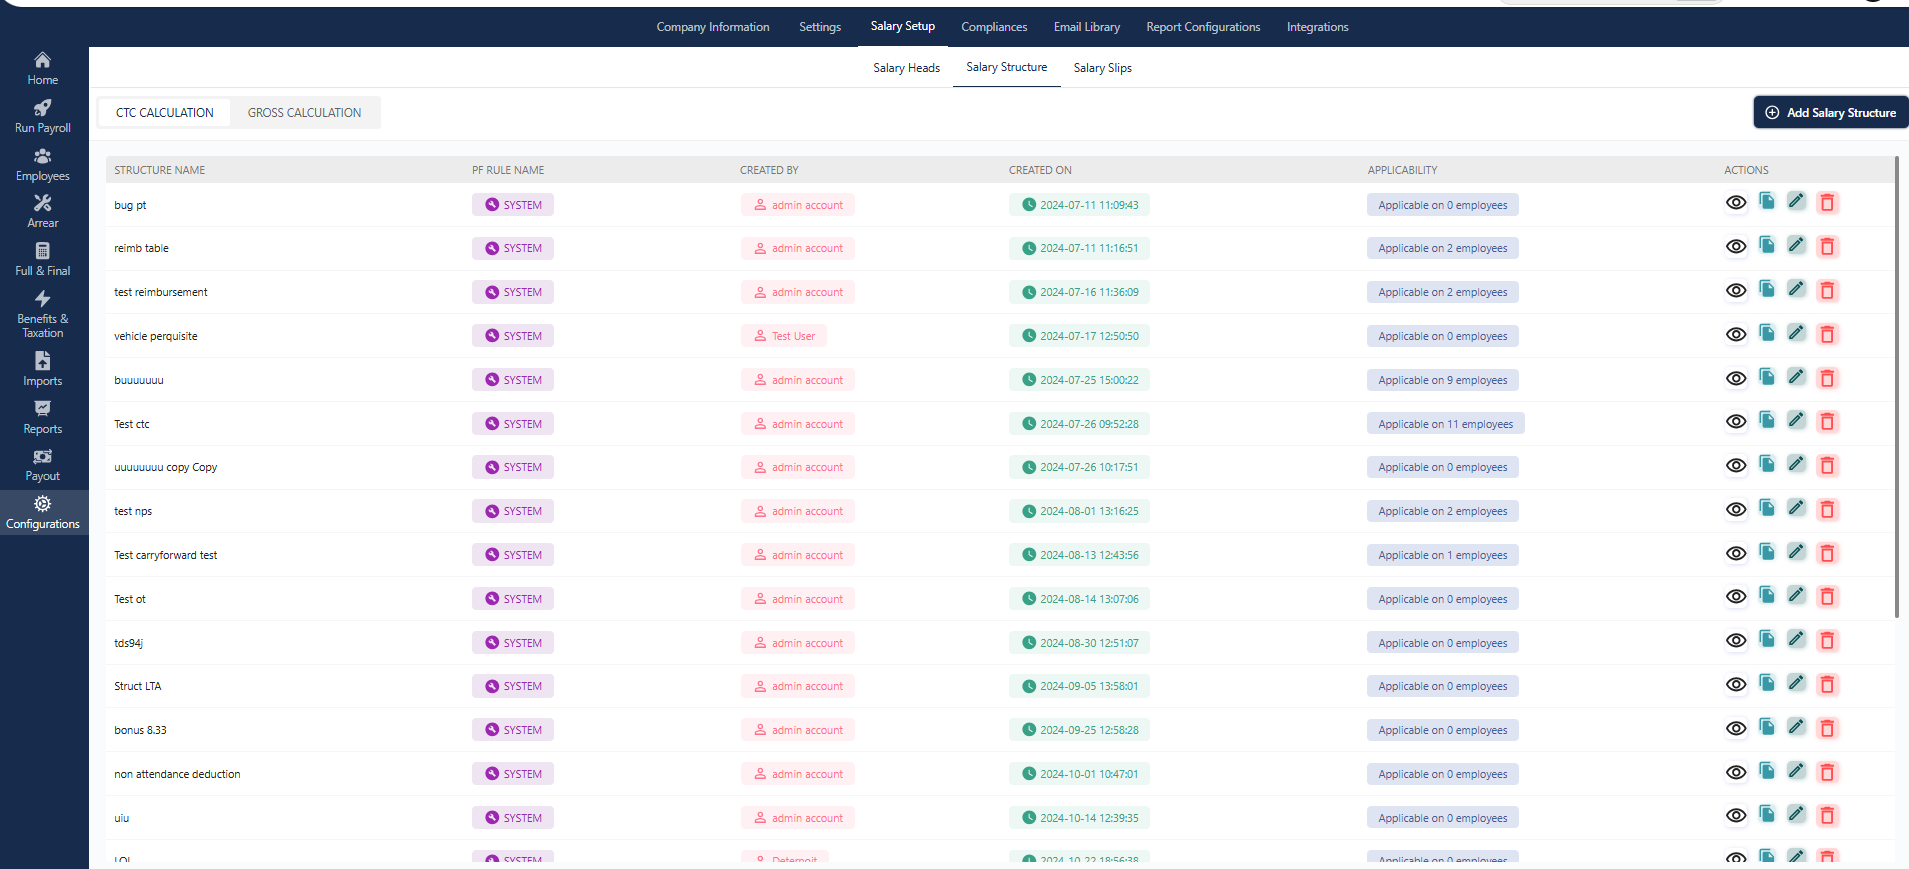
Salary Structure Configuration (CTC & Gross)
1. CTC Calculation Section
Navigation Path
Payroll → Configuration → Salary Setup→ Salary Structure.
This section contains a list of all salary structures where CTC (Cost to Company) is the basis for calculation.
Field | Description |
Structure Name | The name of the salary structure (e.g., Executive_CTC, Intern_CTC) |
PF Rule Name | The PF rule associated with the structure |
Created By | Name of the admin who created the structure |
Created On | Date of creation |
Applicability | Defines the department/designation/entity where this structure is applicable |
Actions | View, Clone, Edit, or Delete the structure |
Note: Structures under CTC calculation include all employer contributions (ESIC, PF, Gratuity, etc.) within the CTC.
2. Gross Calculation Section
This section lists structures where Gross Salary is used as the calculation base. Employer contributions are considered over and above the gross.
Field | Description |
Structure Name | Salary structure created under gross-based methodology |
PF Rule Name | Selected Provident Fund rule for this structure |
Created By | Name of the user who created the structure |
Created On | Date of structure creation |
Applicability | Filters applied to assign the structure to employees |
Actions | View, Clone, Edit, Delete |
Add Salary Structure
Clicking “Add Salary Structure” opens a configuration window where admins can create a new GROSS or CTC based salary structure.
Add New Structure (GROSS or CTC)
- Structure Name * – Mandatory name to identify the structure.
- PF Rule * – Select the applicable Provident Fund Rule from the dropdown.
Overview
The Salary Structure page in Zimyo Payroll enables HR/Admins to configure compensation plans for employees using two distinct calculation methods: CTC Calculation and Gross Calculation. This ensures flexibility in salary planning, payroll compliance, and accurate payslip generation.
EARNINGS Section
Field | Description |
Head Name | Example: BASIC, HRA, LTA, New_Head, Laptop Allowance |
Added | Indicates how many times the head is being used |
Show on Payslip | Toggle to display the head on payslip |
Attendance Based | Enable if the component depends on attendance |
Present Day Based | Enable if calculation depends on presence count |
Calculation | Flat or Formula based |
Formula/Flat Amount | Enter the amount or formula as applicable |
Settings | Additional configuration such as cap, range, etc. |
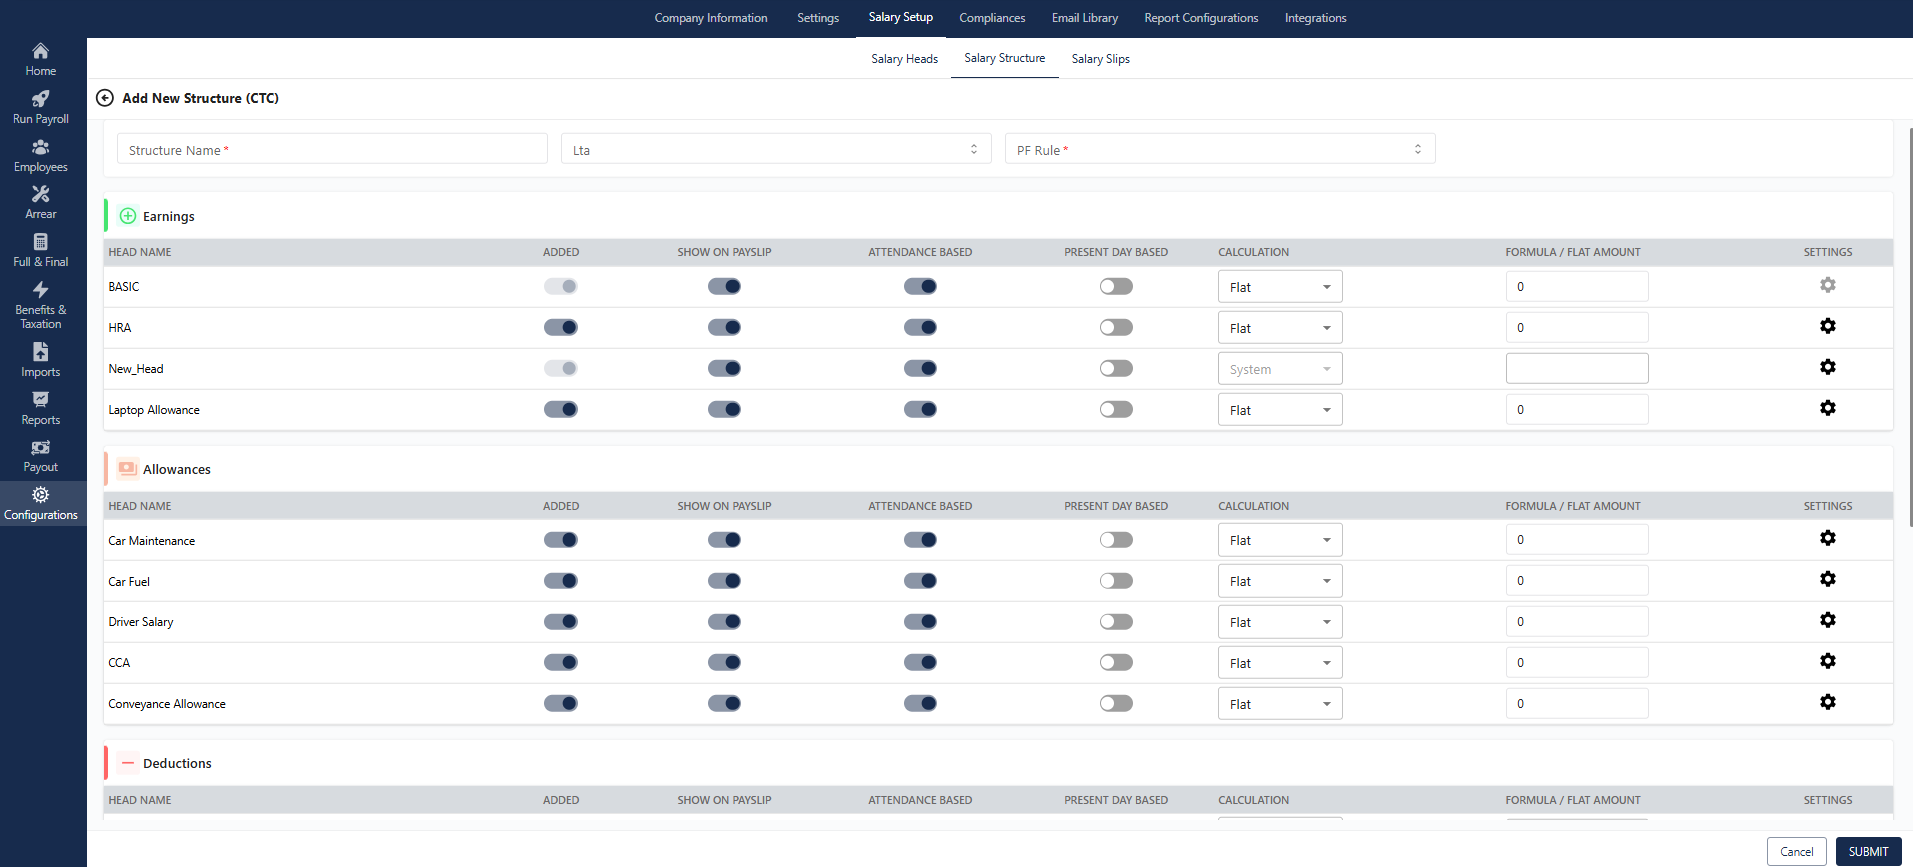
ALLOWANCES Section
Custom allowances such as:
- Car Maintenance
- Car Fuel
- Driver Salary
- CCA
- Conveyance Allowance
Same fields as above apply.
DEDUCTIONS Section
Includes heads like:
- PF
- TDS-94J
- Meal Coupon Deductions
These are subtracted from gross to determine net pay.
COMPLIANCES Section
Employer contributions such as:
- Employer ESI
- Gratuity
- NPS
- Bonus/Ex-gratia
- Indicative Group Medical
- Medi Claim
These may or may not be shown on payslips, based on configuration.
Best Practices
- Always verify PF Rule before applying the structure.
- Use Clone if creating a similar structure to an existing one.
- Regularly audit structures to avoid misconfiguration or duplication.
- Tag structures to applicable designations, departments, or entities for accurate application.
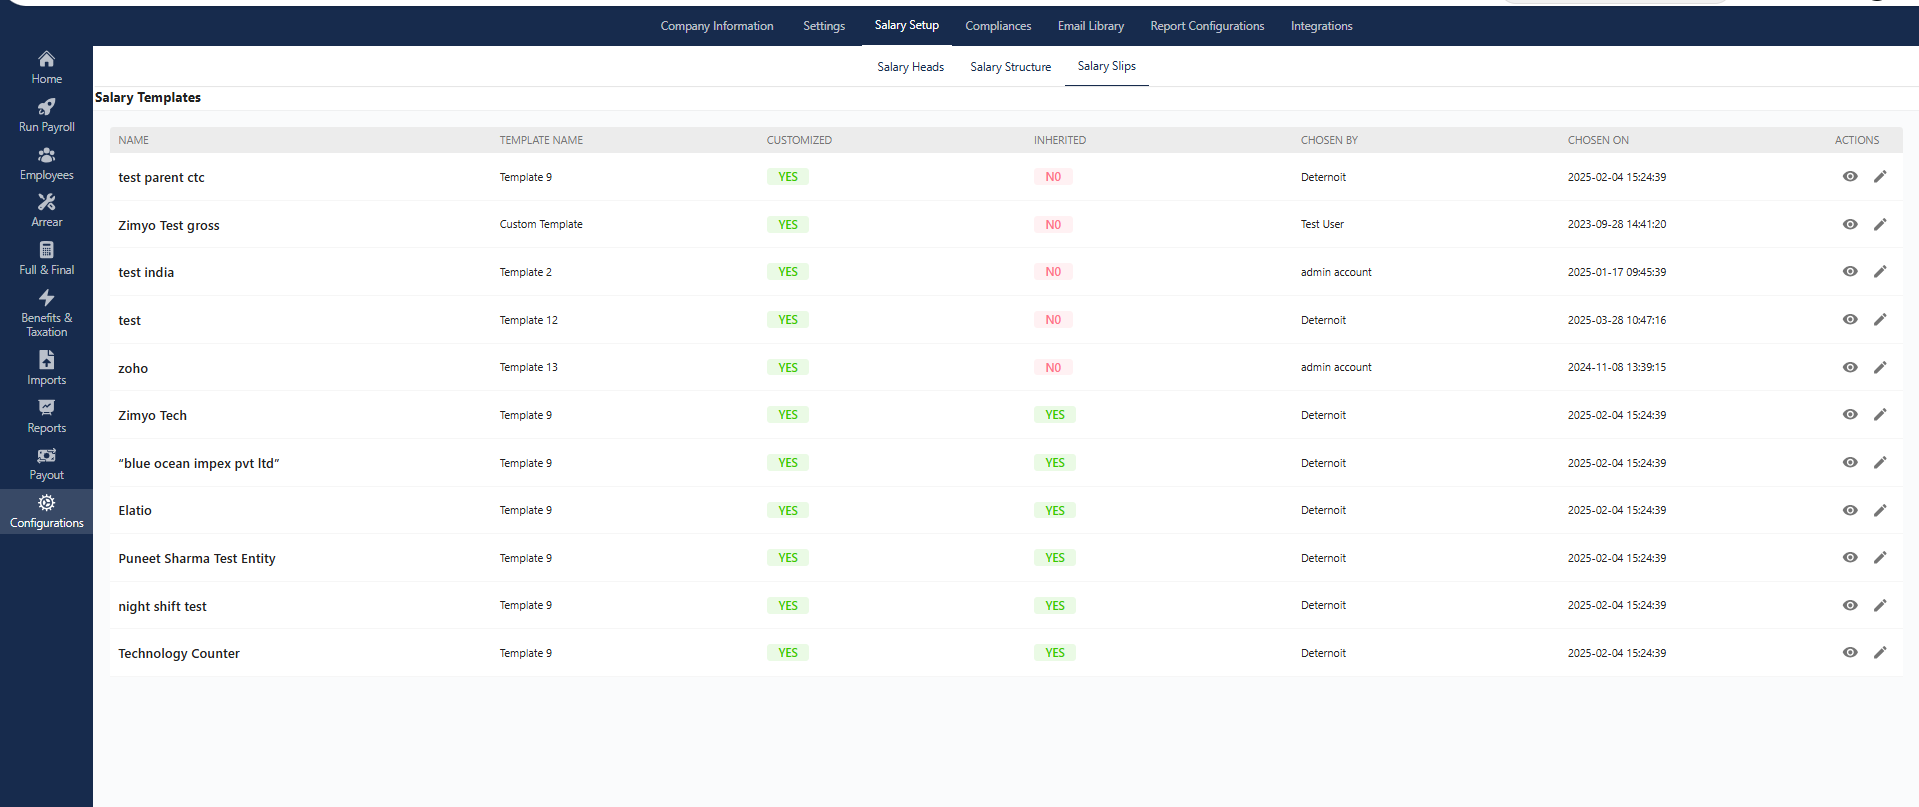
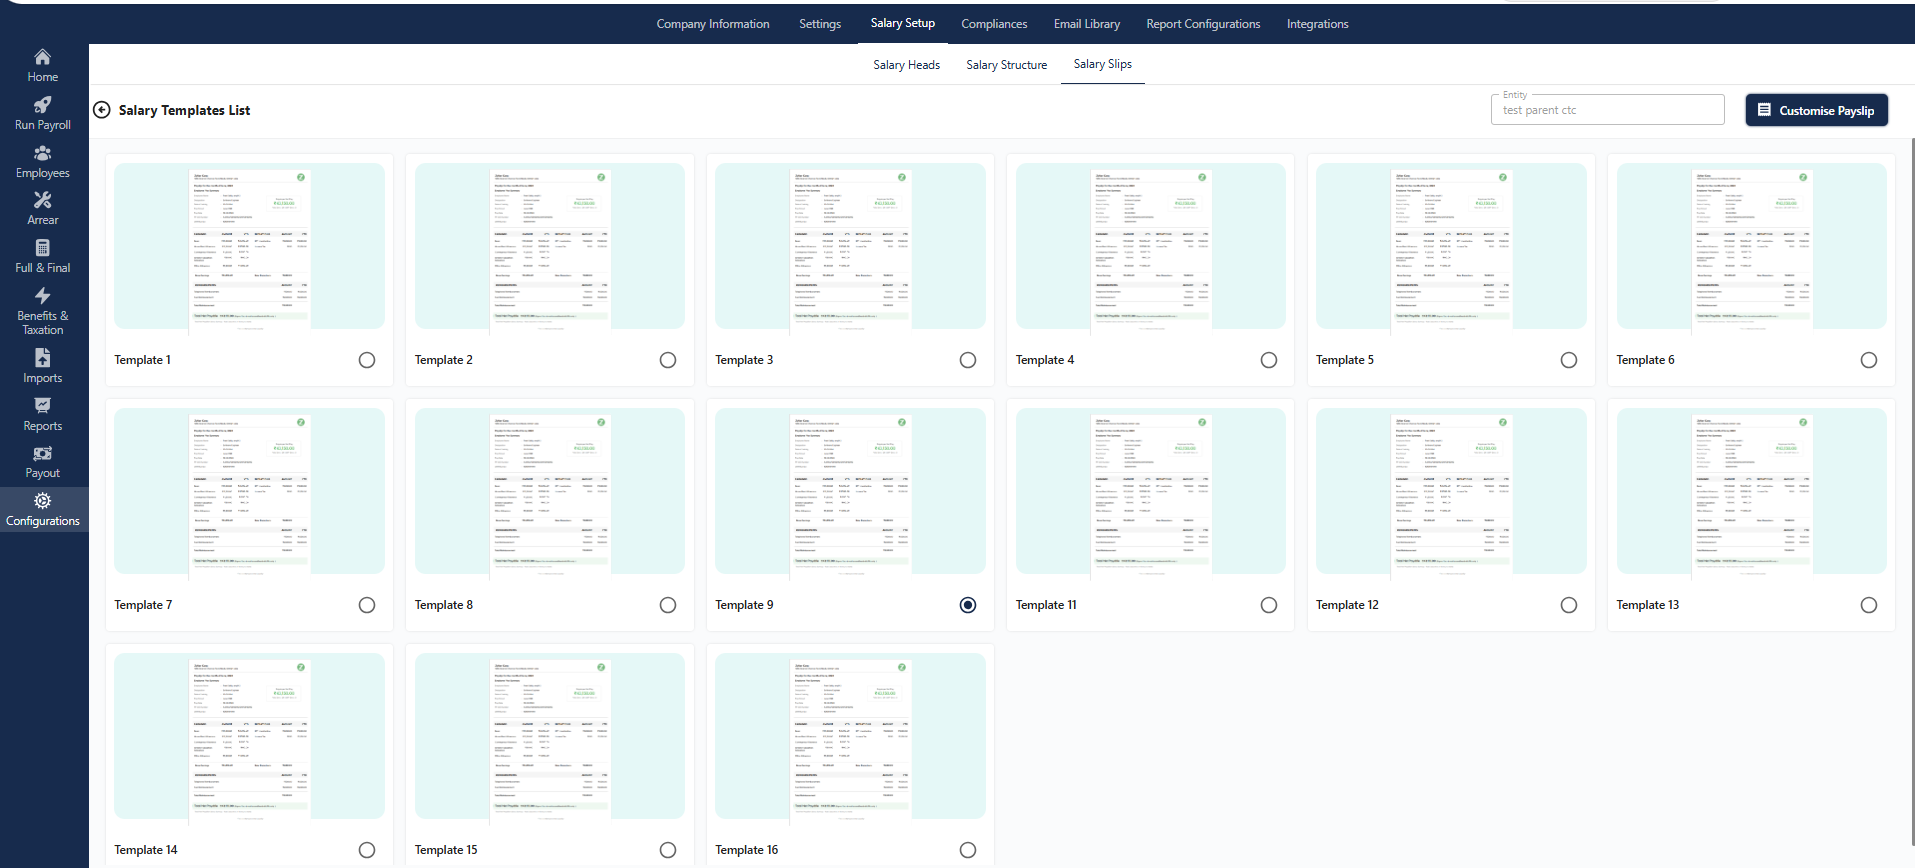
Salary Slip Head – Salary Templates
Navigation Path
Payroll → Configuration → Salary Setup→ Salary Templates → Customize Payslip
Overview
The Salary Templates section under Payroll Configuration enables HR/Admins to manage, edit, and assign customized salary slip formats to employees. These templates control the layout, visibility, and design of the payslip shared with employees, aligning it with company branding and compliance requirements.
This feature helps organizations personalize payslips based on employee grade, entity, location, or business unit.
Customize Payslip
By clicking Customize Payslip, the admin can:
- Add or remove salary components (Earnings, Deductions, Compliances)
- Control column visibility (Attendance, Present Days, Leave, LOP, Net Pay, etc.)
- Include statutory elements like PF, ESI, PT, Income Tax
Templates can be customized at different levels — Global, Entity, or Employee-wise — depending on the organization’s policies.
Edit Templates
Admins can and View new salary slip templates or edit existing ones using the Edit options below the Action head .
Fields during template setup:
- Template Name
- Applicable To (Entity, Department, Designation)
- Salary Components to display
- Compliance Elements
- Additional Info (Bank details, Tax Summary)
- Header/Footer Notes
- Enable/Disable Statutory Disclosure
Different templates for departments: Marketing may need incentive breakdowns, while Admin might not.
Client branding: For third-party payroll processing companies managing multiple client entities.
Compliance Configuration – Zimyo Helpdesk Guide
This section allows you to configure all statutory compliance settings under Payroll Configuration. You can manage PF, ESIC, PT, LWF, TDS 24Q, and Minimum Wages state-wise. Below is the guide for each subsection.
PF Calculation Settings

Purpose:
Configure Provident Fund (PF) contributions and rules for employees and employers.
Navigation Path:
Payroll > Configuration > Compliance > PF Calculation > Edit
Fields Explained:
PF Rule Name: Name of the PF rule.
PF Employee Contribution: Default is 12%.
PF Employer Contribution: Default is 12%.
PF Calculation Type: Select from
AS_PER_BASIC,AS_PER_GROSS, or custom.Limit Employer PF Contribution: Enter a value or
0for full contribution.Pay Employer Contribution outside CTC: Tick to exclude from CTC.
Pay Other Charges of PF Outside CTC: Optional exclusion.
Reduce Proportionately: Tick to reduce PF proportionally.
🔁 Note: After editing PF rules, you must recompute CTC for changes to reflect.

ESIC Calculation Settings
Purpose:
Configure Employee State Insurance (ESI) contributions and applicability.
Navigation Path:
Payroll > Configuration > Compliance > ESIC Calculation
Fields Explained:
Enable ESI Applicability: Toggle ON/OFF.
Employee Contribution: 0.75%
Employer Contribution: 3.25%
Monthly Gross Limit: ₹21,000
Pay Employer Contribution outside CTC: Tick for exclusion.
ESI Challan on Arrear: Enable ESI challan generation for arrears.
Professional Tax Slabs
Purpose:
Manage PT slabs by state, month, and gender as per statutory regulations.
Navigation Path:
Payroll > Configuration > Compliance > Professional Tax Slabs
Supported States: Kerala, Gujarat, Maharashtra, Delhi, Haryana, Assam, Pondicherry, Uttar Pradesh, Karnataka, Punjab, West Bengal.
Fields in Each Slab:
Min Amount / Max Amount
Tax Amount
Gender
Month
Edit / Reset Buttons available for each state.
📌 These slabs can be customized and reset as per latest compliance guidelines.
Labour Welfare Fund (LWF) Tax Slabs
Purpose:
Configure state-wise LWF tax slabs for both employees and employers.
Navigation Path:
Payroll > Configuration > Compliance > Labour Welfare Tax Slabs
States Available: Kerala, Gujarat, Haryana, Maharashtra, West Bengal, Karnataka, Punjab, Delhi.
Fields per Slab:
Min Amount / Max Amount
Employee Share / Employer Share
Applicable Month(s)
Designation (if applicable)
Add Slab / Edit Slab Options Available
✅ Use the Add Slab button to create custom LWF slabs by state.
TDS 24Q Configuration
Purpose:
Manage and configure all quarterly TDS filings and challan-related processes.
Navigation Path:
Payroll > Configuration > Compliance > TDS 24Q
Sections Included:
Store Challan
Challan Mapping
Challan Reports
Configuration
Acknowledgement
Challan Unmapping
To Add a New TDS Challan:
Click Add New Challan
Fill in details like:
Income Tax
Surcharge, Cess, Interest, Fee
Total Deposit
Entity Name
Financial Year
Quarter
Challan Serial No.
BSR Code
Date of Deposit
🔍 Use filters for Entity, Financial Year, Quarter, Challan Serial No to manage and review filings.
Minimum Wages (All States)
Purpose:
Manage minimum wages as per government norms for various employee categories.
Navigation Path:
Payroll > Configuration > Compliance > Min Wages
Employee Categories:
Unskilled
Semi-skilled
Skilled
Highly Skilled
States Supported: Central, Delhi, and all applicable states.
Actions Available:
Edit existing slabs
Add New Slab using the Add New Button
Set wages based on category and state rules.
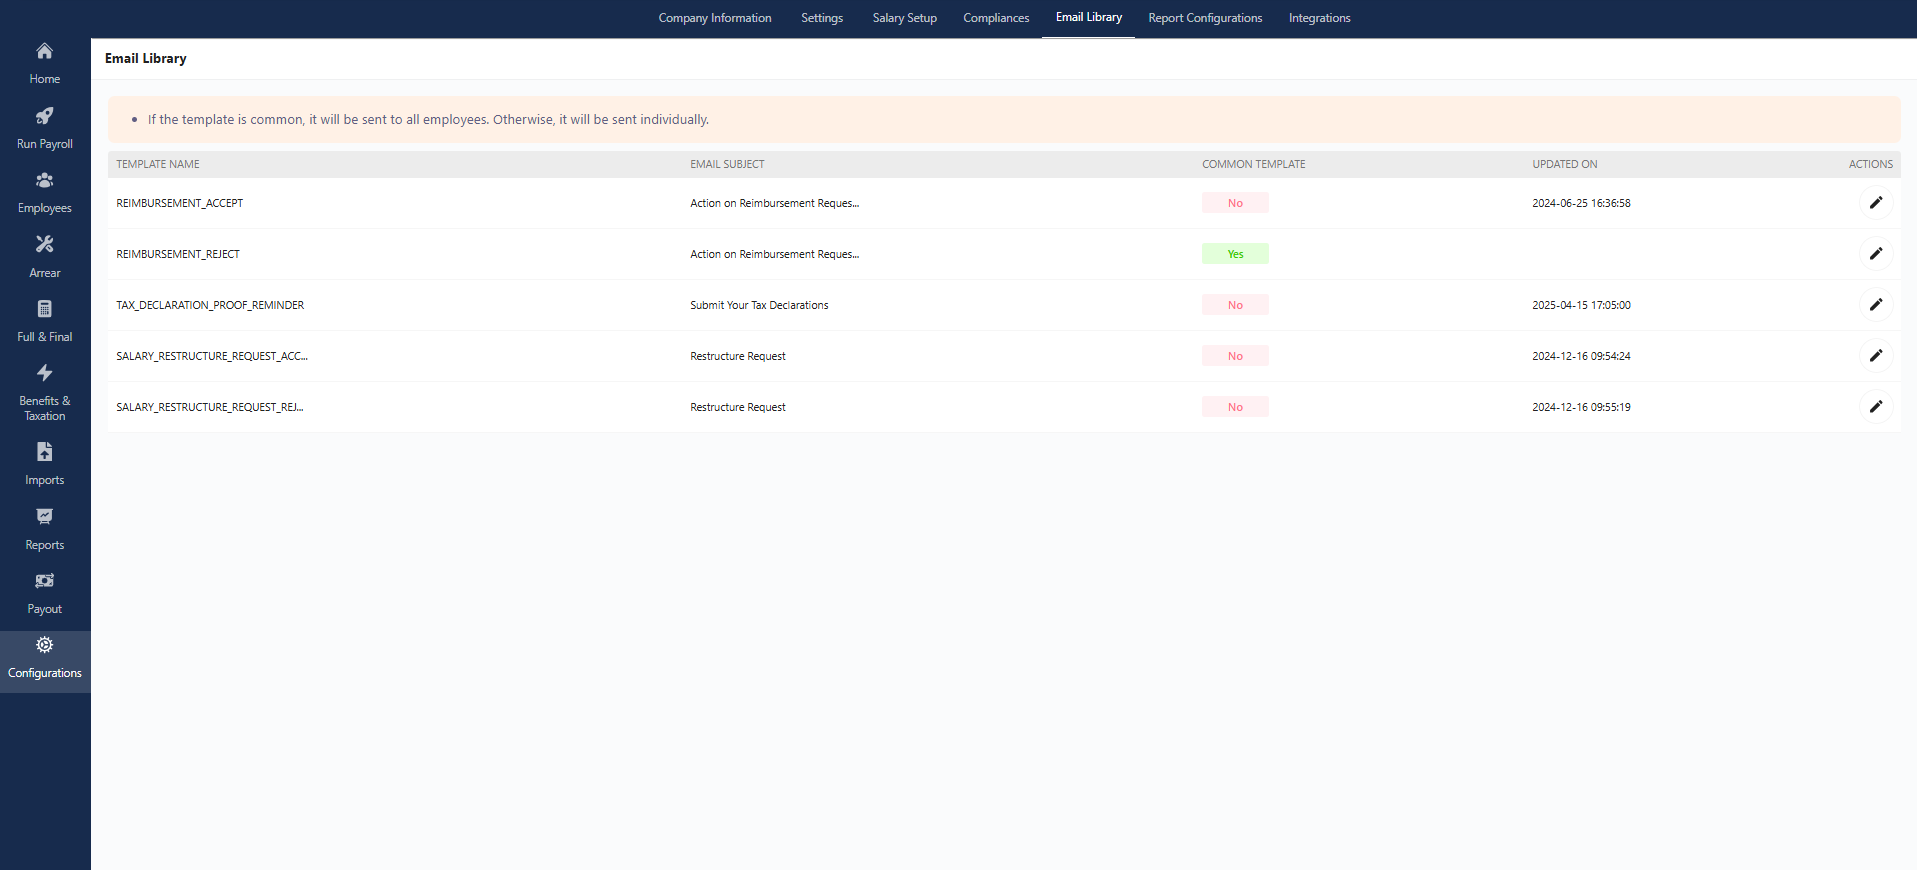
Email Library – Zimyo Helpdesk Guide
The Email Library allows you to manage system-generated email templates used for various payroll and HR actions. These templates can either be common (sent to all employees) or individual (sent based on specific events or approvals).
Overview of Fields
| Field | Description |
|---|---|
| Template Name | Unique system identifier for the email template. |
| Email Subject | The subject line that appears in the recipient’s email. |
| Common Template | Indicates whether the email is sent to all employees (Yes) or individually (No). |
| Updated On | Date and time of the most recent modification made to the template. |
| Actions | You can Edit the content or settings of the template. |
Actions You Can Take
Edit a Template:
Click the Edit button next to a template to modify its subject, body, or recipient logic.Add New Template (if permitted):
Some systems may allow admins to create new templates for workflows such as:Leave approvals
Probation confirmations
Birthday/Work Anniversary wishes
Salary slip availability
Payroll > Configuration > Email Library
From this path, you can:
View the list of all system and custom templates.
Check whether a template is common or event-specific.
Edit or review email triggers for payroll and employee communication.
Report Configuration Help Guide
Path: Payroll > Reports > Draft Custom Report
Draft Custom Report Overview:
The Draft Custom Report feature allows admins to build personalized payroll reports by selecting specific data fields across different categories like personal details, CTC, earnings, and arrears. These reports can be created, saved, copied, or deleted based on business needs.
Example Report
Report Name: Cost Center Report
Created By: Monika Sharma
Created On: 2024-04-26 09:30:38
Available Actions: View | Delete | Copy

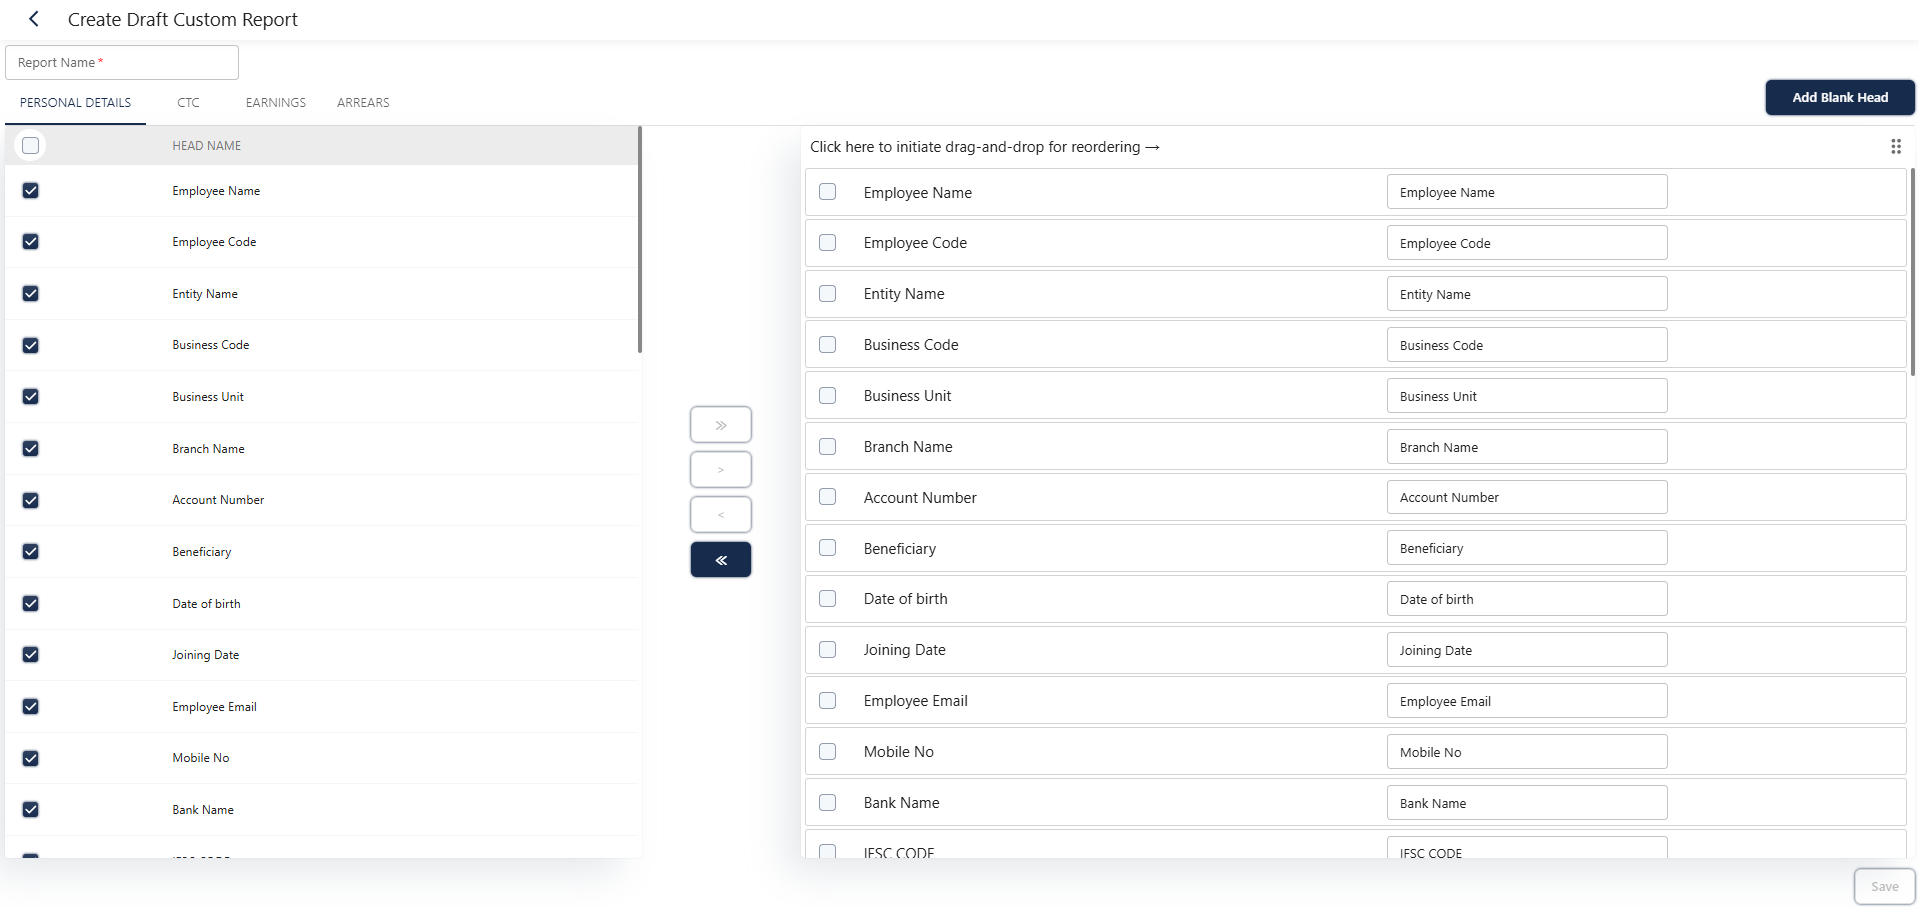
Create a New Custom Report
To build a custom report:
Click the “Create Draft Custom Report” button at the bottom-right of the screen.
You’ll be redirected to a configuration screen divided into the following sections:
Each section contains pre-defined “Head Names” that can be selected and moved to the report builder using a right arrow button.
- Personal Details
- CTC
- Earnings
- Arrears
How to Use the Report Builder
- Each section contains a list of Head Names (payroll fields or identifiers).
- Select desired fields and click the right arrow (→) to add them to your report.
- To enable the drag and drop : click on the (six dots) below the Add blank head.
- You can also add a custom blank head for fields not predefined in the system to add. Click on Add Blank Head.
Notes:
This feature provides complete control over what information appears in custom payroll reports.
Reports can be downloaded or shared after configuration.
F&F Custom Report Configuration Help Guide
📍 Path: Payroll > Reports > Draft Custom Report
The F&F (Full & Final) Custom Report lets you design a report template tailored for employee separation and exit processes. It allows you to choose relevant fields from multiple categories like personal data, leave balances, and final earnings.
This ensures that the final settlement process is transparent, complete, and aligned with your organizational policies.
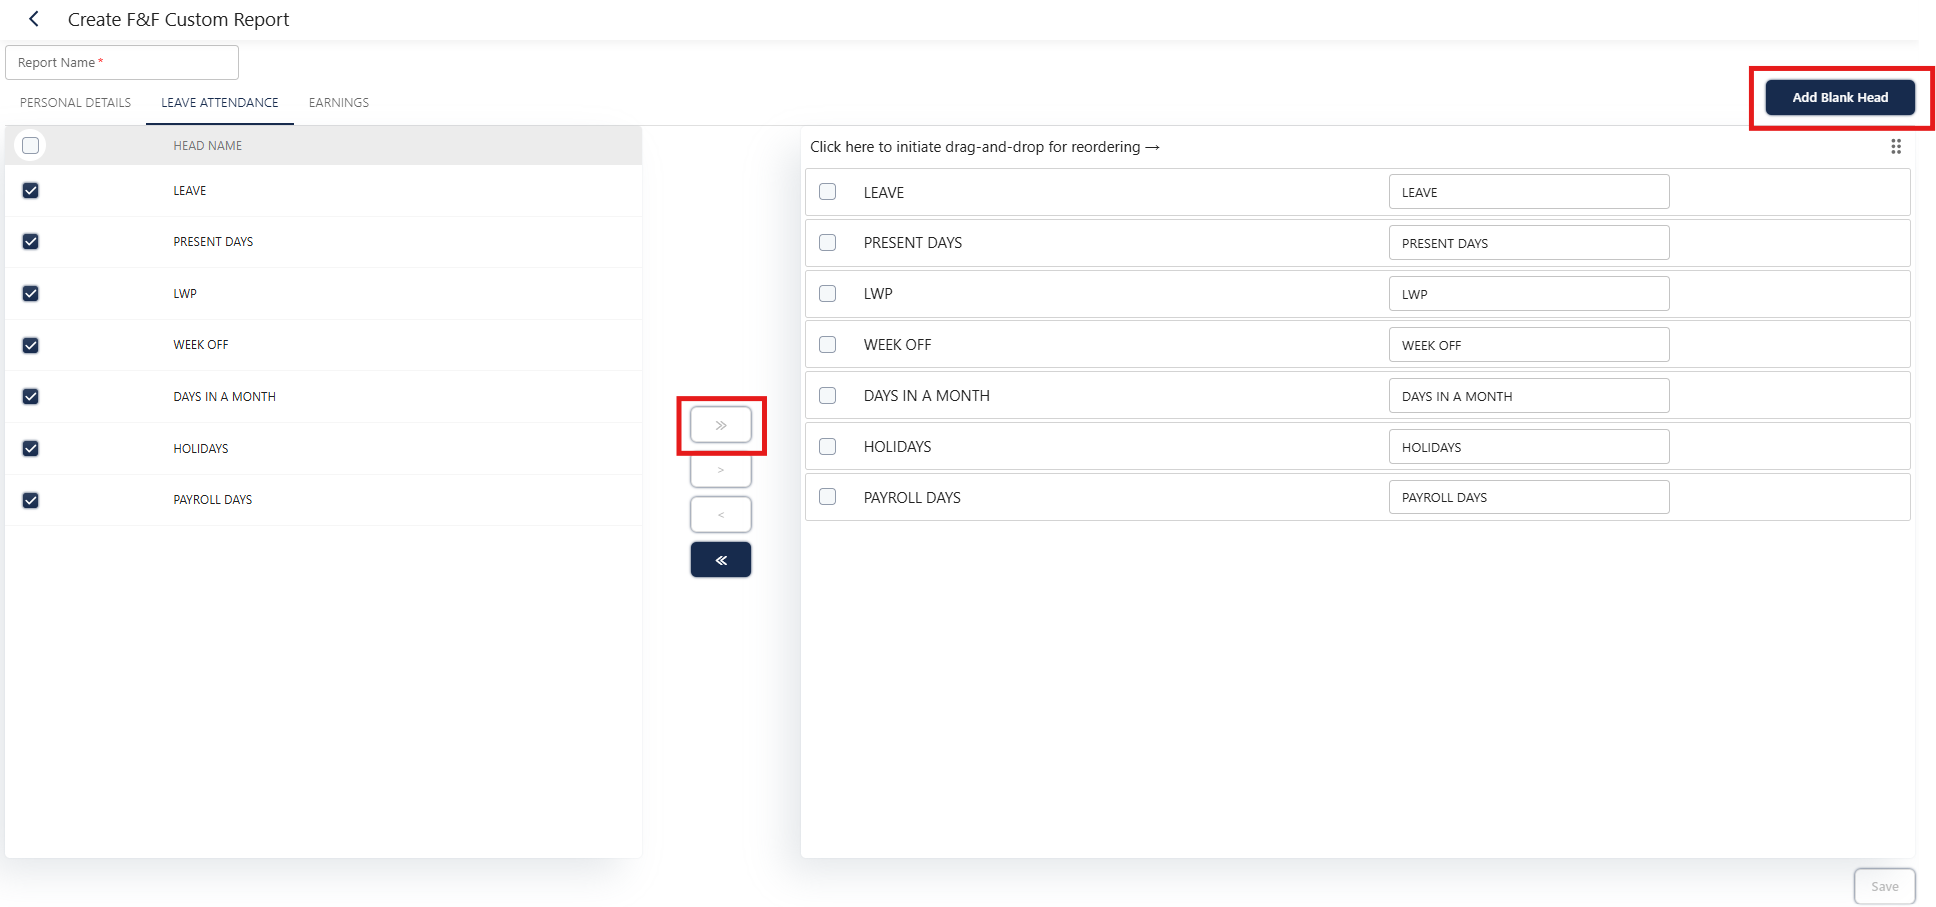
Create a New Custom Report
To build an F&F Custom Report:
Click the “Create Draft Custom Report” button at the bottom-right of the screen.
You’ll be redirected to a configuration screen divided into the following sections:
Each section contains pre-defined “Head Names” that can be selected and moved to the report builder using a right arrow button.
Personal Details
(Example: Employee Name, Employee ID, Date of Joining, Date of Exit)
Leave & Attendance
(Example: Leave Type, Balance Leaves, Attendance Days, LOP Days)
Earnings
(Example: Salary Components, Arrears, Gratuity, Bonus)
How to Use the Report Builder:
- Each section includes predefined Head Names for key fields.
- Select the fields you need and click the right arrow (→) to move them into your custom report view.
- Reorder fields using drag-and-drop (six dots) for better layout.
- You can also add a blank custom head for any extra fields not listed.
Notes:
This report is ideal for final settlements and exit audits.
Reports can be saved, viewed, copied, deleted, or exported based on admin permissions.
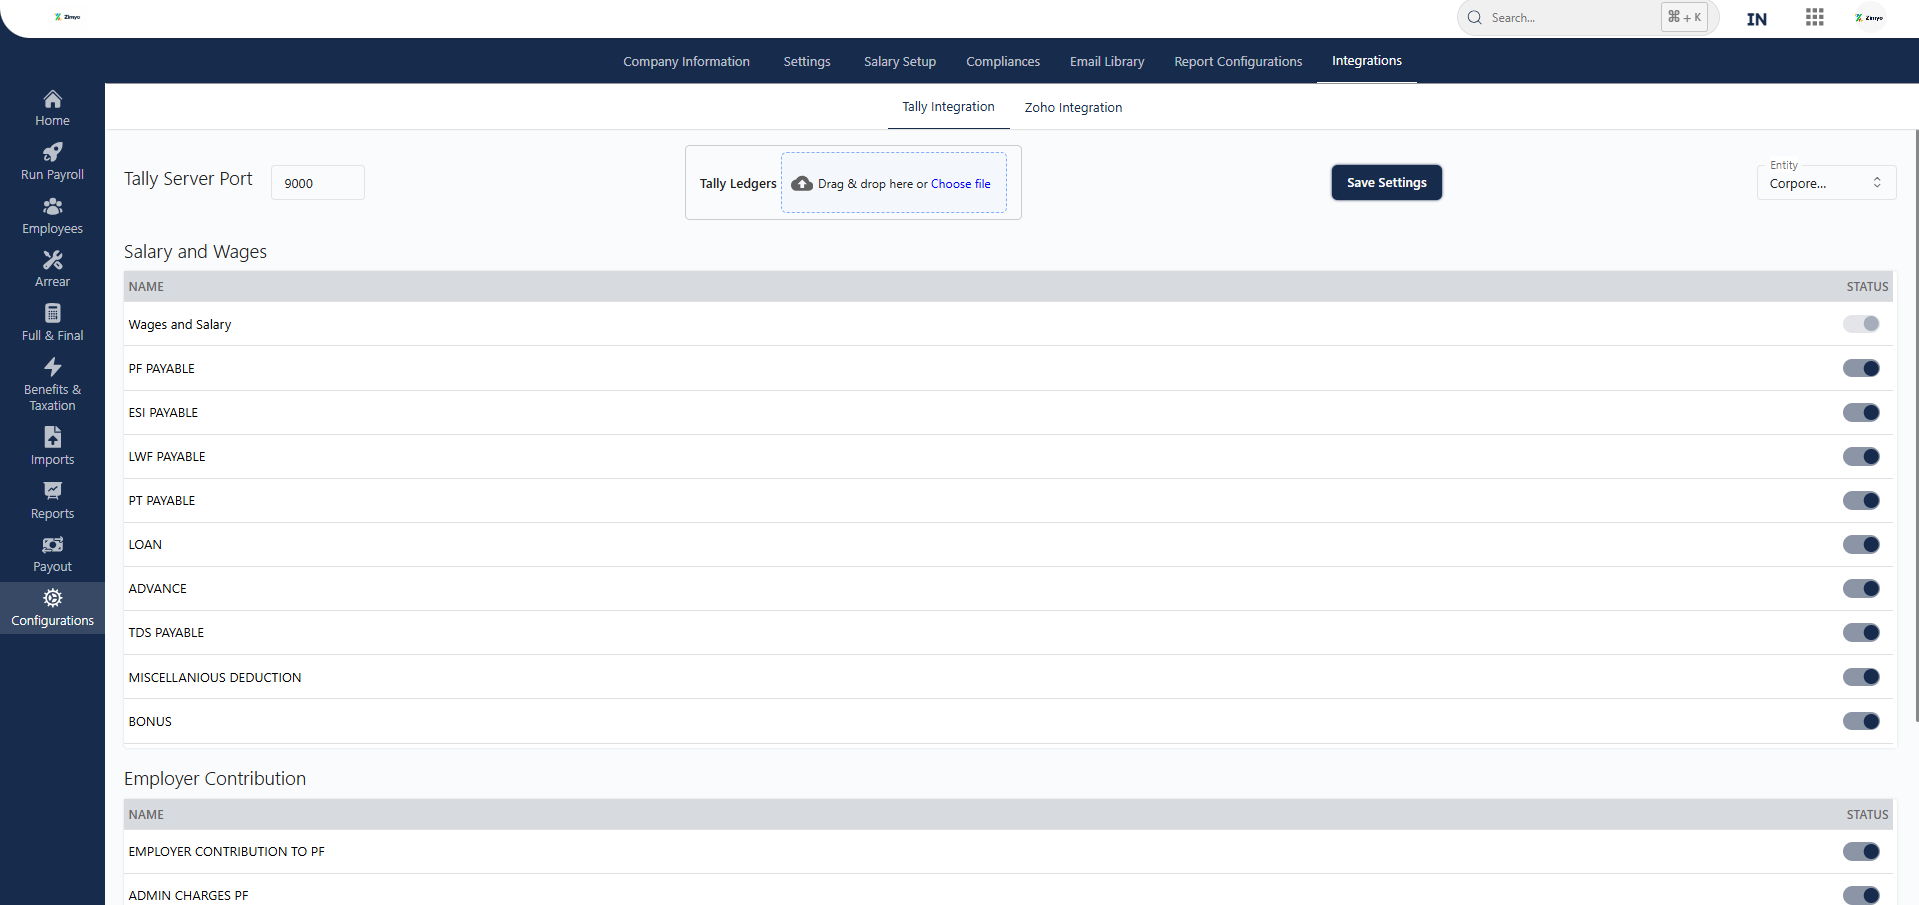
Integration Settings Guide
📍 Path: Payroll > Configuration > Integration
Zimyo offers seamless integration with Tally and Zoho to simplify accounting workflows and automate payroll data transfer into financial systems. Below are the configuration steps and field definitions for each integration.Lorem ipsum dolor sit amet, consectetur adipiscing elit. Ut elit tellus, luctus nec ullamcorper mattis, pulvinar dapibus leo.
Tally Integration ➤ Purpose:
To sync payroll data from Zimyo directly into Tally ERP systems using Tally’s server port and ledger mapping.
Setting Up Tally Integration
1. Tally Server Port
-
Field: (default port for Tally)
-
Purpose: Enables connection between Zimyo and the Tally instance.
-
Upload ledger mapping via
.xmlor.txtfile. -
Option available: Drag & drop here or Choose file
| Component | Description |
|---|---|
| Wages and Salary | Gross payroll amount |
| PF PAYABLE | Employee PF deductions |
| ESI PAYABLE | Employee ESI deductions |
| LWF PAYABLE | Labour Welfare Fund |
| PT PAYABLE | Professional Tax |
| LOAN | Employee loan recovery |
| ADVANCE | Advance salary component |
| TDS PAYABLE | Income tax withheld |
| MISCELLANEOUS DEDUCTION | Any other deduction |
| BONUS | Bonus payout to employee |
| Component | Description |
|---|---|
| EMPLOYER CONTRIBUTION TO PF | Company’s share of PF |
| ADMIN CHARGES PF | Administrative PF charges |
| EMPLOYER CONTRIBUTION TO LWF | Employer’s LWF contribution |
| EMPLOYER CONTRIBUTION TO ESI | Employer’s ESI share |
| EPF PAYABLE | Payable entry for employer PF |
| LWF PAYABLE | Payable entry for LWF |
| ESI PAYABLE | Payable entry for employer ESI |
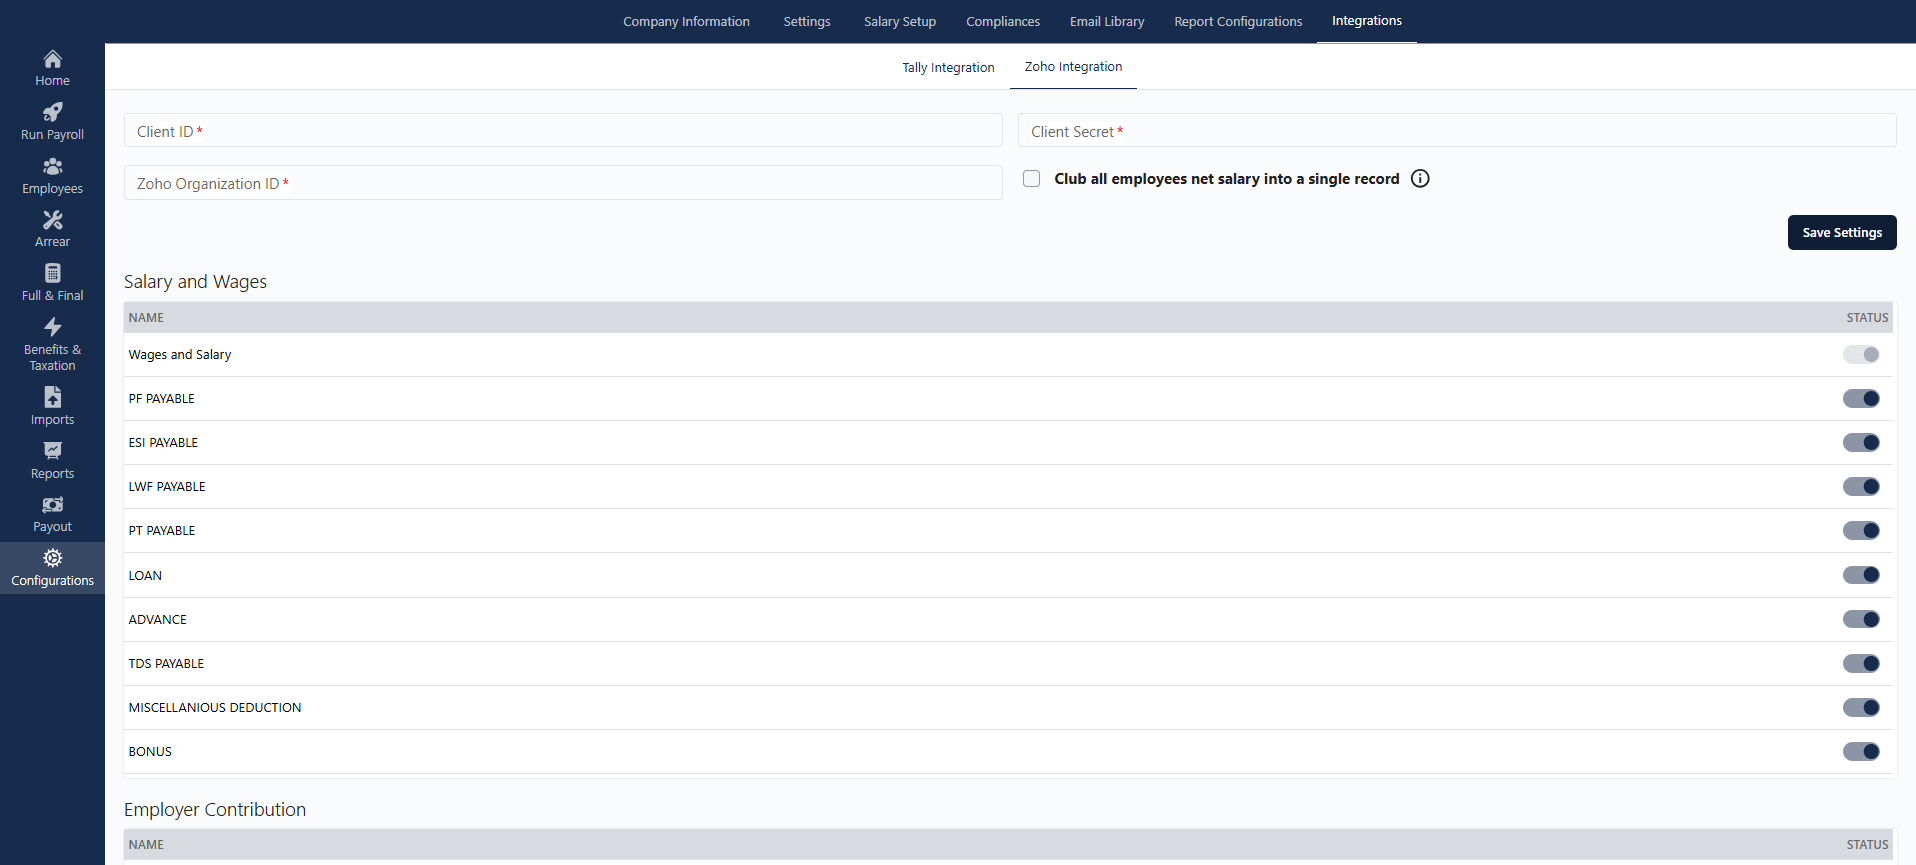
Zoho Integration
➤ Purpose:
Integrate Zimyo payroll with Zoho Books for consolidated or individual employee-level accounting entries.
⚙️ Setting Up Zoho Integration
1. API Credentials
| Field | Description |
|---|---|
| Client ID* | Provided by Zoho Developer Console |
| Client Secret* | Secret key for authentication |
| Zoho Organization ID* | Unique ID for your Zoho org |
2. Salary Clubbing Option
Option: Club all employees’ net salary into a single record
Use Case: Simplifies ledger entries when individual salary bifurcation is not required.
3. Add New Settings (Ledger Mapping)
Similar to Tally, you can map payroll heads to specific Zoho Books ledgers for both employee components and employer contributions:
Employee Side Ledgers:
-
Wages and Salary
-
PF PAYABLE
-
ESI PAYABLE
-
LWF PAYABLE
-
PT PAYABLE
-
LOAN
-
ADVANCE
-
TDS PAYABLE
-
MISCELLANEOUS DEDUCTION
-
BONUS
Employer Contribution Ledgers:
-
EMPLOYER CONTRIBUTION TO PF
-
ADMIN CHARGES PF
-
EMPLOYER CONTRIBUTION TO LWF
-
EMPLOYER CONTRIBUTION TO ESI
-
EPF PAYABLE
-
LWF PAYABLE
-
ESI PAYABLE
-
Make sure your accounting software (Tally or Zoho) is updated to the latest version.
-
Always test new integration settings in a sandbox environment before enabling them in production.
-
Maintain consistent ledger naming conventions to avoid import errors.
-
Admins must have API access permissions from Zoho for integration.